background image

20

Debris shield

Drive belt

Belt retainers

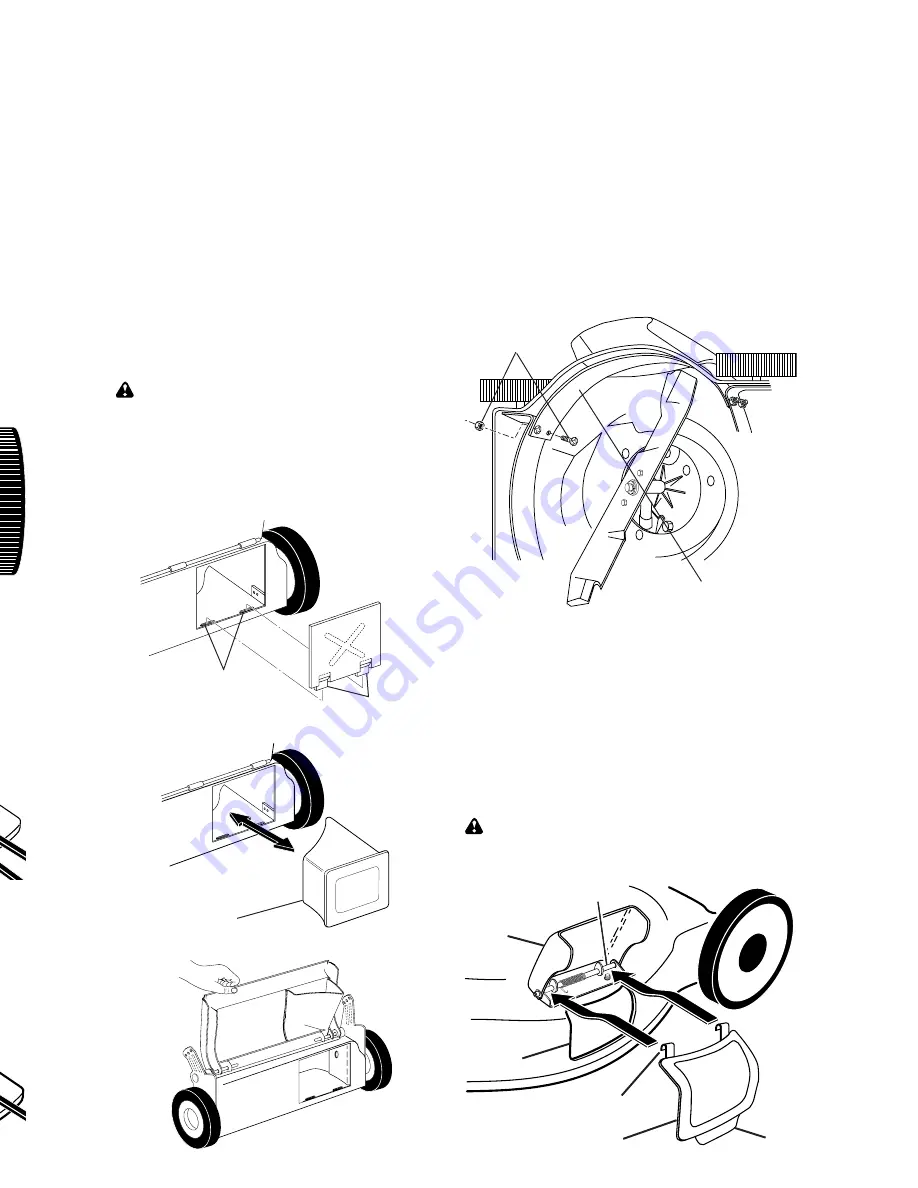
DEBRIS SHIELDS WITH BELT RETAINERS:

Belt

Drive 
cover

PUSH 
DOWN

Pulley

OR:

Debris shield

Drive belt

Belt 
retainer

Engine pulley

3 POSITION “QUICK” 
The handle on your lawn mower has three 
(3) height positions - adjust to height that 
suits you.
•   Squeeze the bottom ends of lower 

handle towards each other until the pin 
in handle can be inserted into one of the 
three height adjustment holes.

High

Handle 

adjustment 

bracket

Handle pin

Medium

Low

SQUEEZE

REAR DEFLECTOR (IF EQUIPPED)
The rear defl ector, attached between the 
rear wheels of your mower, is provided to 
minimize the pos si bil i ty that objects will 
be thrown out of the rear of the mower 
into the operator mowing position.  If the 
defl ector becomes dam aged, it should be 
replaced.

TO REMOVE / REPLACE DRIVE BELT 

FRONT WHEEL DRIVE MODELS:
“STANDARD” OR “DUAL BAIL” MODELS:
•   Remove drive cover.  Remove belt from 

gearcase pulley by pushing down on 
pulley and rolling belt off it.

•   Turn lawn mower on its side.  See 

engine manual for proper direction of 
turning over the engine.

•  Remove blade.
•   Remove debris shield.
•   Remove belt from engine pulley on 

crankshaft.

•   Place new drive belt in the belt retainers 

of the debris shield (if equipped).

•   Install new belt by reversing above steps.
NOTE: Always use factory approved belt 
to assure fi t and long life.

3 POSITION “EZ”
The handle on your lawn mower has three 
(3) height positions - adjust to height that 
suits you.
•   Remove knob and carriage bolt on one 

side of the lower handle.

•   While holding handle assembly, remove 

knob and car riage bolt from opposite 
side, align hole in handle with desired 
hole in handle bracket and reassemble 
bolt and knob and tighten securely.

•   Align opposite side of handle with same 

positioning hole and secure with bolt and 
knob.

Handle 

adjustment 

bracket

Knob

Bolt

High
Med.
Low

9

Slots

Mulcher 

plate tabs

FOR MULCHING MOWERS ONLY

Most mulching mowers are shipped ready 
to be used as a mulcher.  
“REAR DISCHARGE ONLY” MOWERS 
Some models have a seperate mulcher 
plug, other models have the mulcher plug 
built into the rear door.  To convert to bag-
ging or discharging, the plate or plug (if 
so equipped) must be removed from the 
dis charge open ing of the lawn mower.
•   Open rear door and remove mulcher 

plate or plug (if so equipped).  Store 
mulcher plate or plug in a safe place.

•   You can now install grass catcher or 

optional clipping defl ector accessory.

•   To return to mulching operation, install 

mulcher plate or plug into discharge 
opening of mower.  


CAUTION:  Do not run your lawn mower 

without mulcher plate/plug in place or ap-
 proved clipping defl ector or grass catch er 
in place.  Never attempt to op er ate the 
lawn mower with the rear door removed or 
propped open.

MULCHER "PLUG"

Mulcher 
plug

MULCHER "PLATE"

MULCHER PLUG BUILT INTO REAR DOOR

“SIDE DISCHARGE ONLY” MOWERS
MULCHER PLATE TYPE 
To convert to bagging or discharging, 
mulcher plate must be removed from un-
derside of lawn mower.
•   Remove the four (4) screws and lock nuts 

securing the mulcher plate to the mower.

•   Store mulcher plate and hardware in a 

safe place.

•   Mower can now be used for side 

discharging or op tion al grass catcher 
accessory can be attached.

•   To return to mulching operation, simply 

reinstall mulcher plate and tighten hard-
ware securely.

Mulcher plate

Screw and 
lock nut

MULCHER PLUG TYPE “A”
To convert to mulching operation, mulcher 
plug must be installed into discharge open-
 ing of mower.
•   Open discharge guard.
•   Insert tab of mulch plug into housing 

opening.

•   Align hooks of mulch plug over hinge 

rod of discharge guard. Push mulch plug 
down until mulch plug is seat ed in hous-
ing opening.


CAUTION:  Do not run your lawn mower 

without discharge guard, ap proved grass 
catcher or mulcher plug in place.

Hooks

Housing 
opening

Mulcher plug

Hinge rod

Tab

Discharge 
guard

Summary of Contents for 193733

Page 1: ... arrester meeting applicable local or state laws if any If a spark arrester is used it should be maintained in effective working order by the operator In the state of California the above is required by law Section 4442 of the California Public Resources Code Other states may have similar laws Federal laws apply on federal lands A spark arrester for the muffler is available through your nearest au...

Page 2: ...wing Stop machine if anyone enters the area Do not operate the mower when bare foot or wearing open sandals Always wear substantial foot wear Do not pull mower backwards unless absolutely necessary Always look down and behind before and while moving backwards Never direct discharged material toward anyone Avoiddischargingmaterialagainst a wall or obstruction Material may richo chet back toward the...

Page 3: ...me care in handling gasoline Gasoline is extremely flammable and the vapors are explosive Extinguish all cigarettes cigars pipes and other sources of ignition Use only an approved container Never remove gas cap or add fuel with the engine running Allow engine to cool before refueling Never refuel the machine indoors Never store the machine or fuel contain er where there is an open flame spark or p...

Page 4: ...pening is at the back of the mower housing it is a rear dis charge mower Only rear discharge lawn mowers have a grass catcher included with the mower Approved grass catchers for side discharge mowers may be purchased from your nearest authorized dealer Do I have a mulching lawn mower Look for the grass discharge opening on your mower Raise the discharge guard rear door on rear discharge mowers If ...

Page 5: ...vice and Adjustments section of this manual NOTE For shipping purposes the rear wheels on your lawn mower may not be adjusted to the same position as the front wheels Before operating mower adjust all wheels to the same cutting height INSTALL REAR WHEELS HIGH WHEEL MOWERS ONLY Some high wheel models require washers whichwillbeprovidedinapartsbag Ifprovid ed install washers on the axle first as sho...

Page 6: ...Catcher frame hook Rear door Frame handle Frame opening Vinyl bindings FABRIC TOP GRASS CATCHERS TO ASSEMBLE AND ATTACH GRASS CATCHER Put grass catcher frame into grass bag with rigid part of bag on the bottom Slip vinyl bindings over frame NOTE If vinyl bindings are too stiff hold them in warm water for a few minutes If bag gets wet let it dry before using Lift the rear door on the mower housing ...

Page 7: ...harging disconnect harness connector female from battery charger connector male Connect your battery charger to charge battery after each use IMPORTANT The engine will not recharge your battery Spark plug Boot DECK MOUNTED BATTERY Engine connector male Harness connector female Battery charger Charger connector male HANDLE MOUNTED KEY SWITCH UNITS WITH DECK MOUNTED BATTERY After charging connect en...

Page 8: ...eels are in the same setting NOTE Adjuster is properly positioned when plate tab inserts into hole in lever Also 9 position adjusters if so equipped allow lever to be positioned between the plate tabs Bolt Flat washer Wheel 3 8 16 Locknut Spacer LEVER BACKWARD TO LOWER MOWER LEVER FORWARD TO RAISE MOWER Plate tab Lever HOW TO USE YOUR LAWN MOWER ENGINE SPEED CONTROL MODELS WITH REMOTE THROTTLE Eng...

Page 9: ... removed or propped open MULCHER PLUG Mulcher plug MULCHER PLATE MULCHER PLUG BUILT INTO REAR DOOR SIDE DISCHARGE ONLY MOWERS MULCHER PLATE TYPE To convert to bagging or discharging mulcher plate must be removed from un derside of lawn mower Remove the four 4 screws and lock nuts securing the mulcher plate to the mower Store mulcher plate and hardware in a safe place Mower can now be used for side...

Page 10: ...w ready for discharging operation To convert to mulching or bagging operation discharge deflector must be removed and mulcher door must be closed Open mulcher door Discharge deflector MULCHER PLUG TYPE B To convert to bagging or discharging Lift discharge guard and remove mulcher plug Mower can now be used for side dis charging or optional grass catcher can be attached To return to mulching operat...

Page 11: ...her or clipping deflector in place Never attempt to operate mower with the rear door removed or propped open DRIVE CONTROL STANDARD DRIVE CONTROL Self propelling is controlled by holding the operator presence control bar down to the handle and pushing the drive control lever forward until it clicks then releasing the lever Forward motion will stop when the op erator presence control bar is release...

Page 12: ...NT Over time the drive control system may become loose resulting in decreased speed There is a turnbuckle on the underside of the drive control housing to increase tension on the drive cable Pro ceed as follows Turn unit off and disconnect spark plug wire from spark plug Turn nut on underside of drive control to increase drive speed Operate mower to test drive speed Readjust as required If conditi...

Page 13: ...ps forward speed remains the same your drive belt is worn and should be replaced NOTE If mower begins to creep forward the drive cable is too tight Rotate thumb screw clockwise to loosen drive cable Thumb screw TO ENGAGE DRIVE CONTROL Drive control bar DRIVE CONTROL DISENGAGED Operator presence control bar VARI SPEED THUMBSCREW ADJUSTMENT Over time the drive control system may become loose resulti...

Page 14: ... fuel lines and carburetor are empty Use fresh fuel next season See Storage Instructions for additional information Never use engine or carburetor cleaner products in fuel tank or permanent damage may occur TO START ENGINE CAUTION The mower blade rotates whenever the engine is running Move engine speed control to FAST position or to CHOKE START position on models equipped with choke feature If you...

Page 15: ...nte nance section of this manual The special mulching blade will recut the grass clippings many times and reduce them in size so that as they fall onto the lawn they will disperse into the grass and not be noticed Also the mulched grass will biodegrade quickly to provide nutrients for the lawn Always mulch with your highest engine blade speed as this will provide the best recutting action of the b...

Page 16: ...nce To receive full valuefromthewarranty operatormustmain tain mower as instructed in this manual Some adjustments will need to be made periodically to properly maintain your unit All adjustments in the Service and Adjust ments section of this manual should be checked at least once each season Once a year replace the spark plug clean or replace air filter element and check blade for wear A new spa...

Page 17: ... the two 2 holes in the blade with the raised lugs on the adapter 3 Be sure the trailing edge of blade op posite sharp edge is up toward the engine 4 Install the blade bolt with the lock washer and hardened washer into blade adapter and crankshaft 5 Use block of wood between blade and lawn mower housing and tighten the blade bolt turning clockwise The recommended tightening torque is 35 40 ft lbs ...

Page 18: ... of filler hole or to FULL line on dipstick on models so equipped Keep oil at proper level AIR FILTER Your engine will not run properly and may be damaged by using a dirty air filter Clean the element after every 25 hours of operation or every season Replace the air filter every 100 hours of operation or every season whichever occurs first Service air cleaner more often under dusty conditions See ...

Page 19: ...hose from fitting while engine is running Water in engine can result in shortened engine life 8 Start engine as described in the Op eration section of this manual and let engine run for a full minute to remove excess water from mower GRASS CATCHER IF SO EQUIPPED Grass catcher may be hosed with water but must be dry when used CAUTION Under normal usage the catcher material is subject to deteriorati...

Page 20: ...rive cover Remove belt from gearcase pulley by pushing down on pulley and rolling belt off it Turn lawn mower on its side See engine manual for proper direction of turning over the engine Remove blade Remove debris shield Remove belt from engine pulley on crankshaft Place new drive belt in the belt retainers of the debris shield if equipped Install new belt by reversing above steps NOTE Always use...

Page 21: ...OTE Always use factory approved belt to assure fit and long life MODELS WITH GEARCASE MOUNTED BELT KEEPER AND DEBRIS SHIELD Remove drive cover and belt keeper Remove belt from gearcase pulley Turn lawn mower on its side See engine manual for proper direction of turning over the engine Remove blade engine pulley and debris shield Remove belt and engine pulley from debris shield Install new belt by ...

Page 22: ...moving hex nut then remove drive belt from drive pulley belt keepers and idler arm assembly Turn lawn mower on its side See engine manual for proper direction of turning over the engine Use a wood block between blade and mower housing to prevent blade from turning when removing blade bolt NOTE Protect your hands with gloves and or wrap blade with heavy cloth Remove blade bolt Remove blade attachin...

Page 23: ...elt from gearcase pulley Turn lawn mower on its side See engine manual for proper direction of turning over the engine Remove blade engine pulley and debris shield Remove engine pulley and belt from debris shield Belt Drive cover Belt keeper Gearcase pulley Spring Debris shield Drive belt Belt retainer Engine pulley Route the other end of the new drive belt through hole in housing Reinstall debris...

Page 24: ...assistant will be required to hold the control bar in the operating position when making final adjustment to the carburetor See the ADJUSTMENT section of your engine manual for further instructions ENGINE SPEED The engine speed has been factory set Do not attempt to increase engine speed as it may result in personal injury If you believe the engine is running too fast or too slow take your lawn mo...

Page 25: ...or chipped paint surfaces sand lightly before painting HANDLE Your handle may be folded for storage as shown Squeeze the bottom ends of lower handle towards each other until handle clears the handle brackets and swing handles forward over mower Loosen upper handle mounting hard ware enough to allow upper handle to be folded back IMPORTANT When folding handles for storage or transportation be sure ...

Page 26: ... in the fuel tank or permanent damage may occur Use fresh fuel next season NOTE Fuel stabilizer is an acceptable al ternative in minimizing the formation of fuel gum deposits during storage Add stabilizer to gasoline in fuel tank or storage container Alwaysfollowthemixratiofoundonstabilizer container Run engine at least 10 minutes after adding stabilizer to allow the stabilizer to reach the carbur...

Page 27: ... to hard to pull when control bar is released upper handle before pulling starter rope 2 Bent engine crankshaft 2 Contact a qualified service center 3 Blade adapter broken 3 Replace blade adapter 4 Blade dragging in grass 4 Move lawn mower to cut grass or to hard surface Grass catcher 1 Cutting height too low 1 Raise cutting height not filling 2 Lift on blade worn off 2 Replace blade If so equippe...

Page 28: ...SE LA W sh gra arr sh In Pu on au 1937 ...

Reviews: