background image

27

STORAGE

Immediately prepare your tractor for storage at the end 
of the season or if the tractor will not be used for 30 days 
or  more.

WARNING:  Never store the trac tor with 
gas o line in the tank inside a building 
where fumes may reach an open fl ame 
or spark.  Allow the engine to cool before 
storing in any en clo sure.

TRACTOR

Remove mower from tractor for winter storage.  When mower 
is to be stored for a period of time, clean it thor oughly, remove 
all dirt, grease, leaves, etc.  Store in a clean, dry area.
•      Clean entire tractor (See “CLEANING” in the Mainte-

nance section of this manual).

•     Inspect and replace belts, if necessary (See belt re-

 place ment instructions in the Service and Adjustments 
section of this manual).

•      Lubricate as shown in the Maintenance sec tion of this 

man ual.

•     Be sure that all nuts, bolts and screws are securely 

fastened.  Inspect moving parts for damage, breakage 
and wear.  Replace if necessary.

•     Touch up all rusted or chipped paint surfaces; sand 

lightly before painting.

BATTERY

•      Fully charge the battery for storage.
•      After a period of time in storage, battery may require 

re charg ing.

•     To help prevent corrosion and power leakage during 

long periods of storage, battery cables should be dis-
 con nect ed and battery cleaned thoroughly (see “TO 
CLEAN BATTERY AND TERMINALS” in the Mainte-
nance section of this manual).

•     After cleaning, leave cables disconnected and place 

cables where they cannot come in contact with battery 
terminals.

•     If battery is removed from tractor for storage, do not 

store battery directly on concrete or damp surfaces.

ENGINE

FUEL SYSTEM

IMPORTANT

:  IT IS IMPORTANT TO PREVENT GUM DEPOSITS 

FROM FORMING IN ES SEN TIAL FUEL SYSTEM PARTS SUCH 
AS CARBURETOR, FUEL FIL 

TER, FUEL HOSE, OR TANK 

DURING STORAGE.  ALSO, EXPERIENCE INDICATES THAT 
ALCOHOL BLENDED FUELS (CALLED GASOHOL OR USING 
ETHANOL OR METHANOL) CAN ATTRACT MOIS TURE WHICH 
LEADS TO SEPARATION AND FOR MA TION OF ACIDS DURING 
STOR AGE.  ACIDIC GAS CAN DAMAGE THE FUEL SYSTEM 
OF AN ENGINE WHILE IN STORAGE.

•      Empty the fuel tank by starting the engine and let it run 

until the fuel lines and carburetor are empty.

•         Never use engine or carburetor cleaner products in the 

fuel tank or permanent damage may occur.

•      Use fresh fuel next season.

NOTE: 

 Fuel stabilizer is an acceptable alternative in mini-

mizing the formation of fuel gum deposits during stor age.  
Add stabilizer to gasoline in fuel tank or storage container.  
Always follow the mix ratio found on stabilizer container.  
Run engine at least 10 minutes after adding stabilizer to 
allow the stabilizer to reach the carburetor.  Do not empty  
the gas tank and carburetor if using fuel stabilizer.

ENGINE OIL

Drain oil (with engine warm) and replace with clean en-
gine oil.  (See “ENGINE” in the Maintenance section of 
this man ual).

CYLINDER(S)

•      Remove spark plug(s).
•      Pour one ounce of oil through spark plug hole(s) into 

cylinder(s).

•      Turn ignition key to “START” position for a few seconds 

to distribute oil.

•      Replace with new spark plug(s).

OTHER

•      Do not store gasoline from one season to another.
•     Replace your gasoline can if your can starts to rust.  

Rust and/or dirt in your gasoline will cause problems.

•     If possible, store your tractor indoors and cover it to 

give protection from dust and dirt.

•      Cover your tractor with a suitable protective cover that 

does not  retain moisture.  Do not use plastic.  Plastic 
cannot breathe which allows condensation to form and 
will cause your tractor to rust.

IMPORTANT

:   NEVER COVER TRACTOR WHILE EN GINE  AND 

EXHAUST AREAS ARE STILL WARM.

Summary of Contents for 196712

Page 1: ...PROTECTION DURING OPERATION Visit our website www poulan pro com WARNING Read this Manual and follow allWarnings and Safety Instructions Failure to do so can result in serious injury IMPORTANT MANUAL Do Not Throw Away 196712 Rev 1 02 14 05 TR Printed in U S A 02153 ...

Page 2: ...parking brake stop engine and remove keys before dismounting Disengage blades when not mowing Shut off engine and wait for all parts to come to a complete stop before cleaning the machine removing the grass catcher or unclogging the discharge guard Operate machine only in daylight or good artificial light Do not operate the machine while under the influence of alcohol or drugs Watch for traffic wh...

Page 3: ...h towed equipment except at the hitch point Follow the manufacturer s recommendation for weight limits for towed equipment and towing on slopes Never allow children or others in or on towed equip ment On slopes the weight of the towed equipment may cause loss of traction and loss of control Travel slowly and allow extra distance to stop V SERVICE SAFE HANDLING OF GASOLINE To avoid personal injury ...

Page 4: ...ions will enable you to assemble and maintain your tractor properly Always observe the SAFETY RULES CUSTOMER RESPONSIBILITIES Read and observe the safety rules Follow a regular schedule in maintaining caring for and using your tractor Follow the instructions under Maintenace and Stor age sections of this owner s manual WARNING This tractor is equipped with an internal com bustion engine and should...

Page 5: ...Knob 1 Washer 17 32 x 1 3 16 x 12 Gauge 4 Washers 3 8 x 3 4 x 14 Ga 4 Wheels 4 Adjusting Bar 4 Retainer Springs double loop 4 Clevis Pins 4 Locknut 3 8 16 4 Shoulder Bolt Gauge Wheels 1 Hex Bolt 1 4 28 x 1 1 4 1 Hex nut 1 2 20 Steering Sleeve 1 Front Plate Assembly 5 Retainer Springs double loop 2 Retainer Springs single loop 2 Flanged Pins Mower ...

Page 6: ... packing and discard Place seat on seat pan so head of shoulder bolt is positioned over large slotted hole in pan Push down on seat to engage shoulder bolt in slot and pull seat towards rear of tractor Pivot seat and pan forward and assemble adjustment knob and flat washer loosely Do not tighten Lower seat into operating position and sit on seat Slide seat until a comfortable position is reached w...

Page 7: ...n neutral N position Press lift lever plunger and raise attachment lift lever to its highest position Starttheengine Afterenginehasstarted movethrottle control to idle position Release parking brake Slowlymovethemotioncontrolleverforwardandslowly drive tractor off skid Apply brake to stop tractor set parking brake and place motion control lever in neutral position Turn ignition key to STOP positio...

Page 8: ...ounter clockwise until it stops Lower mower linkage with attachment lift control Be sure belt tension rod is in disengaged position Install belt into electric clutch pulley groove Place the suspension arms on outward pointing deck pins Retain with double loop retainer spring with loops up as shown Install front plate assembly to tractor suspension brackets and retain with single loop retainer spri...

Page 9: ...roperly leveled side to side front to rear for best cutting results Tires must be properly inflated for leveling Check mower and drive belts Be sure they are routed properly around pulleys and inside all belt keepers Check wiring See that all connections are still secure and wires are properly clamped Before driving tractor be sure freewheel control is in transmission engaged position see TO TRANS...

Page 10: ...s injury or death The safety alert symbol is used to identify safety inform ation about hazards which can result in death serious injury and or property damage DANGER indicates a hazard which if not avoided will result in death or serious injury WARNING indicates a hazard which if not avoided could result in death or serious injury CAUTION indicates a hazard which if not avoided might result in mi...

Page 11: ...he engine FREEWHEEL CONTROL Disengages transmission for pushing or slowly towing the tractor with the engine off HEIGHTADJUSTMENTKNOB Usedtoadjustthemower cutting height LIFT LEVER PLUNGER ATTACHMENT LIFT LEVER PARKING BRAKE IGNITION SWITCH THROTTLE CONTROL ROS ON POSITION MOTION CONTROL LEVER CLUTCH BRAKE PEDAL FIG 6 FREE WHEEL CONTROL ATTACHMENT CLUTCH SWITCH HOURMETER Indicates hours of operati...

Page 12: ...o neutral N position IMPORTANT THE MOTION CONTROL LEVER DOES NOT RETURN TO NEUTRAL N POSITION WHEN THE CLUTCH BRAKE PEDAL IS DEPRESSED ENGINE Move throttle control between half and full speed fast position NOTE Failure to move throttle control between half and fullspeed fast position beforestoppingmaycauseengine to backfire Turn ignition key to STOP position and remove key Always remove key when l...

Page 13: ...se direction with the attachment clutch engaged will shut off the engine unless ignition key is placed in the ROS ON position WARNING Backing up with the attachment clutch en gaged while mowing is strongly discouraged Turning the ROS ON to allow reverse operation with the attachment clutch engaged should only be done when the operator decides it is necessary to reposition the machine with the atta...

Page 14: ...ne or carburetor cleaner products in the fuel tank or permanent damage may occur Transmission Engaged Transmission Disengaged Avoid stopping or changing speed on hills If slowing is necessary move throttle control lever to slower position If stopping is absolutely necessary push clutch brake pedal quickly to brake position and engage parking brake Move motion control lever to neutral N position IM...

Page 15: ...mes NOTE During this procedure there will be no movement of drive wheels The air is being removed from hydraulic drive system Move motion control lever to neutral N position Shut off engine and set parking brake Engage transmission by placing freewheel control in engaged position See TO TRANSPORT in this sec tion of manual Sitting in the tractor seat start engine After the engine is running move t...

Page 16: ...gh ambient temperatures 2 Service more often when operating in dirty or dusty conditions E N G I N E Replace Oil Filter If equipped Check Transaxle Cooling Check V Belts Replace Fuel Filter 3 2 2 2 2 3 Replace blades more often when mowing in sandy soil 4 Not required if equipped with maintenance free battery 5 Tighten front axle pivot bolt to 35 ft lbs maximum Do not overtighten 1 1 2 2 4 5 Chang...

Page 17: ...ng with the ignition switch in the ROS ON position and the attachment clutch en gaged any attempt by the operator to shift into reverse should NOT shut off the engine BLADE CARE Forbestresultsmowerbladesmustbekeptsharp Replace bent or damaged blades CAUTION Useonlyareplacementblade approved by the manufacturer of your tractor Using a blade not approved by the manufacturer of your tractor is hazard...

Page 18: ...ssufficient for normal use However periodic charging of the battery with an automotive charger will extend its life Keep battery and terminals clean Keep battery bolts tight Keep small vent holes open Recharge at 6 10 amperes for 1 hour NOTE The original equipment battery on your tractor is maintenance free Do not attempt to open or remove caps or covers Adding or checking level of electrolyte is ...

Page 19: ...e replaced once each season If fuel filter becomes clogged obstructing fuel flow to carburetor replacement is required With engine cool remove filter and plug fuel line sec tions Place new fuel filter in position in fuel line with arrow pointing towards carburetor Be sure there are no fuel line leaks and clamps are properly positioned Immediately wipe up any spilled gasoline CLAMP FUEL FILTER CLAM...

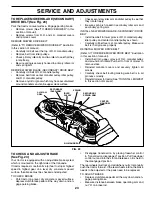
Page 20: ...pringholdinganti swaybartochassis bracket and disengage anti swaybar from bracket Removefourretainerspringsfromfrontplateassembly and remove plate Removeretainerspringsfromsuspensionarmsatdeck and disengage arms from deck Raise attachment lift to its highest position Slide mower forward and remove belt from electric clutch pulley Slide mower out from under right side of tractor TO INSTALL MOWER Be...

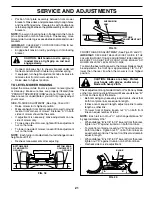
Page 21: ...ore making any necessary adjustments check that both front plate links are equal in length If links are not equal in length adjust one link to same length as other link To lower front of blade loosen nut C on both front links an equal number of turns NOTE Each full turn of nut C will change distance B by approximately 3 16 Whendistance B is1 8 to1 2 loweratfrontthanrear tighten nut D against trunn...

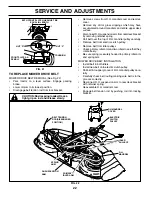
Page 22: ...pings which may have accumulated around mandrels and entire upper deck surface DisconnectR H suspensionarmfromreardeckbracket by removing retainer spring Roll belt over the top of R H mandrel pulley carefully Remove belt from electric clutch pulley Remove belt from idler pulleys Check primary idler arm and two idlers to see that they rotate freely Be sure spring is securely hooked to primary idler...

Page 23: ... belt over L H mandrel pulley Make sure belt is in all grooves properly REINSTALL MOWER DRIVE BELT Refer to TO REMOVE MOWER DRIVE BELT illustration in this section of manual Install belt into upper groove of R H mandrel pulley and around both idlers Pull belt to front of mower to remove slack Reinstall mandrel covers and securely tighten all screws Carefully check belt routing making sure belt is ...

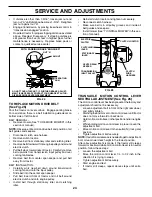
Page 24: ...g brake For assistance there is a belt installation guide decal on bottom side of left footrest BELT REMOVAL Remove mower See TO REMOVE MOWER in this section of manual NOTE Observe entire motion drive belt and position of all belt guides and keepers Disconnect clutch wire harness Remove clutch locator Remove belt from stationary idler and clutching idler Remove belt downward from engine pulley and...

Page 25: ...PEDWITH A 12VOLT SYSTEM THE OTHER VEHICLE MUST ALSO BE A 12 VOLT SYSTEM DO NOT USEYOUR TRACTOR BATTERY TO START OTHER VEHICLES TO ATTACH JUMPER CABLES Connect one end of the RED cable to the POSITIVE terminal of each battery A B taking care not to short against tractor chassis ConnectoneendoftheBLACKcabletotheNEGATIVE terminal C of fully charged battery Connect the other end of the BLACK cable D t...

Page 26: ...TOR Your carburetor is not adjustable If your engine does not operate properly due to suspected carburetor problems take your tractor to an authorized service center for repair and or adjustment FIG 30 TO REPLACE FUSE Replace with 20 amp automotive type plug in fuse The fuse holder is located behind the dash REPLACING BATTERY See Fig 29 WARNING Do not short battery terminals by allowing a wrench o...

Page 27: ...FUEL SYSTEM PARTS SUCH AS CARBURETOR FUEL FILTER FUEL HOSE OR TANK DURING STORAGE ALSO EXPERIENCE INDICATES THAT ALCOHOL BLENDED FUELS CALLED GASOHOL OR USING ETHANOLORMETHANOL CANATTRACTMOISTUREWHICH LEADSTOSEPARATIONANDFORMATIONOFACIDSDURING STORAGE ACIDIC GAS CAN DAMAGE THE FUEL SYSTEM OF AN ENGINE WHILE IN STORAGE Empty the fuel tank by starting the engine and let it run until the fuel lines a...

Page 28: ...ignition switch 7 Check replace ignition switch 8 Faulty solenoid or starter 8 Check replace solenoid or starter 9 Faulty operator presence switch es 9 Contact an authorized service center department Engine clicks but will not 1 Weak or dead battery 1 Recharge or replace battery start 2 Corroded battery terminals 2 Clean battery terminals 3 Loose or damaged wiring 3 Check all wiring 4 Faulty solen...

Page 29: ... pressure 5 Check tires for proper air pressure 6 Worn bent or loose blade 6 Replace sharpen blade Tighten blade bolt 7 Buildup of grass leaves and trash under mower 7 Clean underside of mower housing 8 Mower drive belt worn 8 Replace mower drive belt 9 Blades improperly installed 9 Reinstall blades sharp edge down 10 Improper blades used 10 Replace with blades listed in this manual 11 Clogged mow...

Page 30: ...used for rental or commercial purposes is limited to 90 days from the date of original purchase 5 This Warranty applies only to products which have been properly assembled adjusted operated and maintained in accor dance with the instructions furnished This Warranty does not apply to any product which has been subjected to alteration misuse abuse improper assembly or installation delivery damage or...

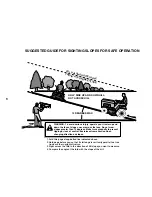
Page 31: ...the face Do not mow slopes greater than 15 degrees Make turns gradually to prevent tipping or loss of control Exercise extreme caution when changing direction on slopes 1 Fold this page along dotted line indicated above 2 Hold page before you so that its left edge is vertically parallel to a tree trunk or other upright structure 3 Sight across the fold in the direction of hill slope you want to me...

Page 32: ...on of part For Techical Assistance call 1 800 829 5886 For a Parts Manual go to our website www poulan pro com support asp NOTE Electrolux Home Products provides parts and service through its authorized distributors and dealers therefore all requests for parts and service should be directed to your local dealer s The philosophy of Electrolux Home Products is to continually improve all of its produ...

Reviews: