background image

5

SAFETY NOTICE:

Exposure to vibrations

through prolonged use of gasoline

powered hand tools could cause blood

vessel or nerve damage in the fingers,

hands, and joints of people prone to

circulation disorders or abnormal swellings.

Prolonged use in cold weather has been

linked to blood vessel damage in otherwise

healthy people. If symptoms occur such as

numbness, pain, loss of strength, change in

skin color or texture, or loss of feeling in the

fingers, hands, or joints, discontinue the

use of this tool and seek medical attention.

An

anti-vibration

system

does

not

guarantee

the

avoidance

of

these

problems. Users who operate power tools

on a continual and regular basis must

monitor closely their physical condition and

the condition of this tool.

SPECIAL

NOTICE

:

Your saw is

equipped with a temperature limiting

muffler and spark arresting screen which

meets the requirements of California Codes

4442 and 4443. All

U.S.

forest land and the

states

of

California,

Idaho,

Maine,

Minnesota, New Jersey, Oregon, and

Washington

require

many

internal

combustion engines to be equipped with a

spark arrestor screen by law. If you operate

a chain saw in a state or locale where such

regulations

exist,

you

are

legally

responsible for maintaining the operating

condition of these parts. Failure to do so is

a violation of the law. Refer to the SERVICE

section for maintenance of the Spark

Arrestor.

Failure to follow all Safety Rules and Precau-

tions can result in serious injury. If situations

occur which are not covered in this manual,

use care and good judgement. If you need

assistance, contact your retailer or call

1-800-554-6723.

ASSEMBLY

The assembly tool provided with your saw is

the only tool needed for assembly. Protec-

tive gloves (not provided) should be worn

during assembly.

ATTACHING THE BAR & CHAIN

(If not

already attached)

WARNING

:

Recheck each assembly

step if the saw is received assembled. Al-

ways wear gloves when handling the chain.

The chain is sharp and can cut you even

when it is not moving!

S

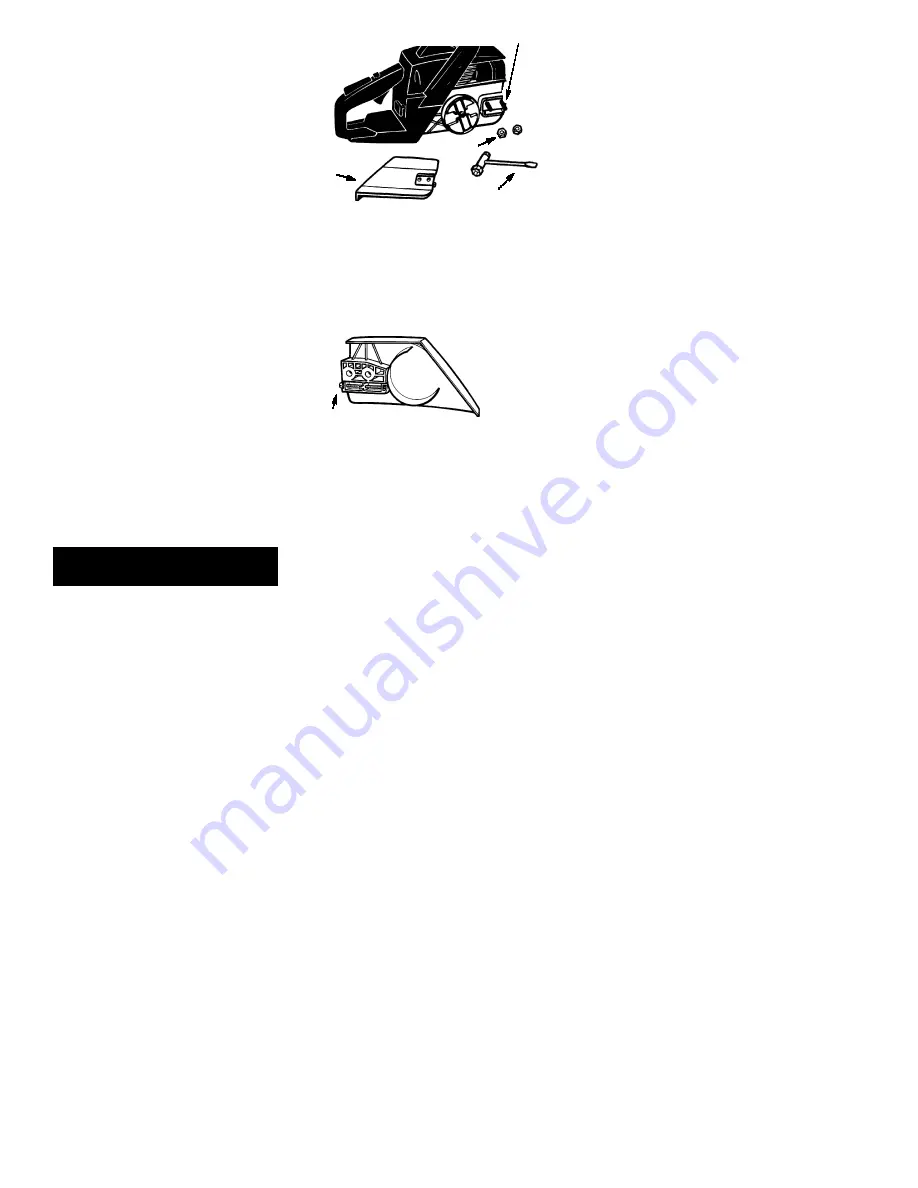
Loosen and remove the clamp nuts and

the bar clamp from the saw.

S

Remove the plastic shipping spacer (if

present).

Bar Clamp

Clamp

Nuts

Assembly Tool

Location of shipping spacer

S

An adjusting pin and screw are used to

adjust the tension of the chain. It is very

important when assembling the bar that

the pin located on the adjusting screw

aligns with a hole in the bar. Turning the

screw will move the adjustment pin up

and down the screw. Locate this adjust-

ment pin before you begin mounting the

bar onto the saw. See illustration below.

Adjustment screw

Inside view of

Bar Clamp

S

Turn the adjusting screw counterclock-

wise to move the adjusting pin almost as

far as it will go to the rear. This should al-

low the pin to be near the correct position.

Further adjustment may be necessary as

you mount the bar.

S

Mount the bar as illustrated.

S

Slide the bar toward the rear of the saw as

far as possible.

S

Prepare the chain by checking the proper

direction. Without following the illustration

it is easy to place the chain on the saw the

wrong direction. Use the illustration of the

chain to determine the proper direction.

S

Place the chain onto the sprocket located

behind the clutch drum. Fit the chain be-

tween the teeth in the sprocket.

S

Start at the top of the bar and fit chain into

groove around the guide bar.

S

Pull the bar forward until the chain is snug

in the groove of the bar.

S

Hold guide bar against the saw frame and

install bar clamp. Make sure the adjusting

pin is aligned with the hole in the bar. Re-

member this pin moves the bar forward

and backward as the screw is turned.

S

Replace the bar clamp nuts and tighten

finger tight. Once the chain is tensioned

you will need to tighten bar clamp nuts.

Summary of Contents for 2000-01

Page 1: ...llant 1 800 554 6723 www poulan com WARNING Read and follow all Safety Rules and Operating Instructions before using this product Failure to do so can result in serious injury ADVERTENCIA Lea el manual del operador y siga todas las advertencias e enstruc ciones de seguridad El no hacerlo puede resultar en lesiones graves Electrolux Home Products North America Div of WCI Outdoor Products Inc August...

Page 2: ... Serious injury to the operator help ers bystanders or any combination of these persons may result from one handed operation A chain saw is in tended for two handed use S Operate the chain saw only in awell venti lated outdoor area S Do not operate saw from a ladder or in a tree unless you are specifically trained to do so S Make sure the chain will not make contact with any object while starting ...

Page 3: ...sult in loss of control and serious injury Avoid Pinch Kickback S Be extremely aware of situations or ob structions that can cause material to pinch the top of or otherwise stop chain S Do not cut more than one log at a time S Do not twist the saw as the bar is with drawn from an undercut when bucking Avoid Pull In S Always begin cutting with the engine at full speed and the saw housing against wo...

Page 4: ...educed Kickback Guide Bar designed with a small radius tip which reduces the size of the kickback danger zone on the bar tip A Reduced Kickback Guide Bar has been demonstrated to significantly reduce the number and seriousness of kickbacks when tested in accordance with safety requirements for gasoline powered chain saws as set by ANSI B175 1 S Low Kickback Chain designed with a contoured depth ga...

Page 5: ...ring assembly ATTACHING THE BAR CHAIN If not already attached WARNING Recheck each assembly step if the saw is received assembled Al ways wear gloves when handling the chain The chain is sharp and can cut you even when it is not moving S Loosen and remove the clamp nuts and the bar clamp from the saw S Remove the plastic shipping spacer if present Bar Clamp Clamp Nuts Assembly Tool Location of shi...

Page 6: ... to operate on unleaded gasoline Before operation gasoline must be mixed with a good quality 2 cycle air cooled engine oil We recommend Poulan Weed Eater brand oil If you do not use this oil use a good quality 2 cycle air cooled oil designed to be mixed at a ratio of 40 1 A 40 1 ratio is obtained by mixing 3 2 onces of oil with 1 gallon of unleaded gasoline When mixing fuel follow the instructions...

Page 7: ...S Slowly press the primer bulb six times S Pull the starter rope quickly with your right hand until the engine starts S Squeeze and release throttle trigger al lowing engine to idle Difficult starting or flooded engine The engine may be flooded with too much fuel if it has not started after 10 pulls Flooded engines can be cleared of excess fuel by following the warm engine starting procedure liste...

Page 8: ...HE TREE S Make notch cut by cutting the top of the notch first Cut through 1 3 of the diameter of the tree Next complete the notch by cutting the bottom of the notch See illus trated Once the notch is cut remove the notch of wood from the tree Notch First cut Second cut Final cut here 2 inches above center of notch S After removing the cutout of wood make the felling cut on the opposite side of th...

Page 9: ...ly reenter the cut To avoid kickback and chain damage do not use a metal wedge Do not attempt to re start saw when it is pinched or hung in alog Overcutting Undercutting Overcutting begins on the top side of the log with the bottom of the saw against the log When overcutting use light downward pressure Undercutting involves cutting on the un derside of the log with top of saw against the log When ...

Page 10: ...ork to ward the top cutting branches and limbs Remove small limbs with one cut S Keep the tree between you and the chain Cut from the side of the tree opposite the branch you are cutting S Remove larger supporting branches with the 1 3 2 3 cutting techniques described in the bucking section S Undercut 1 3 of the way through log S Finish with an overcut S Always use an overcut to cut small and free...

Page 11: ...nition timing is fixed and nonadjustable SPARK PLUG Replace the spark plug yearly STORAGE WARNING Stop engine and allow to cool and secure the unit before storing or transporting in a vehicle Store unit and fuel in an area where fuel vapors cannot reach sparks or open flames from water heaters electric motors or switches furnaces etc Store unit with all guards in place Position so that anysharp ob...

Page 12: ...ROL WARRANTY STATEMENT YOUR WARRANTY RIGHTS AND OB LIGATIONS The U S Environmental Protection Agency and POULAN WEED EATER DIVISION OF WCI OUTDOOR PRODUCTS are pleased to explain the emissions control system warranty on your lawn and garden equipment engine All new utility and lawn and garden equipment engines must be designed built and equipped to meet the stringent anti smog standards POULAN WEE...

Page 13: ...g center CONSEQUENTIAL DAM AGES POULAN WEED EATER may be li able for damages to other engine compo nents caused by the failure of a warranted part still under warranty WHAT IS NOT COVERED All failures caused by abuse neglect or improper maintenance are not covered ADD ON OR MODIFIED PARTS The use of add onor modified parts can be grounds for disallowing a warranty claim POULAN WEED EATER is not li...

Reviews: