background image

14

MULCHING MOWING TIPS

IMPORTANT: 

 FOR BEST PERFORMANCE, KEEP MOWER 

HOUSING FREE OF BUILT-UP GRASS AND TRASH.  CLEAN 
AFTER EACH USE.

•      The spe cial mulch ing blade will recut the grass clip-

 pings many times and reduce them in size so that as 
they fall onto the lawn they will disperse into the grass 
and not be noticed.  Also, the mulched grass will biode-
grade quick ly to provide nutrients for the lawn.  Always 
mulch with your highest engine (blade) speed as this 
will pro vide the best recutting action of the blades.

•      Avoid cutting your lawn when it is wet.  Wet grass tends 

to form clumps and interferes with the mulch ing action.  
The best time to mow your lawn is the early afternoon.  
At this time the grass has dried and the newly cut area 
will not be exposed to the direct sun.

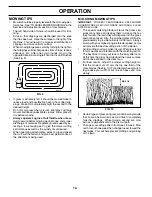
    For best results, adjust the mower cutting height so 

that the mower cuts off only the top one-third of the 
grass blades (See Fig. 10). For ex tremely heavy mulch-
 ing, re duce your width of cut on each pass and mow 
slow ly. 

MAX 1/3

FIG. 10

00272

FIG. 9

 MOWING TIPS

•         Mower should be properly leveled for best mowing per-

formance.  See “TO LEVEL MOWER HOUSING” in the 
Service and Adjustments section of this manual.

•      The left hand side of mower should be used for trim-

 ming.

•     Drive so that clippings are discharged onto the area 

that has been cut.  Have the cut area to the right of the 
machine.  This will result in a more even dis tri bu tion of 
clippings and more uniform cutting.

•         When mowing large areas, start by turning to the right so 

that clippings will discharge away from shrubs, fences, 
driveways, etc.  After one or two rounds, mow in the 
opposite direction making left hand turns until fi nished 
(See Fig. 9).

OPERATION

•      If grass is extremely tall, it should be mowed twice to 

reduce load and possible fi re hazard from dried clip-
 pings.  Make fi rst cut relatively high; the second to the 
desired height.

•      Do not mow grass when it is wet.  Wet grass will plug 

mower and leave undesirable clumps.  Allow grass to 
dry before mowing.

•     

Always operate engine at full throttle when mow-
ing 

to assure better mowing performance and proper 

dis charge of material.  Regulate ground speed by se-
 lect ing a low enough gear to give the mower cut ting 
per for mance as well as the quality of cut desired.

•     When operating attachments, select a ground speed 

that will suit the terrain and give best performance of 
the at tach ment being used.

•        Certain types of grass and grass con di tions may re quire 

that an area be mulched a second time to com pletely 
hide the clippings.  When doing a sec ond cut, mow 
across or perpendicular to the fi rst cut path.

•      Change your cutting pattern from week to week.  Mow 

north to south one week then change to east to west the 
next week.  This will help prevent matting and graining 
of the lawn.

Summary of Contents for 279370

Page 1: ...E PROTECTION DURING OPERATION WARNING Read this Owner s Manual and follow all WarningsandSafetyInstructions Failure to do so can result in serious injury IMPORTANT MANUAL Do Not Throw Away 186895 Rev 2 04 29 03 RD TR Printed in U S A 02478 00993 poulan_pro ...

Page 2: ...he machine Clear the area of objects such as rocks toys wire etc which could be picked up and thrown by the blade Be sure the area is clear of other people before mow ing Stop machine if anyone enters the area Never carry passengers Do not mow in reverse unless absolutely necessary Always look down and behind before and while back ing Be aware of the mower discharge direction and do not point it a...

Page 3: ...the watchful care of another responsible adult Be alert and turn machine off if children enter the area Before and when backing look behind and down for small children Mow up and down slopes 15 Max not across Remove obstacles such as rocks tree limbs etc Watchforholes ruts orbumps Uneventerraincouldoverturn the machine Tall grass can hide obstacles Use slow speed Choose a low gear so that you will...

Page 4: ...enter department We have competent well trained technicians and the proper tools to service or repair this tractor Please read and retain this manual The instructions will enable you to assemble and maintain your tractor properly Always observe the SAFETY RULES CUSTOMER RESPONSIBILITIES Read and observe the safety rules Follow a regular schedule in maintaining caring for and using your tractor Fol...

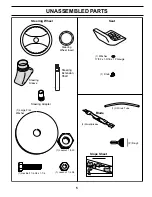
Page 5: ... Wheel Insert Steering Sleeve Steering Wheel 1 Knob 1 Washer 17 32 x 1 3 16 x 12 Gauge Seat 2 Mulch Blades 2 Keys Slope Sheet Steering Extension Shaft Steering Adapter 1 Oil Drain Tube 1 Hex Bolt 1 4 28 x 1 1 4 1 Locknut 1 4 28 1 Locknut 1 2 20 Blade ...

Page 6: ...Check for any additional loose parts or cartons and remove Your new tractor has been assembled at the factory with exception of those parts left unassembled for shipping purposes To ensure safe and proper operation of your tractor all parts and hardware you assemble must be tightened securely Use the correct tools as necessary to insure proper tightness FIG 1 1 4 LOCKNUT LOWER STEERING SHAFT STEER...

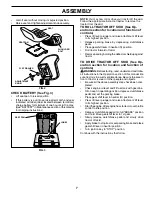
Page 7: ...tion section for location and function of controls WARNING Beforestarting read understandandfollow all instructions in the Operation section of this manual Be sure tractor is in a well ventilated area Be sure the area in front of tractor is clear of other people and objects Be sure all the above assembly steps have been com pleted Check engine oil level and fill fuel tank with gasoline Sit on seat...

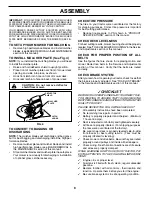
Page 8: ...r best cutting performance Reduce tire pressure to PSI shown in PRODUCT SPECIFICATIONS section of this manual CHECK DECK LEVELNESS For best cutting results mower housing should be properly leveled See TOLEVELMOWERHOUSING intheService and Adjustments section of this manual CHECK FOR PROPER POSITION OF ALL BELTS See the figures that are shown for replacing motion and mower blade drive belts in the S...

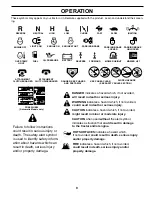
Page 9: ...could result in serious injury or death The safety alert symbol is used to identify safety inform ation about hazards which can result in death serious injury and or property damage DANGER indicates a hazard which if not avoided will result in death or serious injury WARNING indicates a hazard which if not avoided could result in death or serious injury CAUTION indicates a hazard which if not avoi...

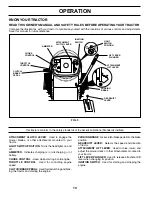
Page 10: ...tery CHOKE CONTROL Used when starting a cold engine THROTTLE CONTROL Used for controlling engine speed CLUTCH BRAKE PEDAL Used for declutching and brak ing the tractor and starting the engine PARKINGBRAKE Locksclutch brakepedalintothebrake position GEARSHIFT LEVER Selects the speed and direction of tractor ATTACHMENT LIFT LEVER Used to raise lower and adjust the mower deck or other attachments mou...

Page 11: ...OTE Failure to move throttle control to slow position and allowing engine to idle before stopping may cause engine to backfire Turn ignition key to OFF position and remove key Always remove key when leaving tractor to prevent unauthorized use Never use choke to stop engine IMPORTANT LEAVING THE IGNITION SWITCH IN ANY POSITION OTHER THAN OFF WILL CAUSE THE BATTERY TO BE DISCHARGED DEAD NOTE Under c...

Page 12: ...To protect hood from damage when transporting your tractor on a truck or a trailer be sure hood is closed and secured to tractor Use an appropriate means of tying hood to tractor rope cord etc TO ADJUST GAUGE WHEELS See Fig 7 Gauge wheels are properly adjusted when they are slightly off the ground when mower is at the desired cutting height in operating position Gauge wheels then keep the deck in ...

Page 13: ...ng time to move fuel from the tank to the engine Sit on seat in operating position depress clutch brake pedal and set parking brake Place gear shift lever in neutral N position Move attachment clutch to DISENGAGED position Move throttle control to fast position Pull choke control out for a cold engine start attempt For a warm engine start attempt the choke control may not be needed NOTE Before sta...

Page 14: ... are discharged onto the area that has been cut Have the cut area to the right of the machine This will result in a more even distribution of clippings and more uniform cutting Whenmowinglargeareas startbyturningtotherightso that clippings will discharge away from shrubs fences driveways etc After one or two rounds mow in the opposite direction making left hand turns until finished See Fig 9 OPERA...

Page 15: ..._sch tractore new1 GENERAL RECOMMENDATIONS The warranty on this tractor does not cover items that have beensubjectedtooperatorabuseornegligence Toreceive full value from the warranty operator must maintain tractor as instructed in this manual Some adjustments will need to be made periodically to properly maintain your tractor All adjustments in the Service and Adjustments section of this manual sh...

Page 16: ...th the ground If blade is balanced it should remain in a horizontal position If either end of the blade moves downward sharpen the heavy end until the blade is balanced TRACTOR Always observe safety rules when performing any main tenance BRAKE OPERATION If tractor requires more than six 6 feet stopping distance at high speed in highest gear then brake must be adjusted See TOADJUSTBRAKE intheServic...

Page 17: ...ne damage from running low on oil Change the oil after every 50 hours of operation or at least once a year if the tractor is not used for 50 hours in one year Check the crankcase oil level before starting the engine and after each eight 8 hours of operation Tighten oil fill cap dipstick securely each time you check the oil level TEMPERATURE RANGE ANTICIPATED BEFORE NEXT OIL CHANGE SAE VISCOSITY GR...

Page 18: ...ion or every season Service paper cartridge every 100 hours of operation or every season whichever occurs first Service air cleaner more often under dusty conditions Pull up on air filter cover handle and rotate towards engine Remove cover Carefully remove air filter cartridge and pre cleaner from base Clean base carefully to prevent debris from falling into carburetor NOTE If very dirty or damage...

Page 19: ...properly positioned Immediately wipe up any spilled gasoline CLAMP FUEL FILTER CLAMP FIG 17 CLEANING Clean engine battery seat finish etc of all foreign matter Keep finished surfaces and wheels free of all gasoline oil etc Protect painted surfaces with automotive type wax We do not recommend using a garden hose or pressure washer to clean your tractor unless the engine and trans mission are covere...

Page 20: ...gs Disconnect front links from deck by removing retainer springs Raise lift lever to raise suspension arms Slide mower out from under tractor IMPORTANT IFANATTACHMENTOTHERTHANTHEMOWER DECK IS TO BE MOUNTED ON THE TRACTOR REMOVE THE FRONTLINKSANDHOOKTHECLUTCHSPRINGINTOSQUARE HOLE IN FRAME TO INSTALL MOWER See Fig 18 Raise attachment lift lever to its highest position Slide mower under tractor with ...

Page 21: ...our mower SIDE TO SIDE ADJUSTMENT See Figs 19 and 20 Raise mower to its highest position At the midpoint of both sides of mower measure height from bottom edge of mower to ground Distance A on both sides of mower should be the same or within 1 4 of each other If adjustment is necessary make adjustment on one side of mower only To raise one side of mower tighten lift link adjustment nut on that sid...

Page 22: ...KE Depress clutch brake pedal all the way down and en gage parking brake Measure distance between brake operating arm and nut A on brake rod If distance is other than 1 1 2 loosen jam nut and turn nut A until distance becomes 1 1 2 Retighten jam nut against nut A Road test tractor for proper stopping distance as stated above Readjust if necessary If stopping distance is still greater than five 5 f...

Page 23: ... ONLY AXLE COVER TO ADJUST STEERING WHEEL ALIGN MENT If steering wheel crossbars are not horizontal left to right whenwheelsarepositionedstraightforward removesteer ing wheel and reassemble per instructions in the Assembly section of this manual FRONT WHEEL TOE IN CAMBER The front wheel toe in and camber are not adjustable on your tractor If damage has occurred to affect the front wheel toe in or ...

Page 24: ...Loose or damaged wiring may cause your tractor to run poorly stop running or prevent it from starting Check wiring See electrical wiring diagram in the Repair Parts section TO REPLACE FUSE Replace with 20 amp automotive type plug in fuse The fuse holder is located behind the dash SEAT PAN KEPS NUT HEX BOLT POSITIVE RED CABLE NEGATIVE BLACK CABLE TERMINAL COVER WEAK OR DEAD BATTERY FULLY CHARGED BA...

Page 25: ...SETTING CAN BE DANGEROUS IF YOU THINK THE ENGINE GOVERNED HIGH SPEED NEEDS ADJUSTING CONTACTYOURNEARESTAUTHORIZEDSERVICECENTER DEPARTMENT WHICH HAS PROPER EQUIPMENT AND EXPERIENCE TO MAKE ANY NECESSARY ADJUSTMENTS CLAMP SCREW ENGINE TO ADJUST THROTTLE CONTROL CABLE See Fig 32 The throttle control has been preset at the factory and adjustment should not be necessary Check adjustment as described be...

Page 26: ...AL FUEL SYSTEM PARTS SUCH AS CARBURETOR FUEL FILTER FUEL HOSE OR TANK DURING STORAGE ALSO EXPERIENCE INDICATES THAT ALCOHOL BLENDED FUELS CALLED GASOHOL OR USING ETHANOLORMETHANOL CANATTRACTMOISTUREWHICH LEADSTOSEPARATIONANDFORMATIONOFACIDSDURING STORAGE ACIDIC GAS CAN DAMAGE THE FUEL SYSTEM OF AN ENGINE WHILE IN STORAGE Drain the fuel tank Start the engine and let it run until the fuel lines and ...

Page 27: ...k all wiring 7 Faulty ignition switch 7 Check replace ignition switch 8 Faulty solenoid or starter 8 Check replace solenoid or starter 9 Faulty operator presence switch es 9 Contact an authorized service center department Engine clicks but will 1 Weak or dead battery 1 Recharge or replace battery not start 2 Corroded battery terminals 2 Clean battery terminals 3 Loose or damaged wiring 3 Check all...

Page 28: ...ose blade 6 Replace sharpen blade Tighten blade bolt 7 Buildup of grass leaves and trash under mower 7 Clean underside of mower housing 8 Mower drive belt worn 8 Replace mower drive belt 9 Blades improperly installed 9 Reinstall blades sharp edge down 10 Improper blades used 10 Replace with blades listed in this manual 11 Clogged mower deck vent holes from buildup of 11 Clean around mandrels to op...

Page 29: ...OFF CLUTCH BRAKE PEDAL UP SOLENOID BLACK WIRING INSULATED CLIPS NOTE IF WIRING INSULATED CLIPS WERE REMOVED FOR SERVICING OF UNIT THEY SHOULD BE REPLACED TO PROPERLY SECURE YOUR WIRING A AMMETER RED G B S M A1 A2 L HOUR METER OPTIONAL OPTIONAL SPARK PLUG GAP 2 PLUGS ON TWIN CYL ENGINES IGNITION SWITCH CIRCUIT POSITION OFF B A1 RUN LIGHT B S A1 START M G A1 B A1 RUN MAKE A2 L NONE NONE NONE REGULAT...

Page 30: ...30 REPAIR PARTS TRACTOR MODEL NUMBER 279370 PRODUCT NUMBER 954 57 06 80 ELECTRICAL 28 29 26 24 42 43 27 27 25 41 27 27 40 33 90 30 8 2 1 27 16 16 52 22 21 D C AMPERES 45 ...

Page 31: ... Ga 11 red 25 146147 Cable Battery 6 Ga w 16 wire red 26 175158 Fuse 20 AMP 27 73510400 Nut Keps Hex 1 4 20 Unc 28 4207J Cable Ground 6 Ga 12 black 29 121305X Switch Plunger 30 175566 Switch Ign 33 140401 Key Ign 40 179720 Harness Ign 41 71110408 Bolt Blk Fin Hex 1 4 20 x 1 2 42 131563 Cover Terminal Red 43 178861 Solenoid 45 122822X Ammeter 52 141940 Protection Wire Loop 90 180449 Cover Terminal ...

Page 32: ...T NUMBER 954 57 06 80 CHASSIS AND ENCLOSURES 26 25 58 64 208 13 208 11 1 3 2 9 208 209 209 5 5 207 3 3 3 142 3 3 3 142 145 37 3 37 24 26 25 209 31 24 30 35 3 26 33 10 26 34 35 18 14 38 14 206 159 17 28 264 263 259 258 261 166 39 chassis_elite sv_pro_4 ...

Page 33: ... 31 136619 Bracket Fender 33 179716X428 Footrest LH 34 179717X428 Footrest RH 35 72110606 Bolt RdHd Sht Sqnk 3 8 16 x 3 4 37 17490508 Screw Thdrol 5 16 18 x 1 2 Tyt 38 175710 Bracket Asm Pivot Mower Rear 39 174714 Bracket Pivot 58 184322 Air Duct Private Label 64 154798 Dash Lower 142 175702 Plate Reinforcement 145 156524 Rod Pivot Chassis Hood 159 169473X428 Cupholder 166 171875 Screw 13 16 x 3 4...

Page 34: ...5 78 76 77 1 25 19 24 2 53 35 34 37 36 35 62 36 59 212 55 77 61 22 27 26 6 113 18 51 5 18 6 85 52 30 32 32 30 52 11 85 80 4 3 13 81 84 82 64 65 145 79 16 96 26 27 51 48 150 151 202 49 47 50 120 21 8 10 156 165 168 166 163 14 159 161 198 158 164 83 162 169 89 197 6 170 66 56 63 116 70 69 26 drive fender stlt_21 ...

Page 35: ...rn Clutch 6 75 56 17060620 Screw 3 8 16 x 1 1 4 57 130801 V Belt Ground Drive 95 25 59 169691 Keeper Belt Span Ctr 61 17120614 Screw 3 8 16 x 875 62 8883R Cover Pedal Blk Round 63 175410 Engine Pulley 64 71170764 Bolt Hex 65 10040700 Washer Lock Hvy Hlcl Spr 7 16 66 154778 Keeper Belt Engine Foolproof 69 142432 Screw Hex wsh HiLo 1 4 x 1 2 Unc 70 134683 Guide Belt Mower Drive RH 74 137057 Spacer A...

Page 36: ... NUMBER 279370 PRODUCT NUMBER 954 57 06 80 STEERING ASSEMBLY 5 5 4 3 43 6 43 8 10 40 32 11 8 6 87 46 46 8 6 87 29 88 71 17 43 91 2 1 41 42 37 36 37 38 12 39 44 51 54 33 35 34 68 67 67 67 13 65 68 15 15 15 29 29 82 steering_pl lt_29 ...

Page 37: ...er lock 5 16 35 73540500 Nut Crownlock 5 16 24 36 155099 Bushing Strg 5 8 Id Dash 37 152927 Screw TT 10 32 x 5 x 3 8 Flange 38 180657 Insert Cap Strg 39 19182411 Washer 9 16 ID x 1 1 2 OD 11 Gr 40 7810H Locknut Center 41 159945 Adaptor Wheel Strg 42 145054X428 Boot Dash Steering 43 121749X Washer 25 32 x 1 1 4 x 16 Ga 44 180640 Extension Steering 46 184946X505 Cap Spindle 51 73540400 Nut Crownlock...

Page 38: ...00500 Nut 23 71110814 Bolt Hex Black 24 19171912 Washer 17 32 x 1 3 16 x 12 Ga 25 127018X Bolt Shoulder 5 16 18 x 62 1 24 16 15 12 13 17 25 4 3 8 9 7 8 9 7 11 2 6 22 21 5 10 5 14 seat_lt knob_1 1 171683 Seat 2 140551 Bracket Pnt Pivot Seat blk 3 71110616 Bolt 4 19131610 Washer 13 32 x 1 x 10 Ga 5 145006 Clip Push In Hinged 6 73800600 Nut 7 124181X Spring Seat Cprsn 2 250 Blk Zi 8 17000616 Screw 3 ...

Page 39: ...t dimensions given in U S inches 1 inch 25 4 mm KEY PART NO NO DESCRIPTION KEY PART NO NO DESCRIPTION 12 176305 Decal Fender 13 173589 Decal Reflector LH 14 160396 Decal V belt Schematic 42 15 173587 Decal Reflector RH 16 145005 Decal Battery Danger Poison 179769X428 Pad Footrest RH 179768X428 Pad Footrest LH 138311 Decal Lift Handle 186895 Manual Owner s English 186896 Manual Owner s French 1 156...

Page 40: ... 23 169837 Shield Browning Debris Guard 29 137180 Arrestor Spark 31 185534 Tank Fuel 32 140527 Cap Asm Fuel W sym Vented KEY PART NO NO DESCRIPTION 2 1 OPTIONAL EQUIPMENT Spark Arrester 29 44 46 32 31 33 37 33 13 4 72 78 81 3 16 78 23 45 14 38 engine bs 1cyl_46 33 123487X Clamp Hose Blk 37 137040 Line Fuel 20 38 181654 Plug Drain Oil Easy 44 17670412 Screw Hexwsh Thdrol 1 4 20 x 3 4 45 17000612 Sc...

Page 41: ...n Plunger 11 139865 Link Lift Lh 12 139866 Link Lift Rh 13 4939M Retainer Spring 15 173288 Link Front 16 73350800 Nut Jam Hex 1 2 13 Unc KEY PART NO NO DESCRIPTION NOTE All component dimensions given in U S inches 1 inch 25 4 mm 17 175689 Trunnion Blk Zinc 18 73800800 Nut Lock w Wsh 1 2 13 Unc 19 139868 Arm Suspension Rear 20 163552 Retainer Spring 31 169865 Bearing Pvt Lift 32 73540600 Nut Crownl...

Page 42: ...5 150 45 144 147 147 142 149 142 54 52 53 55 56 34 1 46 44 21 24 25 26 27 2 28 29 23 21 21 21 18 18 20 2 48 59 19 4 3 5 6 21 40 143 36 40 37 40 159 42_deck_man t path_3 152 151 153 154 157 158 67 153 156 155 102 102 104 103 105 106 104 105 106 103 101 132 95 94 182 91 183 132 114 117 119 116 18 111 118 113 113 117 116 118 119 114 18 112 ...

Page 43: ...c 53 184907 Arm Assembly Pad Brake 54 178515 Washer Hardened 55 155046 Arm Idler 56 122052X Spacer Retainer 59 173442 Guard TUV Idler 67 171598 Knob 68 144959 V Belt 42 Mower 91 180532 Bracket Noseroller LH 94 132264 Roller Nose 95 180533 Bracket Noseroller RH 101 136420 Cover Mulching 102 71081010 Screw 10 24 x 5 8 103 19061216 Washer 10 104 10071000 Washer Lock 10 105 160793 Latch Asm 106 2029J ...

Page 44: ...44 NOTES ...
Page 45: ...d for rental or commercial purposes is limited to 90 days from the date of original purchase 5 This Warranty applies only to products which have been properly assembled adjusted operated and main tained in accordance with the instructions furnished This Warranty does not apply to any product which has been subjected to alteration misuse abuse improper assembly or installation delivery damage or to...

Page 46: ...in Component and parts The cost of normal maintenance and replacement of service items which are not defective shall be paid for by the original purchaser C Securing Warranty Service Warranty service can be arranged for by contacting either aTecumseh Authorized Service Outlet anyTecumseh Registered Service Dealer Tecumseh Authorized Service Distributor or Tecumseh Central Warehouse Distributor or ...

Page 47: ... never across the face Do not mow slopes greater than 15 degrees Make turns gradually to prevent tipping or loss of control Exercise extreme caution when changing direction on slopes 1 Fold this page along dotted line indicated above 2 Hold page before you so that its left edge is vertically parallel to a tree trunk or other upright structure 3 Sight across the fold in the direction of hill slope ...

Page 48: ...rimmers Brushcutters and Blowers 3 For replacement parts have available the following information a Model Number Manufacturer s I D Number b Description of part NOTE Electrolux Home Products provides parts and service through its authorized distributors and dealers therefore all requests for parts and service should be directed to your local dealer s The philosophy of Electrolux Home Products is t...

Reviews: