21
SERVICE AND ADJUSTMENTS
NOTE:
Each full turn of the adjustment nut will change
mower height about 1/8".
• Recheck measurements, adjust if necessary until front
tip of blade is 1/8" to 1/2" lower than the rear tip.
• Hold adjustment nut in position with wrench and tighten
jam nut securely against adjustment nut.
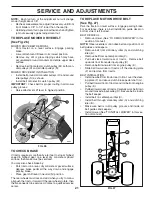
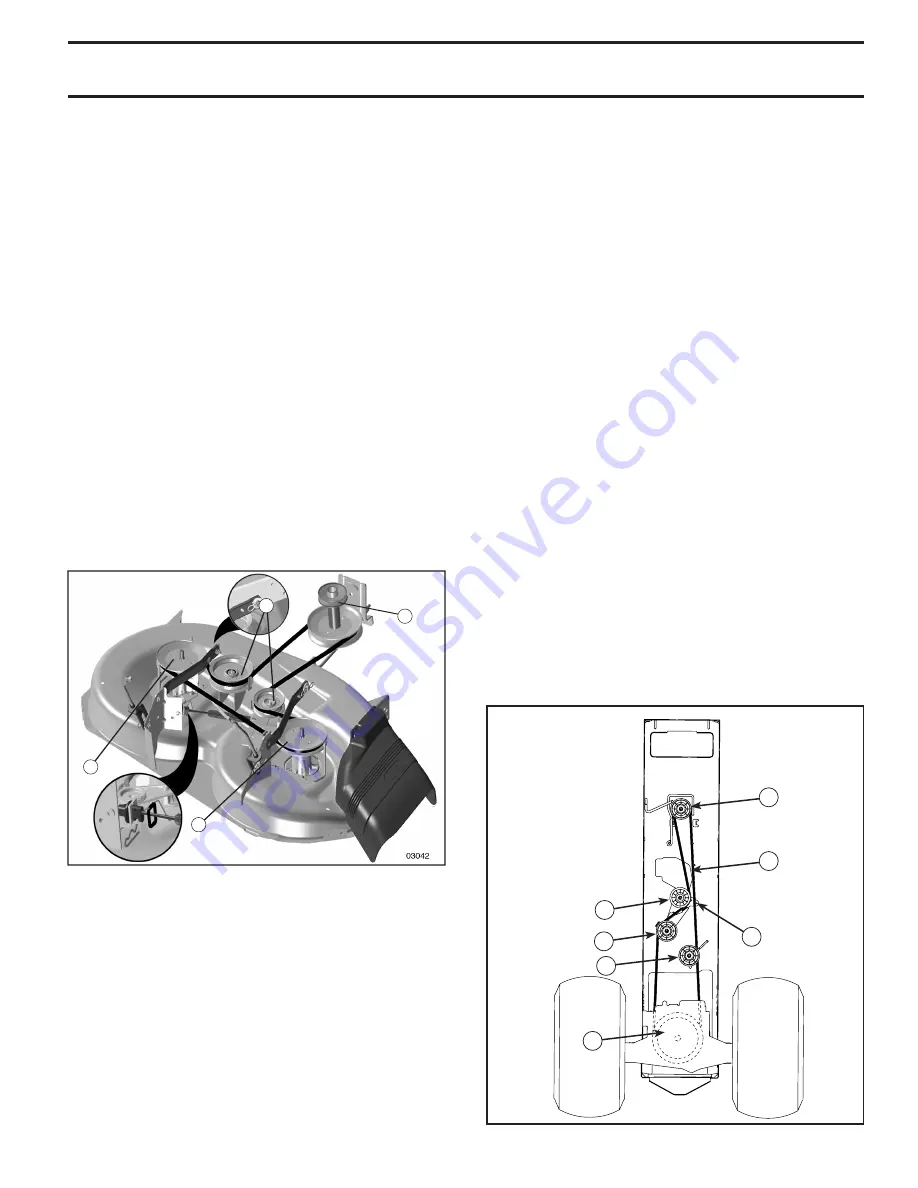
TO REPLACE MOWER DRIVE BELT
(See Fig. 26)
MOWER DRIVE BELT REMOVAL
• Park tractor on a level surface. En
gage parking
brake.
• Lower attachment lift lever to its lowest position.
• Remove any dirt or grass clippings which may have
accumulated around mandrels and entire upper deck
surface.
• Remove belt from electric clutch pulley (M), both man-
drel pulleys (R) and all idler pulleys (S).
MOWER DRIVE BELT INSTALLATION
• Install belt around all mandrel pulleys (R) and around
idler pulleys (S) as shown.
• Install belt onto electric clutch pulley (M).
IMPORTANT:
Check belt for proper routing in all mower
pulley grooves.
• Raise attachment lift lever to highest position.
FIG. 26
R
R
S
M
TO REPLACE MOTION DRIVE BELT
(See Fig. 27)
Park the tractor on level surface. En gage parking brake.
For as sis tance, there is a belt installation guide decal on
bottom side of left footrest.
BELT REMOVAL -
• Remove mower (See “TO RE MOVE MOWER” in this
section of manual).
NOTE:
Observe entire motion drive belt and position of all
belt guides and keepers.
• Remove belt from stationary idler (A) and clutching
idler (B).
• Remove belt from centerspan idler (C).
• Pull belt slack toward rear of trac tor. Remove belt
up wards from trans axle input pulley (D).
• Remove belt downward from engine pulley (E).
• Slide belt toward rear of tractor, off the steering plate
(F) and remove from tractor.
BELT INSTALLATION -
• Install new belt from tractor rear to front, over the steer-
ing plate (F) and above clutch brake pedal shaft (G).
• Pull belt toward front of tractor and roll belt onto engine
pulley (E).
• Pull belt toward rear of tractor. Carefully work belt down
around transaxle input pulley (D). Be sure belt is inside
the belt keeper.
• Install belt on centerspan idler (C).
• Install belt through stationary idler (A) and clutch ing
idler (B).
• Make sure belt is in all pulley grooves and in side all
belt guides and keep ers.
• Install mower (See “TO IN STALL MOWER” in this sec-
tion of manual).
FIG. 27
A
B
C
D
E
F
G
TO CHECK BRAKE
If tractor requires more than fi ve (5) feet to stop at highest
speed in high est gear on a level, dry concrete or paved
surface, then brake must be serviced.
You may also check brake by:
• Park tractor on a level, dry concrete or paved surface,
depress brake pedal all the way down and engage
parking brake.
• Place gear shift lever in neutral (N) position.
The rear wheels must lock and skid when you try to manu-
ally push the tractor forward. If the rear wheels rotate, then
the brake needs to be serviced. Contact a qualifi ed service
center.
Summary of Contents for 404378
Page 29: ...29 NOTES ...

