background image

22

STORAGE

Immediately prepare your tractor for storage at the end 

of the season or if the tractor will not be used for 30 days 

or  more.

WARNING:  Never store the trac tor with 

gas o line in the tank inside a building 

where fumes may reach an open flame 

or spark.  Allow the engine to cool before 

storing in any en clo sure.

TRACTOR

Remove mower from tractor for winter storage.  When mower 

is to be stored for a period of time, clean it thor oughly, remove 

all dirt, grease, leaves, etc.  Store in a clean, dry area.
•  Clean entire tractor (See “CLEANING” in the Main te -

nance section of this manual).

•  Inspect and replace belts, if necessary (See belt re-

 place ment instructions in the Service and Adjustments 

section of this manual).

• 

Lubricate as shown in the Maintenance section of this 

man ual.

•  Be sure that all nuts, bolts and screws are securely 

fastened.  Inspect moving parts for damage, breakage 

and wear.  Replace if necessary.

•  Touch up all rusted or chipped paint surfaces; sand 

lightly before painting.

BATTERY

•  Fully charge the battery for storage.
•  After a period of time in storage, battery may require 

recharging.

•  To help prevent corrosion and power leakage during 

long periods of storage, battery cables should be dis-

 con nect ed and battery cleaned thoroughly (see “TO 

CLEAN BATTERY AND TERMINALS” in the Mainte-

nance  sec tion of this manual).

•  After cleaning, leave cables disconnected and place 

cables where they cannot come in contact with battery 

terminals.

•  If battery is removed from tractor for storage, do not 

store battery directly on concrete or damp surfaces.

ENGINE

FUEL SYSTEM

IMPORTANT

:  IT IS IMPORTANT TO PREVENT GUM DEPOSITS 

FROM FORMING IN ES SEN TIAL FUEL SYSTEM PARTS SUCH 

AS CARBURETOR, FUEL FIL TER, FUEL HOSE, OR TANK 

DURING STORAGE.  ALSO, EXPERIENCE INDICATES THAT 

ALCOHOL BLENDED FUELS (CALLED GASOHOL OR USING 

ETHANOL OR METHANOL) CAN ATTRACT MOIS TURE WHICH 

LEADS TO SEPARATION AND FOR MA TION OF ACIDS DURING 

STOR AGE.  ACIDIC GAS CAN DAMAGE THE FUEL SYSTEM 

OF AN ENGINE WHILE IN STORAGE.

• 

Empty the fuel tank by starting the engine and let it run 

until the fuel lines and carburetor are empty.

• 

Never use engine or carburetor cleaner products in the 

fuel tank or permanent damage may occur.

•  Use fresh fuel next season.

NOTE: 

 Fuel stabilizer is an acceptable alternative in mini-

mizing the formation of fuel gum deposits during stor age.  

Add stabilizer to gasoline in fuel tank or storage container.  

Always follow the mix ratio found on stabilizer container.  

Run engine at least 10 minutes after adding stabilizer to 

allow the stabilizer to reach the carburetor.  Do not empty  

the gas tank and carburetor if using fuel stabilizer.

ENGINE OIL

Drain oil (with engine warm) and replace with clean en-

gine oil.  (See “ENGINE” in the Maintenance section of 

this man ual).

CYLINDER(S)

•  Remove spark plug(s).
•  Pour one ounce of oil through spark plug hole(s) into 

cylinder(s).

• 

Turn ignition key to “START” position for a few seconds 

to distribute oil.

•  Replace with new spark plug(s).

OTHER

•  Do not store gasoline from one season to another.
•  Replace your gasoline can if your can starts to rust.  

Rust and/or dirt in your gasoline will cause problems.

•  If possible, store your tractor indoors and cover it to 

give protection from dust and dirt.

• 

Cover your tractor with a suitable protective cover that 

does not  retain moisture.  Do not use plastic.  Plastic 

cannot breathe which allows condensation to form and 

will cause your tractor to rust.

IMPORTANT

:   NEVER COVER TRACTOR WHILE EN GINE  AND 

EXHAUST AREAS ARE STILL WARM.

Summary of Contents for 430097

Page 1: ...PROTECTION DURING OPERATION Visit our website www poulan pro com WARNING Read this Manual and follow all Warnings and Safety Instructions Failure to do so can result in serious injury IMPORTANT MANUAL Do Not Throw Away 430097 Rev 1 08 19 09 AP Printed in the U S A ...

Page 2: ...king brake stop engine and remove keys before dismounting Disengage blades when not mowing Shut off engine and wait for all parts to come to a complete stop before cleaning the machine removing the grass catcher or unclogging the discharge guard Operate machine only in daylight or good artificial light Do not operate the machine while under the influence of alcohol or drugs Watch for traffic when ...

Page 3: ...h towed equipment except at the hitch point Follow the manufacturer s recommendation for weight limits for towed equipment and towing on slopes Never allow children or others in or on towed equip ment On slopes the weight of the towed equipment may cause loss of traction and loss of control Travel slowly and allow extra distance to stop V SERVICE SAFE HANDLING OF GASOLINE To avoid personal injury ...

Page 4: ... and Stor age sections of this manual WARNING This tractor is equipped with an internal com bustion engine and should not be used on or near any unimprovedforest covered brush coveredorgrass covered land unless the engine s exhaust system is equipped with a spark arrester meeting applicable local or state laws if any If a spark arrester is used it should be maintained in effective working order by...

Page 5: ...and remove BEFORE REMOVING TRACTOR FROM SKID TO CHECK BATTERY See Fig 1 Lift seat to raised position NOTE If this battery is put into service after month and year indicated on label label is located between terminals charge battery for minimum of one hour at 6 10 amps See BATTERY in Maintenance section of this manual for charging instructions For battery and battery cable installation see RE PLACI...

Page 6: ... side to side front to rear for best cutting results Tires must be properly inflated for leveling Check mower and drive belts Be sure they are routed properly around pulleys and inside all belt keepers Check wiring See that all connections are still secure and wires are properly clamped WHILE LEARNING HOW TO USE YOUR TRACTOR PAY EXTRA ATTENTION TO THE FOLLOWING IMPORTANT ITEMS Engine oil is at pro...

Page 7: ... injury or death The safety alert symbol is used to identify safety inform ation about hazards which can result in death serious injury and or property damage DANGER indicates a hazard which if not avoided will result in death or serious injury WARNING indicates a hazard which if not avoided could result in death or serious injury CAUTION indicates a hazard which if not avoided might result in min...

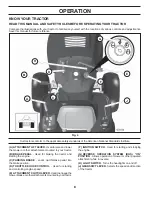
Page 8: ... mower or other attachments mounted to your tractor B BRAKE PEDAL Used for braking the tractor and starting the engine C PARKING BRAKE Locks clutch brake pedal into the brake position D THROTTLE CHOKE CONTROL Used for starting and controlling engine speed E ATTACHMENTCLUTCHLEVER Usedtoengagethe mowerblades orotherattachmentsmountedtoyourtractor F IGNITION SWITCH Used for starting and stopping the ...

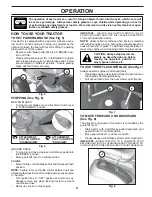
Page 9: ...ee Fig 8 The direction and speed of movement is controlled by the gearshift lever Start tractor with clutch brake pedal depressed and gearshift lever in neutral position Move gearshift lever to desired position Slowly release clutch brake pedal to start movement IMPORTANT BRING TRACTOR TO A COMPLETE STOP BEFORE SHIFTING OR CHANGING GEARS FAILURE TO DO SOWILLSHORTENTHEUSEFULLIFEOFYOURTRANSAXLE B C ...

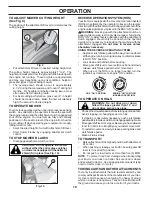
Page 10: ...es by engaging attachment clutch control TO STOP MOWER BLADES Disengage attachment clutch control CAUTION Do not operate the mower without either the entire grass catcher onmowerssoequipped orthedeflector shield S in place See Fig 10 S Fig 10 Fig 9 TO ADJUST MOWER CUTTING HEIGHT See Fig 9 The position of the attachment lift lever A determines the cutting height Put attachment lift lever in desired...

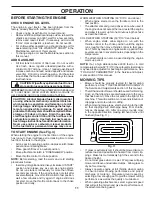
Page 11: ...osite direction making left hand turns until finished See Fig 11 Fig 11 If grass is extremely tall it should be mowed twice to reduce load and possible fire hazard from dried clip pings Make first cut relatively high the second to the desired height Do not mow grass when it is wet Wet grass will plug mower and leave undesirable clumps Allow grass to dry before mowing Always operate engine at full ...

Page 12: ...ENDATIONS The warranty on this tractor does not cover items that have beensubjectedtooperatorabuseornegligence Toreceive full value from the warranty operator must maintain tractor as instructed in this manual Some adjustments will need to be made periodically to properly maintain your tractor At least once a season check to see if you should make any of the adjustments described in the Service an...

Page 13: ...uld shut off the engine When the engine is running with the ignition switch in the ROS ON position and the attachment clutch engaged any attempt by the operator to shift into reverse should NOT shut off the engine BLADE CARE Forbestresultsmowerbladesmustbekeptsharp Replace bent or damaged blades CAUTION Useonlyareplacementbladeap proved by the manufacturer of your tractor Using a blade not approve...

Page 14: ...nwhenusedabove32 F Checkyourengine oil level more frequently to avoid possible engine damage from running low on oil Change the oil after every 50 hours of operation or at least once a year if the tractor is not used for 50 hours in one year Check the crankcase oil level before starting the engine and after each eight 8 hours of operation Tighten oil fill cap dipstick securely each time you check ...

Page 15: ...o reach IMPORTANT Make certain the tractor s discharge chute is directed AWAY from your house garage parked cars etc Remove bagger chute or mulch cover if attached 2 Make sure the attachment clutch control is in the DISENGAGED position set the parking brake and stop the engine 3 Threadthenozzleadapter packagedwithyourtractor s Operator s Manual onto the end of your garden hose 4 Pull back the lock...

Page 16: ...ect mower suspension arm A from chassis and rear lift link C from rear mower bracket D remove retainer springs and washers Go to other side of mower and disconnect the suspen sion arm and rear lift link CAUTION After rear lift links are dis connected the attachment lift lever will be spring loaded Have a tight grip on lift lever when changing position of the lever Slide mower out from under right ...

Page 17: ...peat on opposite side of tractor ATTACH REAR LIFT LINKS C Lift rear corner of mower and position slot in link assembly over pin D on rear mower bracket and secure with washer and retainer spring Repeat on opposite side of tractor Insert end of link E into hole in front mower bracket and secure with washer and retainer spring J Hook end of clutch cable spring Q into hole in idler arm R Push clutch ...

Page 18: ... nut will change mower height about 3 16 Test your adjustment by mowing some uncut grass and visually checking the appearance Readjust if necessary until you are satisfied with the results PRECISION SIDE TO SIDE ADJUSTMENT See Fig 25 With all tires properly inflated park tractor on level ground or driveway CAUTION Blades are sharp Protect your hands with gloves and or wrap blade with heavy cloth R...

Page 19: ...dler B Ensure belt is in all pulley grooves and inside all belt guides and keepers Install mower See TO INSTALL MOWER in this section of manual Fig 29 TO CHECK BRAKE If tractor requires more than five 5 feet to stop at highest speed in highest gear on a level dry concrete or paved surface then brake must be serviced You may also check brake by Park tractor on a level dry concrete or paved surface ...

Page 20: ...ect the other end of the BLACK cable D to good chassis ground away from fuel tank and battery TO REMOVE CABLES REVERSE ORDER BLACK cable first from chassis and then from the fully charged battery RED cable last from both batteries Fig 32 WEAK OR DEAD BATTERY FULLY CHARGED BATTERY TRANSAXLE GEAR SHIFT LEVER NEUTRAL ADJUSTMENT See Fig 30 The transaxle should be in neutral when the gear shift lever i...

Page 21: ...the backside of the grill Close hood INTERLOCKS AND RELAYS Loose or damaged wiring may cause your tractor to run poorly stop running or prevent it from starting Check wiring HOOD HEADLIGHT WIRE CONNECTOR Fig 35 TO REMOVE HOOD AND GRILL ASSEMBLY See Fig 35 Raise hood Unsnap headlight wire connector Stand in front of tractor Grasp hood at sides tilt toward engine and lift off of tractor To replace r...

Page 22: ...FUELSYSTEMPARTSSUCH AS CARBURETOR FUEL FILTER FUEL HOSE OR TANK DURING STORAGE ALSO EXPERIENCE INDICATES THAT ALCOHOL BLENDED FUELS CALLED GASOHOL OR USING ETHANOLORMETHANOL CANATTRACTMOISTUREWHICH LEADSTOSEPARATIONANDFORMATIONOFACIDSDURING STORAGE ACIDIC GAS CAN DAMAGE THE FUEL SYSTEM OF AN ENGINE WHILE IN STORAGE Empty the fuel tank by starting the engine and let it run until the fuel lines and ...

Page 23: ...own fuse 4 Replace fuse 5 Corroded battery terminals 5 Clean battery terminals 6 Loose or damaged wiring 6 Check all wiring 7 Faulty ignition switch 7 Check replace ignition switch 8 Faulty solenoid or starter 8 Check replace solenoid or starter 9 Faulty operator presence switch es 9 Contact an authorized service center department Engine clicks but will not start 1 Weak or dead battery 1 Recharge ...

Page 24: ... Replace blade Tighten blade bolt 7 Buildup of grass leaves and trash under mower 7 Clean underside of mower housing 8 Mower drive belt worn 8 Replace mower drive belt 9 Blades improperly installed 9 Reinstall blades sharp edge down 10 Improper blades used 10 Replace with blades listed in parts manual 11 Cloggedmowerdeckventholesfrombuildup of grass leaves and trash around mandrels 11 Clean around...

Page 25: ...25 SERVICE NOTES ...

Page 26: ...26 SERVICE NOTES ...

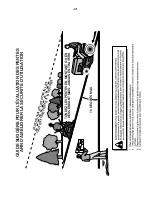
Page 27: ... never across the face Do not mow slopes greater than 15 degrees Make turns gradually to prevent tipping or loss of control Exercise extreme caution when changing direction on slopes 1 Fold this page along dotted line indicated above 2 Hold page before you so that its left edge is vertically parallel to a tree trunk or other upright structure 3 Sight across the fold in the direction of hill slope ...

Page 28: ...s used for rental or commercial purposes is limited to 90 days from the date of original purchase 5 This Warranty applies only to products which have been properly assembled adjusted operated and maintained in ac cordance with the instructions furnished This Warranty does not apply to any product which has been subjected to altera tion misuse abuse improper assembly or installation delivery damage...

Page 29: ...itée à quatre vingt dix 90 jours à compter de la date d achat initiale 5 Cette garantie ne s applique qu aux produits correctement montés réglés utilisés et entretenus conformément aux ins tructions données dans la documentation appropriée Cette garantie ne s applique pas aux produits qui ont été modifiés utilisés incorrectement abusés mal assemblés mal installés ou avariés lors de la livraison ou...

Page 30: ... DES PENTES AFIN D AMÉLIORER LA SÉCURITÉ D UTILISATION TONDEZ LES PENTES EN MONTANT OU EN DESCENDANT MAIS JAMAIS EN TRAVERS 15 DEGRÉS MAX P L I E Z S U I V A N T L E S P O I N T I L L É S C E C I E S T U N E P E N T E A 1 5 D E G R É S ...

Page 31: ...26 REMARQUES D ENTRETIEN ...

Page 32: ...e boulon de lame 7 II y a une accumulation d herbe de feuilles etde débris sous la tondeuse 7 Nettoyez dessous du boîtier de tondeuse 8 La courroie d entraînement de tondeuse est usée 8 Remplacez la courroie d entraînement de tondeuse 9 Les lames n ont pas été correctement montées 9 Réinstallez les lames avec le bord tranchant vers le bas 10 Les mauvaises lames ont été montées 10 Remplacez les lam...

Page 33: ...terie 6 Le câblage est lâche ou endommagé 6 Vérifiez tout le câblage 7 Le contacteur d allumage est défectueux 7 Vérifiez remplacez le contacteur d allumage 8 Le solénoïde ou le démarreur est défectueux 8 Vérifiez remplacez le solénoïde ou le démarreur 9 L interrupteur qui détecte la présence du conduc teur est défectueux 9 Contactez un centre d entretien autorisé II y a un déclic mais le moteur n...

Page 34: ...23 REMARQUES D ENTRETIEN ...

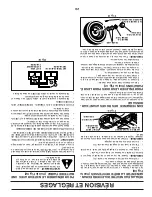
Page 35: ...UYAU D ESSENCE OU LE RÉSERVOIR D ESSENCE PENDANT L ENTREPOSAGE L EXPÉRIENCE DÉMONTRE QUE LES CARBURANTS QUI SONT MÉLANGÉS AVEC DE L ALCOOL ÉTHANOL OU MÉTHANOL ET PARFOIS APPELÉS GASOHOL PEUVENT ATTIRER L HUMIDITÉ QUI CAUSE LA SÉPARATION ET LA FORMATION D ACIDE PENDANT L ENTREPOSAGE L ESSENCE ACIDE PEUT AVARIER LE SYSTÈME DE CARBURANT DU MOTEUR PENDANT L ENTREPOSAGE Vidangez le réservoir d essence ...

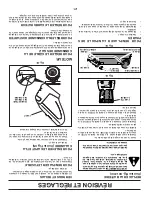
Page 36: ...Serrez à fond 02778 CAPOT CONNECTEUR DES CÂBLES DES PHARES Fig 35 POUR ENLEVER LE CAPOT ET LA CALANDRE Voir la Fig 35 Soulevez le capot Débranchez le connecteur des câbles des phares Placez vous au devant le tracteur Empoignez le capot et les pan neaux latéraux inclinez le un peu vers le moteur et sou le vez le du tracteur Pour le réinstaller inversez les étapes ci dessus MOTEUR POUR RÉGLER LE CÂB...

Page 37: ... corrosion du pneu POUR DÉMARRER LE MOTEUR AVEC UNE BAT TE RIE FAIBLE Voir la Fig 32 AVERTISSEMENT Les batteries au plomb et à l aci de produisent des gaz explosifs Gar dez les étin cel les les flammes les ci ga ret tes etc loin des batteries Portez toujours des lu net tes protectrices lorsque vous êtes pré d une bat te rie Si votre batterie est trop faible pour démarrer le moteur elle devrait êtr...

Page 38: ...en place dans les rainures des poulies ainsi que les guides et les dispositifs de retenue Installez la tondeuse voir POUR INSTALLER LA TON DEUSE dans la présente section du manuel Fig 30 POUR VÉRIFIER LES FREINS À vitesse normale et sur une surface de niveau en ciment ou pavée si plus de 5 pieds 1 5 mètre sont nécessaires pour ar rêter le tracteur vous devez faire vérifier les freins Vous pouvez é...

Page 39: ...esserrez le contre écrou A d abord A A A 02948 Tournez l écrou à la gauche pour baisser la tondeuse Tournez l écrou à la droite pour soulever la tondeuse POUR AJUSTER LE NIVEAU LA TONDEUSE Assurez vous que les pneus soient gonflés jusqu à la pression en PSI indiquée sur ceux ci S ils sont trop ou pas assez gonflés ceci peut affecter l apparence de votre pelouse et vous faire croire que votre tonde...

Page 40: ...C Soulevez le coin arrière de la tondeuse et positionnez la rainure du bras sur la tige D du support arrière de la tondeuse et fixez fermement à l aide d une rondelle et d un ressort arrêtoir Répétez de l autre côté du tracteur FIXEZ LA BIELLE AVANT E Commencez à la gauche du tracteur Insérez l embout de l assemblage de la bielle dans l orifice avant du support de suspension avant du tracteur F In...

Page 41: ...ssort Tenez fermement le levier le levage abaissez le lentement et enclenchez le à sa position la plus basse REMARQUE Assurez vous que les bras de suspension laté raux de la tondeuse A pointent vers l avant avant de glisser la tondeuse sous le tracteur Glisser la tondeuse sous le tracteur jusqu à ce qu elle soit au centre de celui ci POUR ENLEVER LA TONDEUSE Voir Fig 18 Placez l embrayage d accroc...

Page 42: ... le moteur Fermez le robinet d eau 9 Tirez sur la collerette de blocage de l adaptateur de la buse pour dégager l adaptateur du raccord de lavage de la buse de lavage 10 Conduisez le tracteur vers un endroit sec de préférence bétonné ou pavé Déplacez vous le contrôle d embrayage d accessoire à la position EMBRAYÉE pour éliminer l excès d eau et permettre au tracteur de sécher avant de le remiser A...

Page 43: ...i ca tions du Produit de ce manuel Fig 15 Fig 14 00 66 7 BRIDE DE SERRAGE BRIDE DE SERRAGE FILTRE D ESSENCE FILTRE D ESSENCE INSTALLÉ EN LIGNE Voir La Fig 15 Le filtre d essence devrait être remplacé au moins chaque saison Si le filtre d essence est bouché et obstrue l écoulement d es sen ce au carburateur il faut le remplacer Quand le moteur est froid enlevez le filtre et bouchez les tronçons de ...

Page 44: ... PAS ENTRETIEN DES LAMES Pour obtenir les meilleurs résultats les lames de tondeuse doi vent toujours être tranchantes Remplacez les lames cour bées ou endommagées LAME MANDRIN BOULON DE LAME TROU DU CENTRE ÉTOILE ENLEVER LA LAME Voir la Fig 13 Rellvez la tondeuse le plus haut possible pour avoir aux lames REMARQUE Protégez vos mains avec des gants et ou en ve lop pez la lame dans un linge épais E...

Page 45: ...iez l intégrité des systèmes de fixation Vérifiez le système de frein Vérifiez la pression des pneus Vérifiez le système de présence d opérateur et le système del ROS Vérifiez l intégrité des systèmes de fixation Affilez Remplacez les lames de tondeuse Tableau de lubrification Vérifiez le niveau de batterie Nettoyez la batterie et les bornes Vérifiez le niveau d huile du moteur Remplacez l huile d...

Page 46: ... correct Choisissez une vitesse suffisamment basse qui donne le meilleur rendement et la meilleure coupe Quand vous utilisez les accessoires choisissez toujours une vitesse qui convient au terrain et à l ac ces soi re utilisé AVANT DE DÉMARRER LE MOTEUR VÉRIFIER LE NIVEAU D HUILE DU MOTEUR Ce moteur a été rempli à l usine avec l huile d été avant l ex pé di tion Stationnez le tracteur sur un terra...

Page 47: ...ETTES ET AUTRES ACCESSOIRES Remorquez seulement les accessoires recommandés dans les spé ci fi ca tions du fabricant de votre trac teur Faites preure de ju gement lorsque vous remorquez un accessorie Il est dan ge reux de re mor quer des char ge ments trop lourds dans une pente Les pneus peu vent perdre de l ad hé ren ce avec le terrain et vous faire perdre la maîrise de votre tracteur FONCTIONNEM...

Page 48: ... Démarrez le tracteur avec la pédale de frein embrayage baissée et le levier de changement de vitesse à la position point mort N Déplacez le levier de changement de vitesse à la position désirée Relâchez lentement la pédale de frein embrayage pour com men cer le déplacement IMPORTANT Assurez vous que vous arrêtiez complètement le tracteur avant de changer de vitesse Si vous ne le faites pas la dur...

Page 49: ...yer la transmis sion d arrêter le tracteur et de démarrer le moteur C LEVIER DU FREIN DE STATIONNEMENT bloque la pédale de frein embrayage en position de frein D COMMANDE DES GAZ ÉTRANGLEUR permet de dé marrer le mo teur et de commander la vitesse de moteur E LE LEVIER D EMBRAYAGE D ATTACHEMENT est uti li sé pour engager les lames de tondeuse ou les autres ac ces soi res montés sur le tracteur F C...

Page 50: ... est utilisé pour identifier les informations de sécurité à propos des risques qui peuvent avoir pour résultats la mort de sérieuses blessures et ou endommager votre propriété DANGER indique un risque qui s il n est pas évité aura comme conséquence la mort ou des blessures sérieuses AVERTISSEMENT indique un risque qui s il n est pas évité pourrait avoir comme conséquence la mort ou des blessures s...

Page 51: ... l ex pé di tion La pression de pneu correcte est importante pour les meilleurs résultats de tonte Réduisez la pression de pneu à la pression montrée dans la côté de la pneu VÉRIFIER SI LA TONDEUSE EST DE NIVEAU Pour les meilleurs résultats de tonte le boîtier de tondeuse doit être correctement nivelé Référez vous à la section POUR NI VELER LE BOÎTIER DE TONDEUSE dans la section Entretien et Ré gl...

Page 52: ...nneaux situés à chaque bout et étendre à plat les panneaux des côtés Vérifiez s il y a des pièces détachées et conservey les AVANT RETIRER LE TRACTEUR DE PALETTE Fig 1 ÉTIQUETTE VÉRIFIER LA BATTERIE Voir la Fig 1 Levez le siege à la position elevée REMARQUE Si cette batterie est mise en service après le mois ou l année indiquée sur l étiquette Étiquette localisée entre les bor nes chargez la batte...

Page 53: ...il survient d un problème que vous ne pouvez pas ré sou dre con tac tez le centre d entretien autorisé le plus proche Vous y trouverez des techniciens qualifiés équipés de outils ap pro priés pour l entretien et la réparation de ce tracteur Veuillez lire et conserver ce manuel Les instructions qu il con tient vous permettront de monter et d entretenir cor rec te ment votre tracteur Observez toujou...

Page 54: ...squ à la fin de l opération de remplissage N utilisez pas de dispositif de verrouillage de la buse ouverte Si du carburant tombe sur vos vêtements changez les immédiatement Ne faites jamais déborder le réservoir Remettez le capuchon de gaz en place et serrez solidement ENTRETIEN GÉNÉRAL Ne faites jamais fonctionner la machine dans un endroit clos Tous les écrous et les boulons doivent être bien se...

Page 55: ...avant de nettoyer la machine ou d enlever le ramasse herbe ou de libérer la protection de l évacuation Ne faites marcher la machine que le jour ou à la lumière artificielle Ne faites pas marcher la machine si vous être sous l influence de l alcool ou de drogues Faites attention à la circulation si vous opérez à proximité d une route ou si vous la traversez Faites très attention lorsque vous charge...

Page 56: ...tre site web www poulan pro com AVERTISSEMENT Lisez soigneusement le man uel suivez tous les aver tis se ments et les in struc tions de sécurité Les bles sures sérieuses peuvent en résulter si vous ne lisez pas ces aver tis se ments et in struc tions de sécurité MANUEL IMPORTANT NE JETEZ PAS 430097 Rev 1 08 19 09 AP Imprimé aux É U ...

Reviews: