background image

11

S

If the brake is already activated, it is

disengaged by pulling the front hand guard

back toward the front handle as far as

possible.

S

When cutting with the saw, the chain brake

must be disengaged.

Engaged

Disengaged

Braking function control

CAUTION:

The chain brake must be

checked several times daily. The engine

must be running when performing this proce-

dure. This is the only instance when the saw

should be placed on the ground with the en-

gine running.

Place the saw on firm ground. Grip the rear

handle with your right hand and the front han-

dle with your left hand. Apply full throttle by

fully depressing the throttle trigger. Activate

the chain brake by turning your left wrist

against the hand guard without releasing

your grip around the front handle. The chain

should stop immediately.

Inertia activating function control

WARNING:

When performing the

following procedure, the engine must be

turned off.

Grip the rear handle with your right hand and

the front handle with your left hand. Hold the

chain saw approximately 14

(35 cm) above

a stump or other wooden surface. Release

your grip on the front handle and use the

weight of the saw to let the tip of the guide bar

fall forward and contact the stump. When the

tip of the bar hits the stump, the brake should

activate.

OPERATING TIPS

S

Check chain tension before first use and

after 1 minute of operation. See CHAIN

TENSION in the ASSEMBLY section.

S

Cut wood only. Do not cut metal, plastics,

masonry, non-wood building materials, etc.

S

Stop the saw if the chain strikes a foreign

object. Inspect the saw and repair or re-

place parts as necessary.

S

Keep the chain out of dirt and sand. Even a

small amount of dirt will quickly dull a chain

and thus increase the possibility of kickback.

S

Practice cutting a few small logs using the

following techniques to get the “feel” of us-

ing your saw before you begin a major

sawing operation.

S

Squeeze the throttle trigger and allow the

engine to reach full speed before cutting.

S

Begin cutting with the saw frame

against the log.

S

Keep the engine at full speed the entire

time you are cutting.

S

Allow the chain to cut for you. Exert only

light downward pressure. If you force

the cut, damage to the bar, chain, or en-

gine can result.

S

Release the throttle trigger as soon as

the cut is completed, allowing the en-

gine to idle. If you run the saw at full

throttle without a cutting load, unneces-

sary wear can occur to the chain, bar,

and engine.

It is recommended that

the engine not be operated for lon-

ger than 30 seconds at full throttle.

S

To avoid losing control when cut is com-

plete, do not put pressure on saw at end

of cut.

S

Stop the engine before setting the saw

down after cutting.

TREE FELLING TECHNIQUES

WARNING:

Check for broken or

dead branches which can fall while cutting

causing serious injury. Do not cut near build-

ings or electrical wires if you do not know the

direction of tree fall, nor cut at night since you

will not be ale to see well, nor during bad

weather such as rain, snow, or strong winds,

etc. If the tree makes contact with any utility

line, the utility company should be notified im-

mediately.

S

Carefully plan your sawing operation in ad-

vance.

S

Clear the work area. You need a clear area

all around the tree so you can have secure

footing.

S

The chain saw operator should keep on

the uphill side of the terrain as the tree is

likely to roll or slide downhill after it is felled.

S

Study the natural conditions that can cause

the tree to fall in a particular direction.

Natural conditions that can cause a tree to

fall in a particular direction include:

S

The wind direction and speed.

S

The lean of the tree. The lean of a tree

might not be apparent due to uneven or

sloping terrain. Use a plumb or level to de-

termine the direction of tree lean.

S

Weight and branches on one side.

S

Surrounding trees and obstacles.

Look for decay and rot. If the trunk is rotted,

it can snap and fall toward the operator.

Check for broken or dead branches which

can fall on you while cutting.

Make sure there is enough room for the tree to

fall. Maintain a distance of

2-1/2

tree lengths

from the nearest person or other objects. En-

gine noise can drown out a warning call.

Remove dirt, stones, loose bark, nails, sta-

ples, and wire from the tree where cuts are to

be made.

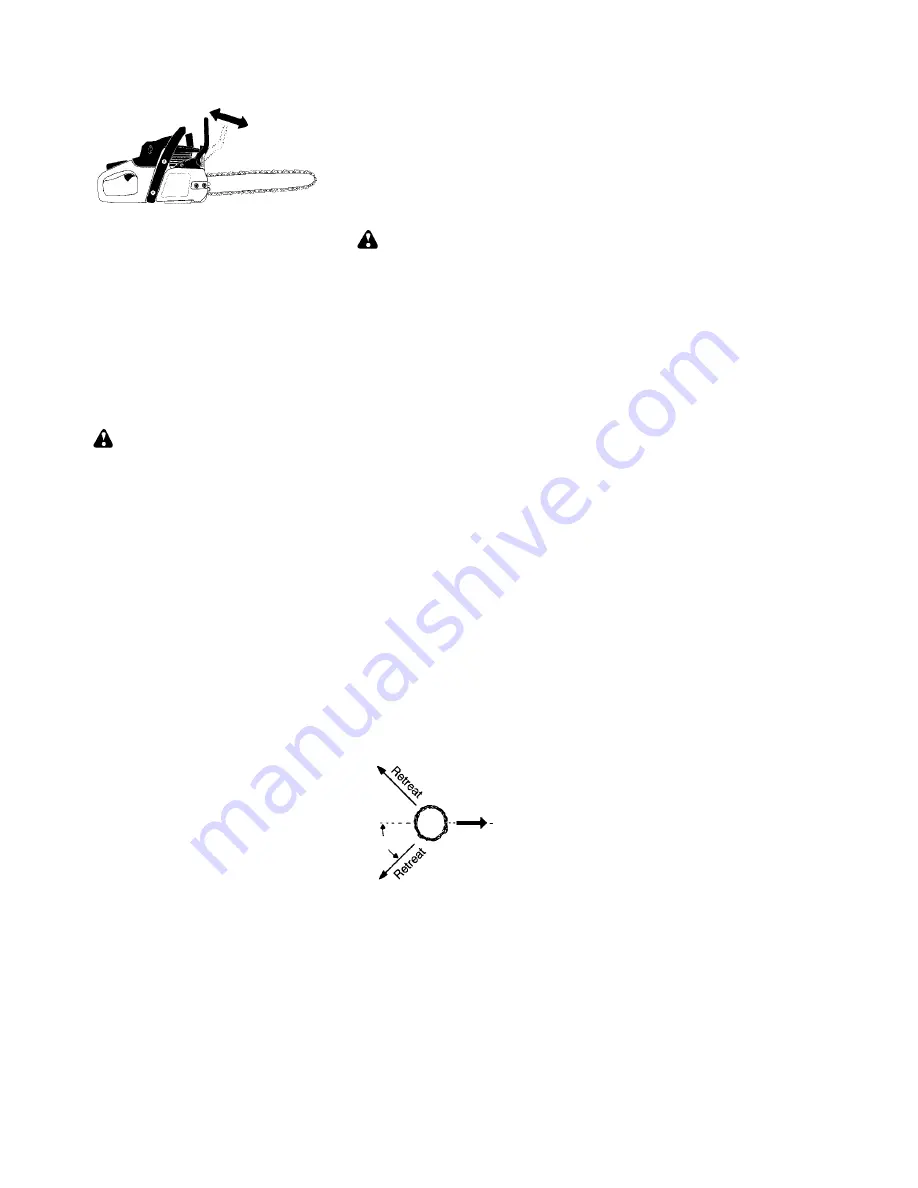
Plan a clear retreat path to the rear and diag-

onal to the line of fall.

Direction of Fall

45

_

Plan a clear retreat path

Summary of Contents for 545047535

Page 1: ...c Instruction Manual Manual de Instrucciones Manuel d Instructions WARNING Read and follow all Safety Rules and Operating Instructions before using this product Failure to do so can result in serious injury ADVERTENCIA Lea el manual de instrucciones y siga todas las advertencias e en strucciones de seguridad El no hacerlo puede resultar en lesiones graves AVERTISSEMENT Lire le manuel d instruction...

Page 2: ...ast idle lever out to the full extent to the FULL CHOKE posi tion Push the choke fast idle lever in to the HALF CHOKE position Starting Reminder SAFETY RULES WARNING Always disconnect spark plug wire and place wire where it can not contact spark plug to prevent accidental starting when setting up transporting ad justing or making repairs except carburetor adjustments Because a chain saw is a high ...

Page 3: ...ur body and the guide bar and chain to the rear preferably covered with a scabbard MAINTAIN YOUR SAW IN GOOD WORKING ORDER S Have all chain saw service performed by a qualified service dealer with the exception of the items listed in the maintenance sec tionofthis manual Forexample ifimprop er tools are used to remove or hold the fly wheelwhen servicingthe clutch structural damage to the flywheel ...

Page 4: ... chain sharp and properly tensioned A loose or dull chain can in crease the chance of kickback occurring Follow manufacturer s chain sharpening and maintenance instructions Check ten sion at regular intervals with the engine stopped never with the engine running Make sure the bar nuts are securely tight ened after tensioning the chain S Begin and continue cutting at full speed If the chain is movi...

Page 5: ... be caused by allowing contact of the bar tip in the danger zone with any hard object Kickback can also be caused by pinching the saw chain along the top of the guide bar This action may push the guide bar rapidly back toward the op erator Either of these events may cause you to lose control of the saw which could result in serious injury or even death DO NOT RELY UPON ANY OF THE DEVICES BUILT INT...

Page 6: ...tingscreen If you operate a chain saw in a state or locale where such regulations exist you are legally responsible for maintaining the operating condition of these parts Failure to do so is a violation of the law Refer to the SERVICE section for maintenance of the spark arresting screen Failureto follow all Safety Rules andPrecau tions can result in serious injury If situations occur which are no...

Page 7: ...and back ward as the screw is turned Clutch Cover Lower Hole Guide Bar Adjusting Pin 12 Install bar nuts and finger tighten only Once the chain is tensioned you will need to tighten bar nuts CHAIN TENSION Including units with chain already installed WARNING Wear protective gloves when handlingchain The chainis sharpand can cut you even when it is not moving NOTE When adjusting chain tension make s...

Page 8: ...e WARNING If the saw is operated with a loose chain the chain could jump off the guide bar and result in serious injury OPERATION KNOW YOUR CHAIN SAW READ THIS INSTRUCTION MANUAL AND SAFETY RULES BEFORE OPERATING YOUR CHAIN SAW Compare the illustrations with your unit to familiarize yourself with the location of the various controls and adjustments Save this manual for future reference Chain Adjus...

Page 9: ...ontents of this con tainer into 1 gallon 4 liters of gasoline to achieve the proper fuel mixture DO NOTUSE automotive or marine oil These oils will causeengine damage Whenmixing fuelfol low the instructions printed on the container Always read andfollow thesafety rules listed under HANDLE FUEL WITH CAUTION BAR AND CHAIN LUBRICATION The bar and chain require continuous lubri cation Lubrication is p...

Page 10: ...en squeeze and re lease the throttle trigger to allow engine to return to idle speed STARTING A WARM ENGINE 1 Move ON STOP switch to the ON posi tion 2 Slowly press primer bulb 6 times 3 Pull the choke fast idle lever out to the FULL CHOKE position to set the fast idle then push the lever in to the HALF CHOKE position 4 Pull the starter rope sharply with your right hand until the engine starts 5 S...

Page 11: ...ing S Allow thechaintocutfor you Exertonly light downward pressure If you force the cut damage to the bar chain oren gine can result S Release the throttle trigger as soon as the cut is completed allowing the en gine to idle If you run the saw at full throttle without a cutting load unneces sary wear can occur to the chain bar and engine It is recommended that the engine not be operated for lon ge...

Page 12: ...O NOT cut down a partially fallen tree with your saw Be extremely cautious with partially fallen trees that may be poorly supported When a tree doesn t fall com pletely setthesaw asideandpull downthe tree with a cable winch block and tackle or tractor CUTTING A FALLEN TREE BUCKING Bucking is the term used for cutting a fallen tree to the desired log size WARNING Do not stand on the log being cut A...

Page 13: ...ult in serious injury WARNING Neverclimb intoa treeto limb or prune Do not stand on ladders plat forms a log or inany positionwhich cancause you to lose your balance or control of the saw IMPORTANT POINTS S Work slowly keeping both hands firmly gripped on the saw Maintain secure footing and balance S Watch out for springpoles Springpoles are small size limbs which can catch the saw chain and whipt...

Page 14: ...s not cover items that have been subjected to operator abuse or negligence To receive full value from the warranty the operator must main tain unit as instructed in this manual Various adjustments will need to be made periodical ly to properly maintain your unit S Once a year replace the spark plug air filter and check guide bar and chain for wear A new spark plug and air filter assures proper air...

Page 15: ...mful emissions Always clean your air filter after 10 tanks of fuel or 5 hours of operation whichever comes first Clean more frequently in dusty conditions A used air filter can never be completely cleaned It is advisable to replace your air fil ter with a new one after every 50 hours ofop eration or annually whichever comes first 1 Loosen 3 screws on cylinder cover 2 Remove cylinder cover 3 Remove...

Page 16: ...ut chain movement idle too fast or stalling idle too slow The idle speed screw is located in the area above the primer bulb and is labeled T S Turn idle screw T clockwise to increase engine speed S Turn idle screw T counterclockwise to decrease engine speed If you require further assistance or are unsure about performing this procedure contact your authorized service dealer or call our customer as...

Page 17: ... ON 2 See Difficult Starting in Operation Section 3 Fill tank with correct fuel mixture 4 Install new spark plug 5 Check for dirty fuel filter replace Check for kinked or split fuel line repair or replace Engine will not idle properly 1 Idle speed requires adjustment 2 Carburetor requires adjustment 1 See Carburetor Adjustment in the Service and Adjustments Section 2 Contact an authorized service ...

Page 18: ...TY RIGHTS AND OBLIGA TIONS The U S Environmental Protection Agency California Air Resources Board Envi ronment Canada and ELECTROLUX HOME PRODUCTS INC are pleased to explain the emissions control system warranty on your year 2005 and later small off road engine In California all small off road engines must be designed built and equipped to meet the State s stringent anti smog standards ELEC TROLUX...

Page 19: ...ranted part still under warranty WHAT IS NOT COVERED All failures caused by abuse neglect or improper maintenance are not covered ADD ON OR MODIFIED PARTS The use of add on or modified parts can be grounds for disallowing a warranty claim ELECTROLUX HOME PRODUCTS INC is not liable to cover failures of warranted parts caused by the use of add on or modified parts HOW TO FILE A CLAIM If you have any...

Reviews: