background image

-- 7 --

OPERATION

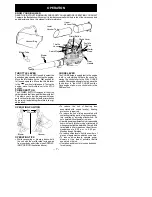
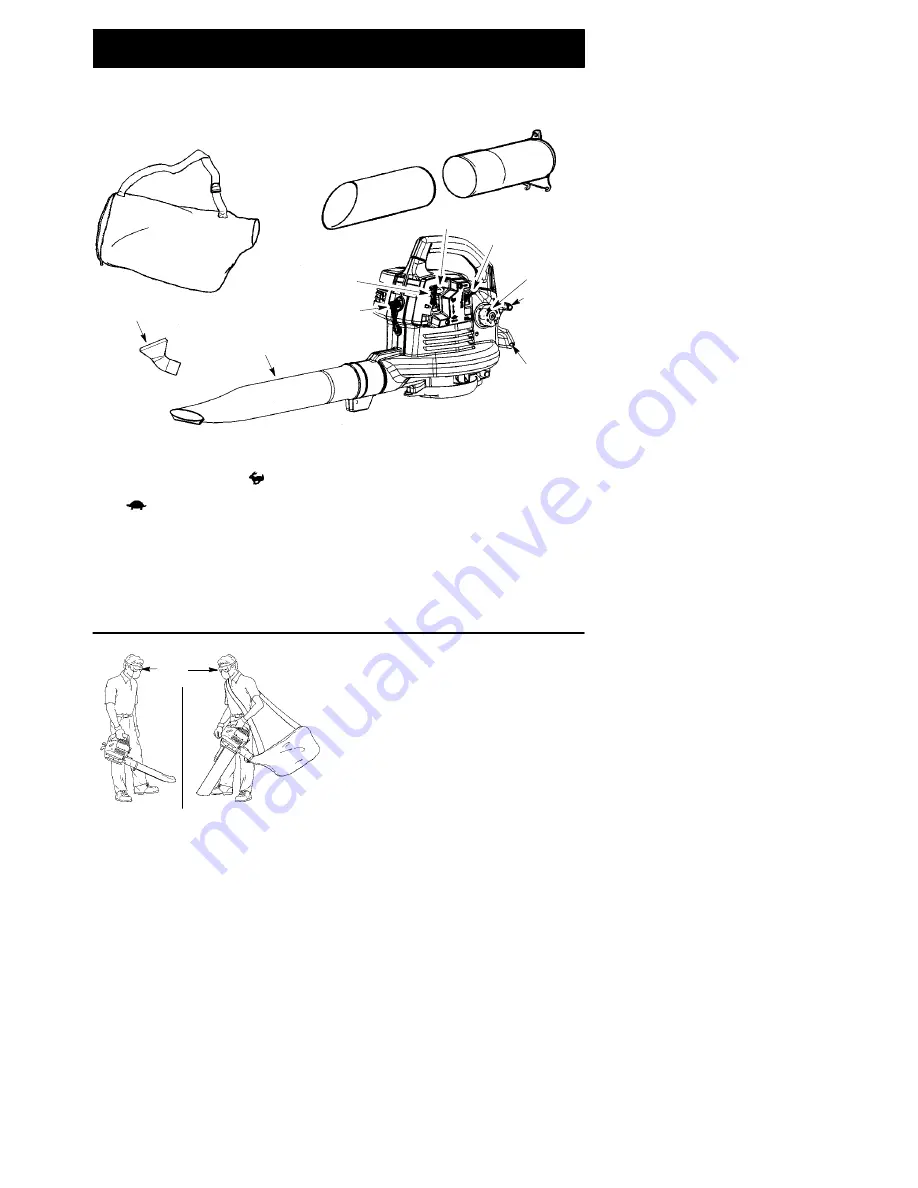
KNOW YOUR BLOWER

READ THIS INSTRUCTION MANUAL AND SAFETY RULES BEFORE OPERATING YOUR UNIT.

Compare the illustrations with your unit to familiarize yourself with the location of the various controls

and adjustments. Save this manual for future reference.

Choke Lever

Fuel Mix

Fill Cap

Starter

Rope

Throttle

Lever

Spark Plug

Blower

Tube

Primer Button

Rear

Handle

Lower

Vacuum Tube

Upper

Vacuum Tube

Vacuum Bag

Elbow Tube

THROTTLE LEVER

The THROTTLE LEVER is used to select the

desired engine speed and to stop the engine.
Move the throttle lever to the

position for

full speed operation. Move the throttle lever
to the

position for idle speed. To stop the

engine, move the throttle lever to the STOP

position.

PRIMER BUTTON

The PRIMER BUTTON removes air from the

carburetor and fuel lines and fills them with fuel.

This allows you to start the engine with fewer

pulls on the starter rope. Activate primer button

by pressing it and allowing it to return to its origi-

nal position.

CHOKE LEVER

The CHOKE helps to supply fuel to the engine

to aid in cold starting. Activate the choke by

moving the choke lever to the FULL CHOKE

position. After engine attempts to start, move the

choke lever to the HALF CHOKE position.

Once engine starts, move choke lever to the

RUN position.

OPERATING POSITION

Blower

Eye

Protection

Vacuum

OPERATING TIPS

S

While vacuuming or blowing debris, hold

the unit with the muffler side facing away

from your body and clothes (see OPERAT-

ING POSITION illustration above).

S

To reduce the risk of hearing loss

associated with sound level(s), hearing

protection is required.

S

To reduce the risk of injury associated with

contacting rotating parts, stop the engine be-

fore installing or removing attachments. Do

not operate without guard(s) in place.

S

Operate power equipment only at reasonable

hours--not early in the morning or late at night

when people might be disturbed. Comply with

times listed in local ordinances. Usual recom-

mendations are 9:00 a.m. to 5:00 p.m.,

Monday though Saturday.

S

To reduce noise levels, limit the number of

pieces of equipment used at any one time.

S

To reduce noise levels, operate power

blowers at the lowest possible throttle

speed to do the job.

S

Use rakes and brooms to loosen debris be-

fore blowing.

Summary of Contents for 545137220

Page 1: ...e seguridad El no hacerlo puede resultar en lesiones graves AVERTISSEMENT Veuillez lire le manuel d instructions et bien respecter tous les avertissements et toutes les instructions de sécurité Tout défaut de le faire pourrait entraîner des blessures graves Poulan PRO 1030 Stevens Creek Road Augusta GA 30907 545137220 11 30 06 Instruction Manual Manual de Instrucciones Manuel d Instructions Please...

Page 2: ...heavy long pants long sleeves boots and gloves Always stop unit and disconnect spark plug before cleaning or servicing WARNING The muffler is very hot during and after use Do not touch the muffler muffler guard or surrounding surfaces or allow com bustible material such as dry grass or fuel to do so Secure hair above shoulder length Do not wear jewelry loose clothing or clothing with loosing hangi...

Page 3: ...r unit as a vacuum for D Picking up dry material such as leaves grass small twigs and bits of paper D For best results during vacuum use operate your unit at high speed D Move slowly back and forth over the mate rial as you vacuum Avoid forcing the unit intoapileofdebris as this canclog theunit D Keep the vacuum tube about an inch above the ground for best results PLAN AHEAD D Always wear eye prot...

Page 4: ...xic materials D To avoid spreading fire do not use near leaf or brush fires fireplaces barbecue pits ashtrays etc D Use only for jobs explained in this manual MAINTAIN YOUR UNIT PROPERLY D Have all maintenance other than the rec ommended procedures described in the in struction manual performed by an autho rized service dealer D Disconnect spark plug before performing maintenance except for carbur...

Page 5: ...small end of the elbow tube through the small opening in the bag Small Opening Zipper Opening Elbow Tube Rib NOTE Make sureedge of the smallopening is flush against the flared area of the elbow tube and the rib on the elbow tube is on the bottom 3 Closethezipperonthe bag Make surethe zipper is closed completely 4 Remove blower tube from engine Rib Groove 5 Inserttheelbow tube intothe bloweroutlet ...

Page 6: ...g up on the upper vacuum tube with your other hand Latch Area 3 Remove the vacuum bag 4 Close the vacuum inlet cover and make sure it is latched closed 5 Reinstall the blower tube see BLOWER TUBE ASSEMBLY SHOULDER STRAP ADJUSTMENT 1 Hold the unit as shown with the muffler side facing away from your body and clothes 2 Pass the shoulder strap over your head and onto your right shoulder 3 Extend your...

Page 7: ...el to the engine to aid in cold starting Activate the choke by moving the choke lever to the FULL CHOKE position After engineattempts tostart movethe choke lever to the HALF CHOKE position Once engine starts move choke lever to the RUN position OPERATING POSITION Blower Eye Protection Vacuum OPERATING TIPS S While vacuuming or blowing debris hold the unit with the muffler side facing away from you...

Page 8: ...ainer momentarily to assure that the fuel is thoroughly mixed Always read and follow the safety rules relating to fuel before fueling your unit IMPORTANT Experience indicates that alcohol blended fuels called gasohol or using ethanol or methanol can attract moisture which leads to separation and formation of acids during storage Acidic gas can damage the fuel system ofan enginewhile instorage Toav...

Page 9: ... idle Starting could require pulling the starter rope many times depending on how badly the unit is flooded If unit still doesn t start refer to the TROUBLE SHOOTING TABLE or call 1 800 554 6723 MAINTENANCE WARNING Avoid touching muffler unless engine and muffler are cold A hot muffler can cause serious burns WARNING Stop engine and be sure the impeller blades have stopped turning be fore opening ...

Page 10: ...lter onfuel line reinstall parts Fuel Line Fuel Filter CHECK MUFFLER MOUNTING SCREWS Once each year ensure muffler mounting screws are secure and tightened properly to prevent damage Mounting Screw Holes Muffler Cover Screws 1 Loosen and remove the 2 screws from the muffler cover 2 Remove the muffler cover 3 Tighten the 2 muffler mounting screws se curely 4 Reinstall muffler cover and 2 screws Tig...

Page 11: ...dirty fuel filter replace Check for kinked or split fuel line repair or replace 5 Contact an authorized service dealer Engine will not idle properly 1 Fuel not reaching carburetor 2 Carburetor requires adjustment 3 Crankshaft seals worn 4 Compression low 1 Check for dirty fuel filter replace Check for kinked or split fuel line repair or replace 2 Contact an authorized service dealer 3 Contact an a...

Page 12: ...e of your small off road engine Your emission con trol system includes parts such as the carbure tor the ignition system and thefuel tank Califor nia only Where a warrantable condition exists Poulan PRO will repair your small off road en gine engine at no cost to you Expenses cov ered under warranty include diagnosis parts and labor MANUFACTURER S WARRANTY COVERAGE If any emissions related part on...

Page 13: ...HOWTO FILEA CLAIM If youhave any ques tions regardingyourwarranty rights andrespon sibilities youshouldcontactyour nearestautho rized service center or call Poulan PRO at 1 800 554 6723 WHERE TO GET WAR RANTY SERVICE Warranty services or re pairs shall be provided at all Poulan PRO ser vice centers Call 1 800 554 6723 MAINTE NANCE REPLACEMENT AND REPAIR OF EMISSION RELATED PARTS Any Poulan PRO app...

Reviews: