background image

10

recommended. Mix gasoline and oil at a ratio

of 40:1. A 40:1 ratio is obtained by mixing 3.2

ounces (95 ml) of oil with 1 gallon (4 liters) of

unleaded gasoline. DO NOT USE automotive

oil or marine oil. These oils will cause engine

damage. When mixing fuel, follow instructions

printed on container. Once oil is added to

gasoline, shake container momentarily to

assure that the fuel is thoroughly mixed. Always

read and follow the safety rules relating to fuel

before fueling your unit.

BAR AND CHAIN LUBRICATION

The bar and chain require lubrication. The chain

oiler provides continuous lubrication to the chain

and guide bar. Be sure to fill the bar oil tank

when you fill the fuel tank (Capacity = 4.6 fl. oz.).

Lack of oil will quickly ruin the bar and chain.

Too little oil will cause overheating shown by

smoke coming from the chain and/or discolor-

ation of the bar. The oil output is automatically

metered during operation. Always fill the bar oil

tank when you fill the fuel tank.

Genuine Poulan or Poulan PRO bar and

chain oil is recommended to protect your unit

against excessive wear from heat and fric-

tion. Poulan or Poulan PRO oil resists high

temperature thinning. If Poulan or Poulan

PRO bar and chain oil is not available, use a

good grade SAE 30 oil.

S

Never use waste oil for bar and chain

lubrication.

S

Always stop the engine before removing

the oil cap.

IMPORTANT

Experience indicates that alcohol blended

fuels (called gasohol or using ethanol or

methanol) can attract moisture which leads to

separation and formation of acids during stor-

age. Acidic gas can damage the fuel system

of an engine while in storage. To avoid engine

problems, empty the fuel system before stor-

age for 30 days or longer. Drain the gas tank,

start the engine and let it run until the fuel lines

and carburetor are empty. Use fresh fuel next

season. Never use engine or carburetor

cleaner products in the fuel tank or permanent

damage may occur. See the STORAGE sec-

tion for additional information.

HOW TO STOP YOUR UNIT

S

To stop the engine, move the ON/OFF

switch to the OFF position.

ON/OFF Switch

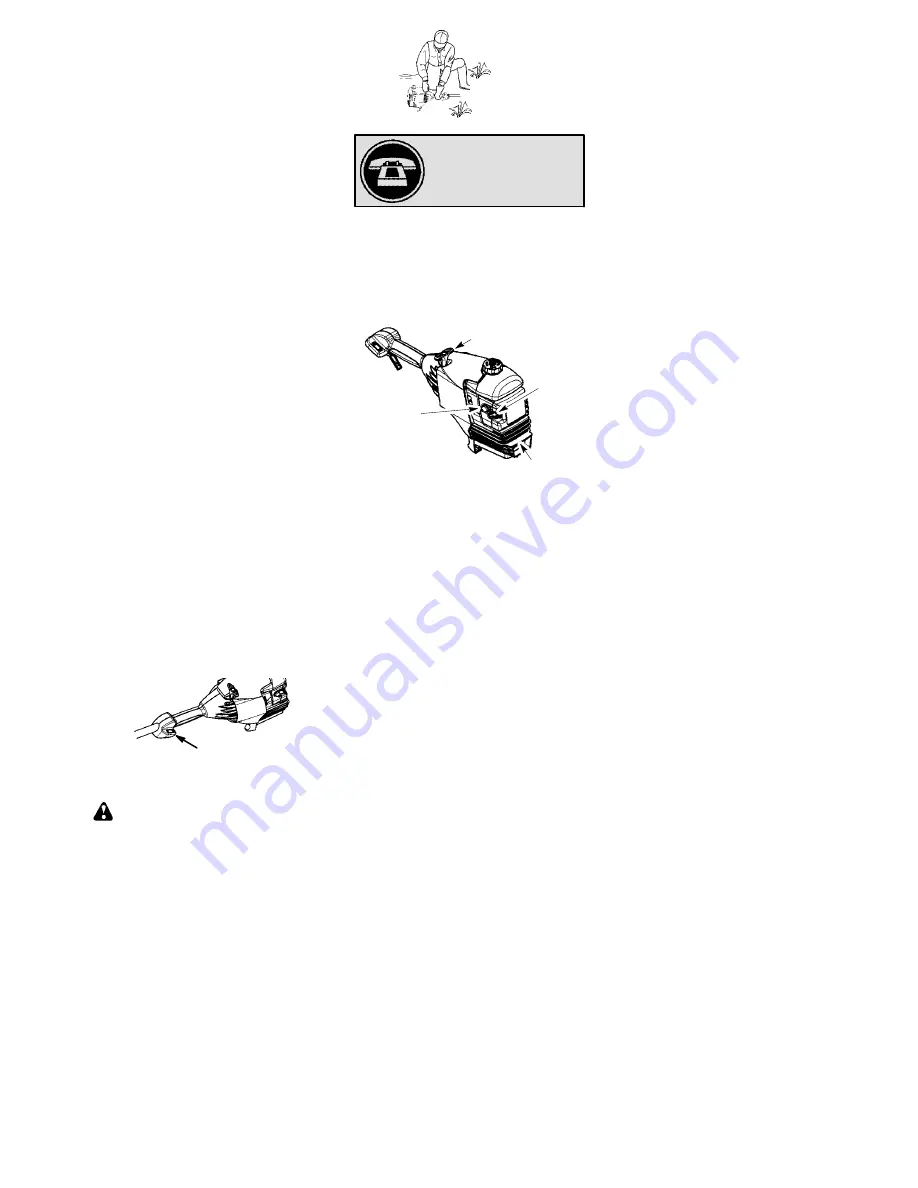
HOW TO START YOUR UNIT

WARNING:

Make sure the chain will

not make contact with any object while start-

ing the engine. Never try to start the unit when

the guide bar is in a cut. Avoid any contact

with the muffler. A hot muffler can cause seri-

ous burns.

Starting Position

HELPFUL TIP

If your engine still does not

start after following these

instructions, please call

1--800--554--6723.

STARTING A COLD ENGINE

NOTE:

DO NOT squeeze the throttle trigger

until the engine has started and runs.

1. Set unit on a flat surface.

2. Move ON/OFF switch to the ON position.

3. Slowly press the primer bulb 6 times.

4. Move the start lever to the START posi-

tion.

Start

Lever

Starter Handle

Primer Bulb

Muffler

5. Pull starter rope handle sharply until en-

gine starts and runs.

6. Allow unit to run for 5 seconds, then fully

squeeze the throttle trigger to disengage

the starting system.

STARTING A WARM ENGINE

1. Move ON/OFF switch to the ON position.

2. Squeeze and hold the throttle trigger.

Keep throttle trigger fully squeezed until

engine runs smoothly.

3. Pull starter rope sharply while squeezing

throttle trigger until engine runs.

NOTE:

Normally, the warm starting proce-

dure can be used within 5--10 minutes after

the unit is turned OFF. If the unit sits for more

than 10 minutes without being ran, it will be

necessary to start the unit by following the

steps under STARTING A COLD ENGINE or

following the starting instruction steps shown

on the unit.

STARTING A FLOODED ENGINE

Flooded engines can be started by placing

the ON/OFF switch in the ON position. Move

the start lever to the RUN position and fully

squeeze throttle trigger. Pull the starter han-

dle repeatedly while squeezing throttle trigger

until engine starts and runs. This could re-

quire pulling the starter handle many times,

depending on how badly the unit is flooded.

If the unit still doesn’t start, refer to

TROUBLESHOOTING

TABLE

or

call

1-800-554-6723.

Summary of Contents for 545137279

Page 1: ...s e instrucciones de seguridad El no hacerlo puede resultar en le siones graves AVERTISSEMENT Lire le manuel d instructions et bien respecter tous les avertisse ments et toutes les instructions de sécurité Tout défaut de le faire pourrait entraîner des blessures graves Instruction Manual Manual de Instrucciones Manuel d Instructions PP446E For Occasional Use Only Poulan PRO 1030 Stevens Creek Road...

Page 2: ...dult users who understand and can follow safety rules precautions and operating instructions found on the unit and in this manual SAFETY INFORMATION ON THE UNIT INSTRUCTION MANUAL S Wear protective gear Always use steel toed safety footwear with non slip soles snug fitting clothing heavy long pants and long sleeves heavy duty non slip gloves eye protection such as non fogging vented goggles or fac...

Page 3: ...ING ORDER S Have all service performed by a qualified service dealer with the exception of the items listed in the maintenance section of this manual S Make certain the chain stops moving when the throttle trigger is released For correction refer to CARBURETOR ADJUSTMENTS S Never modify your unit in any way S Keep the handles dry clean and free of oil or fuel mixture S Keep fuel and oil caps screw...

Page 4: ... left hand encircling and your left thumb under the assist handle Keep your right hand completely around the throttle handle whether your are right handed or left handed S Stand with your weight evenly balanced on both feet S Stand slightly to the left side of the pruner to keep your body from being in a direct line with the cutting chain KICKBACK SAFETY FEATURES The following features are include...

Page 5: ... away Stop unit immediately if ap proached WARNING Inspect the area to be trimmed before each use Remove objects rocks broken glass nails wire etc which can be thrown by or becomeentangled inline Hard objects can damage the trimmer head and be thrown causing serious injury S Use only for trimming scalping mowing and sweeping Do not use for edging pruning or hedge trimming S Cut from your right to ...

Page 6: ...e objects rocks broken glass nails wire etc which can be thrown or become entangled in the blade or trimmer line S Throw away and replace blades that are bent warped cracked broken or damaged in any other way S Install required shield properly before using the unit Use the metal shield for all metal blade use WARNING Only use brushcutter at tachments that provide a metal shield with proboscis nose...

Page 7: ...ver dis charge chute Rocks or debris could be thrown into the eyes and face and cause seri ous injury or blindness WARNING Inspect the area where the unit is to be used Remove objects that could be thrown or damage the unit Some objects may be hidden by fallen snow be alert for the possibility S Direct material discharge away from glass enclosures automobiles etc S Do not run engine at high speed ...

Page 8: ...he primary hole unless otherwise stated in the applicable attachment instruction manual Usingthe wronghole couldlead toseri ous injury or damage to the unit Locking Release Button in Primary Hole Secondary Hole For optional attachments see the AS SEMBLY section of the applicable attach ment instruction manual SHOULDER STRAP ASSEMBLY WARNING Proper shoulder strap adjustments must be made with the e...

Page 9: ...thecar buretor and fuel lines and fills them with fuel This allows you to start the engine with fewer pulls on the starter rope Activate the primer bulb by pressing it and allowing it to return to its original form START LEVER The START LEVER helps to supply fuel to the engine to aid in starting Activate the starting system by moving the start lever to the START position DO NOT squeeze the throttl...

Page 10: ...ank or permanent damage may occur See the STORAGE sec tion for additional information HOW TO STOP YOUR UNIT S To stop the engine move the ON OFF switch to the OFF position ON OFF Switch HOW TO START YOUR UNIT WARNING Make sure the chain will not make contact with any object while start ing the engine Never try to start the unitwhen the guide bar is in a cut Avoid any contact with the muffler A hot...

Page 11: ...aft Locking Release Button Attachment Guide Recess WARNING Make sure the locking release button is locked in the primary hole and the knob is securely tightened before op erating the unit All attachments are designed to be used in the primary hole unless otherwise stated in the applicable attachment instruction manual Usingthe wronghole couldlead toseri ous injury or damage to the unit Locking Rel...

Page 12: ...all size limbs or slender material S Watch out for branches immediately behind the branch being pruned If the chain hits the rear branch damage to the unit may occur S Be alert for springback Watch out for branches that are bent or under pressure Avoid being struck by the branch or the pruner when the tension in the wood fibers is released S Keep a clear work area Frequently clear branches out of ...

Page 13: ... important Chains stretchduringuse This is especially truedur ing the first few times youuse your pruner Al ways check chain tension each time you use and refuel your unit 1 Use the screwdriver end of the chain ad justment tool bar tool to move chain around guide bar to ensure kinks do not exist The chain should rotate freely Chain Adjustment Tool Guide Bar 2 Loosen bar clamp nut until it is finge...

Page 14: ...eatingorburringoftherails occurs If replacement is necessary use only the guide bar specified for your pruner in the repair parts list LUBRICATION Bar Oil Fill Cap S See GUIDE BAR AND CHAIN OIL under the OPERATION section MUFFLER AND SPARK ARREST ING SCREEN WARNING The muffler on this prod uct contains chemicals known to the State of California to cause cancer As your unit is used carbon deposits ...

Page 15: ...n CHAIN ADJUSTMENT See CHECK CHAIN TENSION in MAINTE NANCE section CARBURETOR ADJUSTMENT WARNING Keep others away when making idle speed adjustments The chain will be moving during most of this procedure Wear your protective equipment and observe all safety precautions After making adjust ments the chain must not moveat idlespeed The carburetor has been carefully set at the factory Adjustment to t...

Page 16: ...in your engine Fuel stabilizer is an acceptable alternative in minimizing the formation of fuel gum deposits during storage Add stabilizer to the gasoline in the fuel tank or fuel storage container Fol low the mix instructions found on stabilizer container Run engine at least 5 minutes after adding stabilizer HELPFUL TIP During storage of your gas oil mixture the oil will sepa rate from the gas We...

Page 17: ...der a load 1 Clean or replace air filter 2 Clean or replace plug and regap 3 Contact an authorized service dealer 4 Contact an authorized service dealer 5 Contact an authorized service dealer Engine smokes excessively 1 Choke partially on 2 Fuel mixture incorrect 3 Air filter dirty 4 Carburetor requires adjustment 1 Adjust choke 2 Empty fuel tank and refill with correct fuel mixture 3 Clean or rep...

Page 18: ... control system on your small off road engine for the periods of time listed below provided there has been no abuse neglect or improper maintenance of your small off road engine Your emission control system includes parts such as the carburetor the ignition system and the fuel tank California only Where a warrantable condition exists Poulan PRO will repair your small off road engine at no cost to ...

Page 19: ...ed parts caused by the use of add on or modified parts HOW TO FILE A CLAIM If you have any questions regarding your warranty rights and responsibilities you should contact your nearest authorized service center or callPou lan PRO at 1 800 554 6723 WHERE TO GET WARRANTY SERVICE Warranty ser vices or repairs shallbe providedat allPoulan PRO service centers Call 1 800 554 6723 MAINTENANCE RE PLACEMEN...

Reviews: