background image

15

TILLER

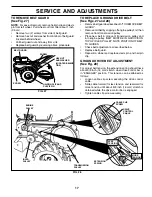
TO ADJUST HANDLE HEIGHT (See Fig. 22)

Select handle height best suited for your tilling conditions.  
Handle height will be different when tiller digs into soil.
•      First loosen handle lock lever.
•      Handle can be positioned at different settings between 

“HIGH” and “LOW” positions.

•      Retighten handle lock lever securely after adjusting.

HANDLE LOCK
LEVER

HANDLE (LOW
POSITION)

HANDLE (HIGH 
POSITION)

FIG. 22

TIRE CARE

CAUTION:  When mounting tires, un-
 less beads are seated, over in fl a tion can 
cause an explosion.

•      Maintain 20 PSI (1.4 kg/cm

2

) of tire pressure.  If tire 

pres sures are not equal, tiller will pull to one side.

•     Keep tires free of gasoline or oil which can damage 

rubber.

TO REMOVE WHEEL (See Fig. 23)

•      Place  blocks  under  trans mis sion to keep tiller from 

tip ping.

•      Remove hairpin clip and clevis pin from wheel.
•      Remove wheel and tire.
•      Repair tire and reassemble.

FIG. 23

SERVICE  AND ADJUSTMENTS

CAUTION:  Disconnect spark plug wire from spark plug and place wire where it cannot come into 
contact with plug.

CLEVIS PIN

HAIRPIN CLIP

Summary of Contents for HDR500L

Page 1: ...ration Maintenance Service and Adjustments Storage Troubleshooting Repair Parts OWNER S MANUAL MODEL NO HDR500L 5 HP 17 Inch Tiller For Parts and Service contact our authorized distributor call 1 800...

Page 2: ...to stop the unit and disengage the controls quickly Never allow children to operate the equipment Never allow adults to operate the equipment without proper instruction Keep the area of operation clea...

Page 3: ...and should not be used on or near any unimproved forest covered brush covered or grass covered land un less the engine s exhaust system is equipped with a spark arrester meeting applicable local or s...

Page 4: ...IRED FOR ASSEMBLY A socket wrench set will make assembly easier Standard wrench sizes are listed 1 Utility knife 1 Tire pressure gauge 1 Pair of pliers 1 9 16 wrench OPERATOR S POSITION See Fig 1 When...

Page 5: ...ng lock in place until handle assembly is lowered into position FIG 3 GEARCASE NOTCH HANDLE ASSEMBLY HANDLE LOCK LOOSEN HANDLE LOCK LEVER TO MOVE TIGHTEN HANDLE LOCK LEVER TO HOLD FLAT WASHER CARRIAGE...

Page 6: ...e REMOVE TILLER FROM CRATE Make sure shift lever indicator is in N position See Fig 7 Tilt tiller forward by lifting handle Separate cardboard cover from leveling shield Rotate tiller handle to the ri...

Page 7: ...TROL BAR THROTTLE CONTROL SHIFT LEVER OUTER SIDE SHIELD FIG 8 MEETS ANSI SAFETY REQUIREMENTS Our tillers conform to the safety standards of the American National Standards Institute SHIFT LEVER Used t...

Page 8: ...E HARD TO SHIFT GEARS Brieflyengagedrivecontrolbarandreleaseorrocktiller forward and backward until are able to shift gears DEPTH STAKE See Fig 10 The depth stake can be raised or lowered to allow you...

Page 9: ...RTANT BE VERY CAREFUL NOT TO ALLOW DIRT TO ENTER THE ENGINE WHEN CHECKING OR ADDING OIL OR FUEL USE CLEAN OIL AND FUEL AND STORE IN APPROVED CLEAN COVERED CONTAINERS USE CLEAN FILL FUNNELS CHECK ENGIN...

Page 10: ...to it Do not lean on handle This takes weight off the wheels and reduces traction To get through a really tough section of sod or hard ground apply upward pressure on handle or lower the depth stake...

Page 11: ...ller are secured to the tine shaft with shear pins See TINE REPLACEMENT in the Service and Adjustments section of this manual If the tiller is unusually overloaded or jammed the shear pins are designe...

Page 12: ...ine operation Check for loose fasteners LUBRICATION Keep unit well lubricated See LUBRICATION CHART MAINTENANCE SCHEDULE FILL IN DATES AS YOU COMPLETE REGULAR SERVICE Check Engine Oil Level Change Eng...

Page 13: ...oid possible engine damage from running low on oil Change the oil after every 25 hours of operation or at least once a year if the tiller is not used for 25 hours in one year Check the crankcase oil l...

Page 14: ...BLOWER HOUSING CYLINDER FINS FIG 21 COOLING SYSTEM See Fig 21 Your engine is air cooled For proper engine performance and long life keep your engine clean Clean air screen frequently using a stiff bri...

Page 15: ...RE CAUTION When mounting tires un lessbeadsareseated overinflationcan cause an explosion Maintain 20 PSI 1 4 kg cm2 of tire pressure If tire pressures are not equal tiller will pull to one side Keep t...

Page 16: ...replaced FIG 25 To maintain the superb tilling performance of this machine the tines should be checked for sharpness wear and bending particularly the tines which are next to the transmission If the...

Page 17: ...an be attained as follows Loosen cable clip screw securing the drive control cable Slide cable forward for less tension and rearward for more tension until about 5 8 inch 16 mm stretch is obtained whi...

Page 18: ...ottle lever up until it touches high speed stop and hold in this position Tighten cable clamp screw securely TO ADJUST CARBURETOR Thecarburetorhasbeenpresetatthefactoryandadjustment should not be nece...

Page 19: ...nk Start the engine and let it run until the fuel lines and carburetor are empty Never use engine or carburetor cleaner products in the fuel tank or permanent damage may occur Use fresh fuel next seas...

Page 20: ...rk plug wire loose 9 Connect and tighten spark plug wire 10 Dirty engine air screen 10 Clean engine air screen 11 Dirty clogged muffler 11 Clean replace muffler 12 Carburetor out of adjustment 12 Make...

Page 21: ...nc 19 19131611 Washer 13 32 x 1 x 11 Ga 20 109228X Lever Lock Handle 21 150217 Handle 26 159232 Cable Clutch 29 73731000 Nut Keps 10 24 Unc 31 150696 Bolt Pivot 34 145821 Bracket Clutch Cable 35 14648...

Page 22: ...327 x 0 42 x 2 09 22 74770508 Bolt Hex 5 16 24 x 1 2 23 102190X Tire 183122X624 Rim 795R Tire Valve KEY PART NO NO DESCRIPTION 24 126875X Rivet Drilled 25 4497H Clip Hairpin 26 165501X428 Guard Belt...

Page 23: ...Lock 3 8 9 73220600 Nut Hex 3 8 16 10 74760524 Bolt Hex 5 16 18 x 1 1 2 11 4497H Clip Hairpin 12 126875X Rivet Drilled 13 102190X Tire 183122X624 Rim 795R Tire Valve 15 Engine Briggs Stratton Model N...

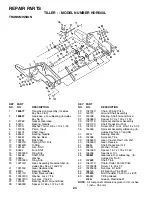
Page 24: ...75 60 6855M Fitting Grease 6066J Grease Plastilube 1 1 180677 Transmission Assembly Includes Key Nos 2 53 2 180627 Gearcase L H w Bearing Includes Key No 4 3 161963 Gasket Gearcase 4 5020J Bearing Nee...

Page 25: ...4 14 124343X Bracket Shield Tine 15 161414X428 Shield Side Outer R H 16 73900400 Nut Hex Flange 1 4 20 Unc 18 72040410 Bolt Carriage 1 4 20 x 1 1 4 Gr 5 19 102701X Grip 20 73220600 Nut Hex 3 8 16 21...

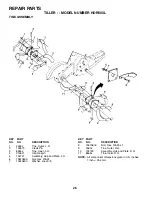
Page 26: ...Inner R H KEY PART NO NO DESCRIPTION 1 4459J Tine Outer L H 2 132673 Clevis Pin 3 6554J Tine Inner L H 4 3146R Clip Hairpin 5 132727 Assembly Hub and Plate L H 6 73610600 Nut Hex 3 8 24 7 10040600 Wa...

Page 27: ...acement 6 102180X Decal Shift Indicator 7 175643 Decal Briggs Stratton 8 171077 Decal OHV N I C 9 141906 Decal Warning Rotating Tines 10 156199 Decal Reverse 11 171078 Decal Rewind INTEK 12 162215 Dec...

Page 28: ...anty does not apply to any product which has been subjected to alteration misuse abuse improper assembly or installation delivery damage or to normal wear of the product 5 Exclusions Excluded from thi...

Reviews: