background image

Summary of Contents for PB 18542 LT

Page 1: ...8542 LT LAWN TRACTOR WARNING Read this Manual and follow all Warnings and Safety Instructions Failure to do so can result in serious injury ALWAYS WEAR EYE PROTECTION DURING OPERATION Visit our websit...

Page 2: ...off blades set parking brake stop engine and remove keys before dismounting Disengage blades when not mowing Shut off engine and wait for all parts to come to a complete stop before cleaning the machi...

Page 3: ...with a portable container rather than from a gasoline dispenser nozzle Keep the nozzle in contact with the rim of the fuel tank or container opening atall times until fueling is complete Do not use a...

Page 4: ...tain this manual The instructions will enable you to assemble and maintain your tractor properly Always observe the SAFETY RULES CUSTOMER RESPONSIBILITIES Read and observe the safety rules Follow a re...

Page 5: ...1 Large Flat Washer Steering Wheel Steering Wheel Adapter 1 Hex Bolt 5 16 18 x 4 Steering Wheel Insert Steering l Extension Shaft 1 5 16 _ Lock Washer Seat 1 Washer 17 32 x 1 3 16 x 12 Gauge 1 Knob I...

Page 6: ...l adapter from steering wheel and slide adapter onto steering shaft extension Position steering wheel so cross bars are horizontal left to right and slide inside boot and onto adapter Assemble large f...

Page 7: ...DRIVE TRACTOR OFF SKID See Op eration section for location and function of controls _ WARNING Before starting read understand and follow all instructions in the Operation section of this manual Be sur...

Page 8: ...UALITY PRODUCT PLEASE REVIEW THE FOLLOWING CHECKLIST All assembly instructions have been completed No remaining loose parts in carton Battery is properly prepared and charged Minimum 1 hour at 6 amps...

Page 9: ...ctions could result in serious injury or death The safety alert symbol is used to identify safety inform ation about hazards which can result in death serious injury and or property damage _l_ lfl_ lt...

Page 10: ...age the mower blades or other attachments mounted to your tractor ATTACHMENT LIFT LEVER Used to raise lower and adjust the mower deck or other attachments mounted to your tractor CLUTCH BRAKE PEDAL Us...

Page 11: ...ITION OTHERTHAN OFF WILL CAUSETHE BATTERY TO BE DISCHARGED DEAD NOTE Under certain conditions when tractor is standing idle with the engine running hot engine exhaust gases may cause browning of grass...

Page 12: ...ne running turn ignition key counterclockwise to ROS ON position Look down and behind before backing Move gear shift lever to reverse R position and slowly release clutch brake pedal to start movement...

Page 13: ...information Never use engine or carburetor cleaner products in the fuel tank or permanent damage may occur TO START ENGINE See Fig 4 When starting the engine for the first time or if the engine has r...

Page 14: ...mow in the opposite direction making left hand turns until finished See Fig 7 f f FIG 7 If grass is extremely tall it should be mowed twice to reduce load and possible fire hazard from dried clip ping...

Page 15: ...ver items that have been subjected to operator abuse or negligence To receive full value from the warranty operator must maintain tractor as instructed in this manual Some adjustments will need to be...

Page 16: ...any attempt by the operator to shift into reverse should shut off the engine When the engine is running with the ignition switch in the ROS ON position and the attachment clutch en gaged any attempt...

Page 17: ...to your expected operating temperature F 20 0 30 32 40 60 80 100 c _0 20 1 0 _0 10 4 TEMPERATURE RANGE ANTICIPATED BEFORE NEXT OIL CHANGE oilvEsc chart1 e FIG 10 NOTE Although multi viscosity oils 5W3...

Page 18: ...FICATIONS section of this manual IN LINE FUEL FILTER See Fig 12 The fuel filter should be replaced once each season If fuel filter becomes clogged obstructing fuel flow to carburetor replacement is re...

Page 19: ...om rear deck brackets by removing retainer springs Disconnect front links from deck by removing retainer springs Raise lift lever to raise suspension arms Slide mower out from under tractor IMPORTANT...

Page 20: ...8 to 1 2 lower than the rear when the mower is in its high est position Check adjustment on right side of tractor Measu redistance D directly in front and behind the mandrel at bottom edge of mower h...

Page 21: ...distance is still greater than five 5 feet in highest gear further maintenance is necessary Replace brake pads or contact a qualified service center WITH PARKING BRAKE ENGAGED TO REPLACE MOTION DRIVE...

Page 22: ...Repair tire and reassemble On rear wheels only align grooves in rear wheel hub and axle Insert square key Replace washers and snap retaining ring securely in axle groove Replace axle cover NOTE To se...

Page 23: ...ire connector Stand in front of tractor Grasp hood at sides tilt toward engine and lift off of tractor To replace reverse above procedure HOOD FIG 26 TERMINAL FIG 24 KEPS NUT HEX POSITIVE RED CABLE NE...

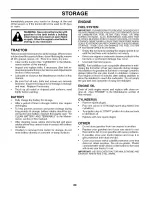
Page 24: ...SENTIAL FUEL SYSTEM PARTS SUCH AS CARBURETOR FUEL FILTER FUEL HOSE OR TANK DURING STORAGE ALSO EXPERIENCE INDICATES THAT ALCOHOL BLENDED FUELS CALLED GASOHOL OR USING ETHANOLOR METHANOL CANATTRACTMOIS...

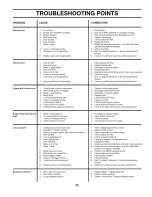
Page 25: ...fuel filter 5 Empty fuel tank and refill tank with fresh clean gasoline 6 Check all wiring 7 See To Adjust Carburetor in Service Adjustments section 8 Contact an authorized service center department...

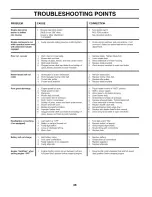
Page 26: ...es and trash around mandrels 1 Light switch is OFF 2 Bulb s or lamp s burned out 3 Faulty light switch 4 Loose or damaged wiring 5 Blown fuse 1 Bad battery cell s 2 Poor cable connections 3 Faulty reg...

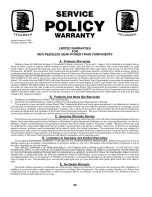
Page 27: ...for rental or commercial purposes is limited to 90 days from the date of original purchase 5 This Warranty applies only to products which have been properly assembled adjusted operated and maintained...

Page 28: ...wer Train Component and parts The cost of normal maintenance and replacement of service items which are not defective shall be paid for by the original purchaser C Securinq Warranty Service Warranty s...

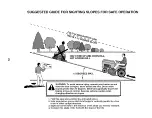
Page 29: ...s greater than 15 degrees Make turns gradually to prevent tipping or loss of control Exercise extreme caution when changing direction on slopes 1 Fold this page along dotted line indicated above 2 Hol...

Page 30: ...umber b Description of part For Techical Assistance call 1 800 829 5886 For a Parts Manual go to our website www poulan pro com support asp NOTE Electrolux Home Products provides parts and service thr...

Reviews: