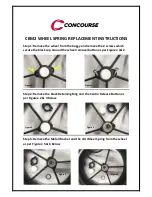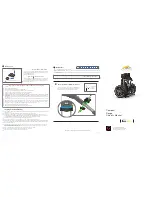

The rear wheels are assembled and released by pressing the black release clip and pushing onto the axle until the clutch is engaged.
Note: the wheels can be locked into two positions on the axle; push onto the inner groove to engage drive. The outer groove can be
used when drive is not required. To open the frame, pull the yellow release handle (1) down and unfold the front wheel so the frame is
flat. Release the cam lock lever under the handle right side (2) and then press the release button (3) and lift the handle up to open the
upper frame. Ensure the middle joint is open fully to the stop position on this joint before closing the same cam lock lever.
Thank you for purchasing the new PowaKaddy Compact C2i Trolley. We hope you enjoy your new trolley and welcome your feedback and
comments. Please read these instructions carefully. Battery care is very important, please refer to the back page of this manual for battery
care instructions.
When you receive your new PowaKaddy you will have the following:
1 x Trolley
|
1 x Lithium Battery
|
1 x Charger
|
2 x Wheels
|
1 x Instruction pack
Note: Your new Lithium or Lithium Extended battery is stored in the frame inside the trolley packaging.
Remove the battery and activate using the isolation switch located on the underside of the battery.
(See Section 2 Plug‘n’Play™ for battery removal)
1
P L U G ’
n
’ P L A Y
T M
1
2
2
3
1
2
+
-
7h
0 1
Getting Started
Front Wheel Adjustment
1
2
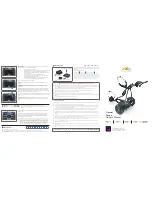
Your C2i trolley features an innovative Plug’n’Play™ battery
system including sprung terminals and a locking feature to
maintain power connection over uneven terrain. Once your
battery is charged and trolley assembled, connect your battery
as shown.
Engage the rear of the battery first.
Press the front until the battery clips into position. The
trolleys power will automatically be connected.
To remove the battery depress the latch in front of the battery
and lift the battery out.
Note: The Lithium battery can be stored within the tray for
transportation. Please ensure you de-activate the battery using
the red isolation switch located on the underside. Leaving your
battery in the ON (1) position could lead to your battery
discharging or trolley activating during transportation.
Your trolley will already be pre-set to run straight. If you find your trolley tracking
to the left or right you can re-adjust this by releasing the front wheel lever and
rotating the adjustment roller. Rotate up to make your trolley track more to the
LEFT and rotate down to track more to the RIGHT. Once you are happy the
trolley is running straight re-apply the lever to lock in position.
A
B
C
1
3
2
5
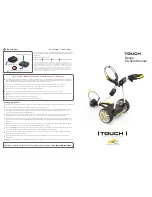
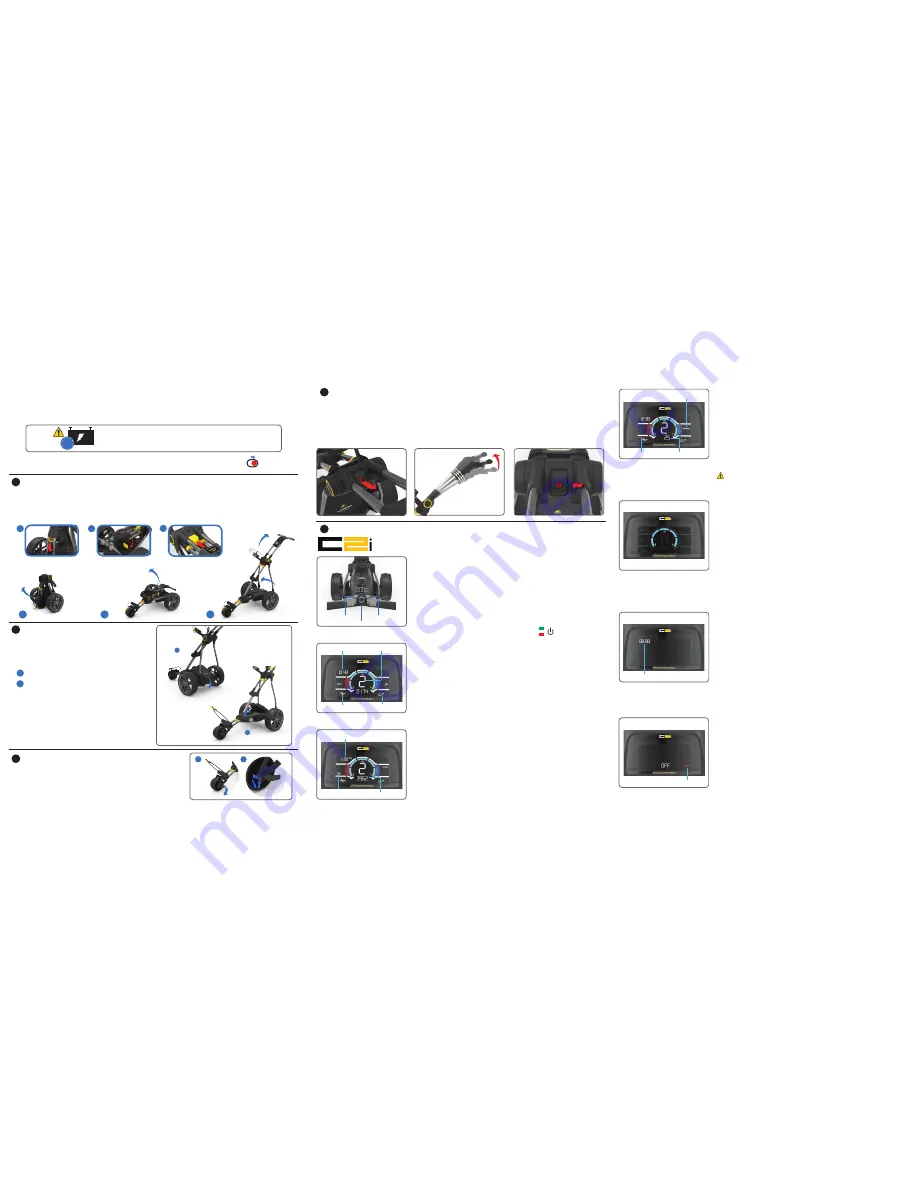
Controls Overview
4
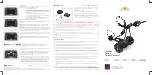
Handle Height Adjustment
The PowaKaddy C2i has a handle height adjust feature that allows you to position and lock the handle in 3 different positions depending on
your height. Once adjusted the frame will close and open to the same handle position each time so you only need to adjust once. For
convenience each trolley is supplied in the centre height position, which should be ideal for most users.
Should you need to adjust the handle height un screw the fastener in the centre of the upper joint (highlighted red) and lift the height
adjustment plate underneath shown below. There are 3 positions indicated on the upper joint and the corresponding feature on the height
adjust plate. Move the handle and upper frame up or down to the desired position and tighten the screw again to secure at the new height.
Central Control Knob
Left Function Button
Right Function Button
Clock
Power Indicator
USB
Speed Indicator
Trip Time Indicator
Total / Trip
Distance Indicator
Distance
Yards / Metres
ADF Indicator
ADF Distance
Battery Gauge
Clock
Competition Mode
Distance
Power Indicator:
Displays whether power is being applied to
the drive system. (green/red)
ON
OFF
Digital Speed Setting:
Rotate the central control knob to adjust the speed of the trolley from 0 - 9 when
the motor is powered on. Press central control knob to pause and resume your
selected speed.
The all new C2i features a bright colour multi-function display packed
with additional features to enhance your game.
Left Function Button
- Press to toggle between Time/Trip Time and Total Distance /Trip
•
Total:
This will show the total distance covered by the trolley. This cannot be reset.
•
Trip Time:
This displays the “on” time of the trolley. This will reset when the battery is
disconnected.
Right Function Button
- Press to toggle between Yards and Meters
USB Charging Port:
Located on the underside of the handle. Open the hatch to charge
GPS & mobile devices. The output is rated to 5v/500mA suitable for most USB devices*
*USB output voltage 5v/500mA compatible with most USB portable devices, please check device manufacturers instructions
before use. Powakaddy International Ltd accepts no liability for loss of data or damage from using the charging port with
incompatible device.
•
Trip:
This displays the total trip distance travelled during the round. This will reset when
the battery is disconnected.
Automatic Distance Function (ADF):
The ADF function is a convenient way of sending your trolley a set distance. (15, 30, 45 yards
or meters) For example when you are approaching a green you can send the trolley towards
the next tee if the route allows. Please note it is not recommended to send your trolley
unattended over steep or rough terrain. To activate when trolley is in pause mode:
1: Press and hold the central control knob until ‘ADF’ appears on the display
2: Rotate the control knob to select the distance required between 15 to 45 Yrds/Metres.
3: To start the function press the control knob.
4: To cancel rotate the Central Control Knob to “00” and select by pressing the control knob.
WARNING!
Before using the ADF function please ensure the route is clear from any
obstacles. To interrupt the distance function when in operation press the on/off
button to stop the motor function.
**Please note ADF distance are approximate based on flat level terrain conditions using a fully charged battery. The overall
distance may be affected by terrain conditions, obstacles or incline, battery power and weight of golf bag.
The battery gauge on the C2i is similar to a car fuel gauge - F (full), ½ (half full) & E
(empty). There are five blue bars and depending on the charge state of your battery will
determine how many bars illuminate. When a fully charged battery is connected to the
trolley all five blue bars will illuminate.
As you progress through your round the blue bars will extinguish from full to empty.
When the fifth blue bar is extinguished it indicates that the battery is flat. When your
battery is new you may lose only one or two bars during the entire round. As your
battery ages, you may lose more bars.
If you lose all the blue bars this could indicate; (1) you may not have fully charged your
battery (2) your battery is nearing the end of its useful life and you should consider
buying a replacement.
Understanding the Battery Gauge
Central Control Knob:
Turn to control the speed of the trolley in normal
operation. Press to pause and resume at your selected speed.
Note: The C2i Compact Range now includes a power save mode as standard on all
models to extend the life of your battery. If you have the trolley powered and do
not use the trolley for more than 20 mins, the display will automatically power
off to save energy. When you are ready to move off simply press or move the
control dial on the handle to wake up the display.
adjust the setting or input values.
Time:
save each digit.
COMP Mode:
Factory Settings
Your new C2i trolley is ready to use, but there are a number of preferences you can
change in the programming mode. To enter programming mode:
1: Connect the battery to the trolley.
2: With the trolley powered and the default display shown press and hold both function
buttons for 3 seconds. The main features on the display will be replaced by the clock
flashing in the top left hand corner of the display.
3: Press the right function button to scroll through the options.
4: Select or modify the option by pressing the central control knob, then use the dial to
5: Press and hold both function buttons to save and exit after changing any settings. The
display will then return to the default display.
Each of the Factory Settings are detailed below:
With the clock flashing rotate the control knob to the required digit and press to
With `COMP’ highlighted on the display press the control knob to turn the
‘competition’ mode on and off. This will disable ADF and distance functions measurement.
Security Pin:
With the padlock icon highlighted you can turn the PIN function on and
off by pressing the central control knob. To select your security PIN rotate the control
knob to select your 4 digit code, save each digit by pressing the control knob. Repeat
for each digit and then press and hold both buttons to save the new PIN.
Note: if you have added a PIN lock this will be required every time you turn the trolley
on. In the event you have forgotten your PIN you can use the default factory PIN:
7921
to unlock the controls.
IMPORTANT- you must fully charge your battery before using your trolley.
Always recharge your battery within 24 hrs of use. Failure to do so could reduce
the life of your battery. See section 6 Battery Care for further infromation.