Note: it is not recommended to send your trolley unattended
over steep or rough terrain.
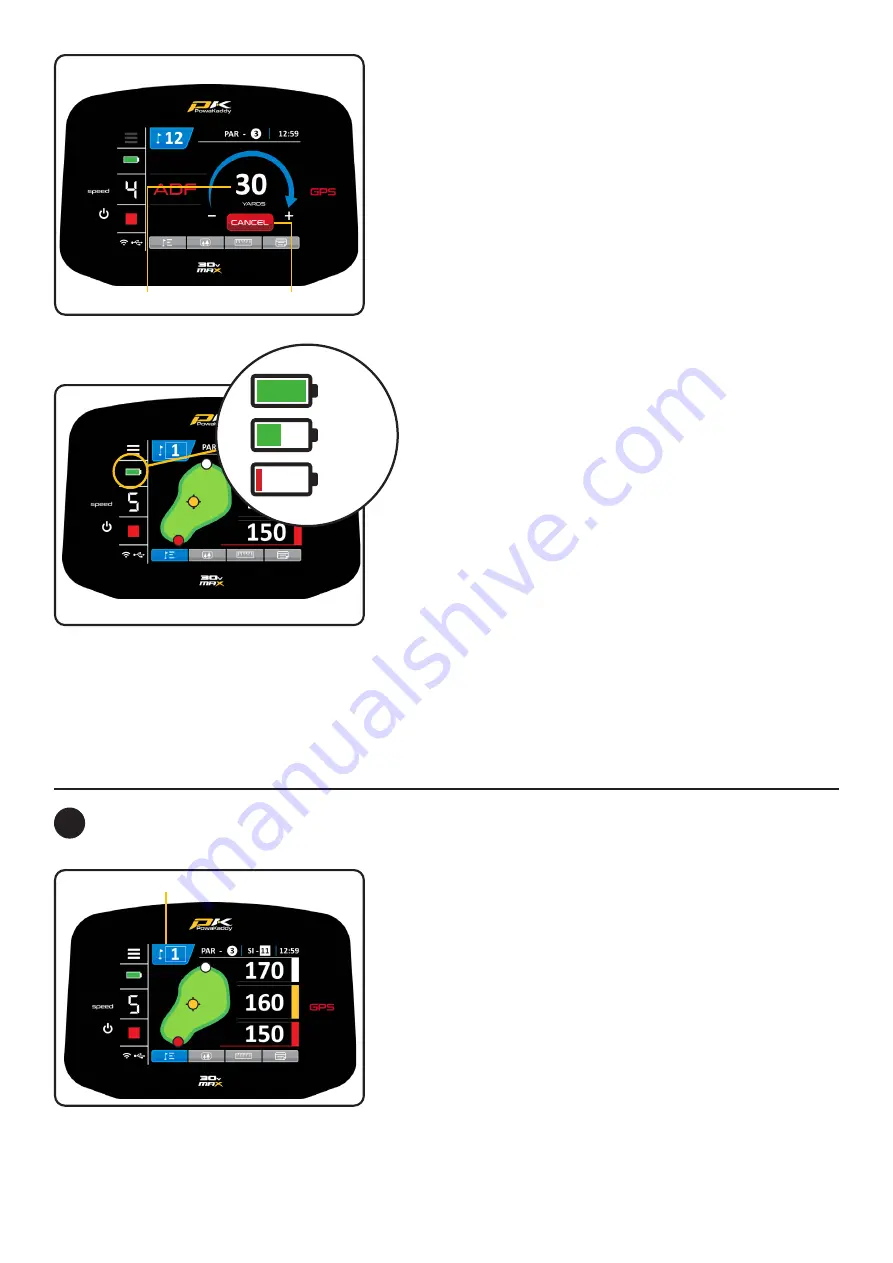
To activate ADF the motor must be paused and then:
1. Press and hold the control dial until ADF display (left)
appears on the screen.
2. Rotate the control dial to select the distance between 5
and 50 (Yards/Metres).
3. To set the trolley in motion, press the control dial to start
the motor. The trolley will run by default at speed 4.
To cancel the ADF during set-up, rotate the control dial so “0” is
displayed as the distance to travel and confirm by pressing the
control dial or alternatively, press the red ‘CANCEL’ button.
To cancel when the trolley is in motion, simply press the control
dial to pause the motor as you would during normal use or
alternatively, press the red ‘CANCEL’ button.
Note: ADF distances are approximate based on flat level terrain conditions
using a fully charged battery. The overall distance may be affected by terrain
conditions, obstacles or incline based on battery power and the weight.
Battery Gauge: located on the left side of the display. The
charge state of your battery will determine how much of the
bar will illuminate.
As you progress through the round the inner bar of the gauge
will drop. When the bar has fully extinguished it indicates that
the battery is flat. When your battery is new, the bar may only
drop a small amount during the entire round. As your battery
ages, you may lose more.
If the bar is completely extinguished; (1) you may not have fully
charged your battery (2) your battery is nearing the end of its
useful life and should be replaced.
ADF
Battery Gauge
Full
Charge
Half
Charge
Empty
Distance to Travel
Cancel Button
10
GPS Functions
Select Hole:
Once the course data has loaded, your trolley display GPS
information for Hole 1. Once you enter the ‘tee zone’ of the
next hole in sequence, the trolley will automatically advance to
display information for the next hole.
If you have not entered the mapped ‘tee zone’, therefore not
auto-advancing or you are not starting from the 1st tee; you
can select a hole manually. To do so:
•
Press the blue ‘Hole’ graphic at the top of the display.
•
A grid displaying holes 1 to 18 is shown. From the grid
select the desired hole.
•
Once a new hole is selected you will return to the previous
display you were on.
Current Hole/Change Hole


