background image

Powered by Safety

®

1

General Information

01.4IB.60306

Ch 1  General Information

!

WARNING

The equipment described in this document may contain high voltages and currents which can 

cause death or serious injury.

The equipment is designed for use, installation, and maintenance by knowledgeable users of such 

equipment having experience and training in the field of high voltage electricity.  This document and all 

other documentation shall be fully read, understood, and all warnings and cautions shall be abided by.  If 

there are any discrepancies or questions, the user shall contact Powell immediately at 1.800.480.7273.

!

WARNING

Prior to adjustments, servicing, maintenance, or any act requiring the operator to make physical 

contact with the equipment, the power source must be disconnected and the equipment grounded.  

Failure to do so may result in death or serious injury.

NOTICE

The information in this instruction bulletin is not intended to explain all details or variations of the 

Powell equipment, nor to provide for every possible contingency or hazard to be met in connection 

with installation, testing, operation, and maintenance of the equipment.  For additional 

information and instructions for particular problems, which are not presented sufficiently for the 

user’s purposes, contact Powell at 1.800.480.7273.

Powell reserves the right to discontinue and to change specifications at any time without incurring 

any obligation to incorporate new features in products previously sold.

NOTICE

Summary of Contents for 05PV36ARMM-4

Page 1: ...Instruction Bulletin 01 4IB 60306 PowlVac ARG ARM Series 4 Vacuum Circuit Breakers 5kV 15kV 1200A 2000A 3000A 25kA 36kA 50kA 63kA Powered by Safety ...

Page 2: ...m Circuit Breakers 5kV 15kV 1200A 2000A 3000A 25kA 36kA 50kA 63kA 01 4IB 60306 Contact Information Powell Electrical Systems Inc powellind com info powellind com Service Division PO Box 12818 Houston Texas 77217 2818 Tel 713 944 6900 Fax 713 948 4569 ...

Page 3: ...ut the safety alert symbol is used to address practices not related to personal injury CAUTION NOTICE NOTICE is used to address practices not related to personal injury Qualified Person For the purposes of this manual a qualified person as stated in NFPA 70E is one who has skills and knowledge related to the construction and operation of the electrical equipment and installations and has received ...

Page 4: ...Powered by Safety PowlVac ARG ARM Series 4 Vacuum Circuit Breakers 5kV 15kV 1200A 2000A 3000A 25kA 36kA 50kA 63kA 01 4IB 60306 This page is left blank intentionally ...

Page 5: ...ion 8 2 Electrical Description 19 C Automatic Racking Mechanism 20 1 Breaker Position Indicator 20 2 Interlocking 20 3 Blocking Interlock 21 4 Racking Mechanism 21 D Circuit Breaker Compartment Interfaces 22 1 Primary Disconnecting Devices 22 2 Secondary Disconnecting Devices 22 3 MOC Mechanism Operated Cell Switch Actuator 22 4 TOC Truck Operated Cell Switch Actuator 22 5 Ground Connection 22 6 S...

Page 6: ...ted Position 34 4 Emergency Racking In Procedure 34 F Removing the Circuit Breaker From the Circuit Breaker Compartment 35 1 Removing the Circuit Breaker from the Connected to the Test Disconnected Position 35 2 Removing the Circuit Breaker from the Test Disconnected Position out of the Circuit Breaker Compartment 36 3 Emergency Racking Out Procedure 37 Ch 5 Maintenance 38 A General Description 38...

Page 7: ...liding Contact Finger Assembly for circuit breaker rated up to 50kA only 53 3 Closing Coil Assembly 53 4 Primary Shunt Trip Coil Assembly 53 5 Secondary Shunt Trip Coil Assembly 53 6 Undervoltage Device Assembly UV 53 7 Charging Motor Assembly 53 8 Anti Pump Relay Assembly 54 9 Latch Check Switch 54 10 Motor Cutoff Switch Assembly 54 11 Auxiliary Switch 54 12 Ground Connection Assembly 54 13 Racki...

Page 8: ... 15 Figure 7 Operation Sequence 17 Figure 8 Typical Control Scheme 18 Figure 9 Circuit Breaker in Shipping Carton 24 Figure 10 Circuit Breaker with Shipping Bracket 24 Figure 11 Circuit Breaker on Crane 25 Figure 12 Secondary Disconnect Override Device 30 Figure 13 Removing Circuit Breaker from Compartment 36 Figure 14 Lubrication 50kA shown 42 Figure 15 Lubrication 50kA shown cont 43 Figure 16 Ma...

Page 9: ...es Table A Field Dielectric Test Values 27 Table B Lubrication 41 Table C Timing 51 Table D Primary Resistance 51 Table E Primary Current Path 55 Table F Control Devices 57 Table G Miscellaneous Parts 59 Table H Miscellaneous Parts cont 60 ...

Page 10: ...Powered by Safety PowlVac ARG ARM Series 4 Vacuum Circuit Breakers 5kV 15kV 1200A 2000A 3000A 25kA 36kA 50kA 63kA 01 4IB 60306 This page is left blank intentionally ...

Page 11: ... servicing maintenance or any act requiring the operator to make physical contact with the equipment the power source must be disconnected and the equipment grounded Failure to do so may result in death or serious injury NOTICE The information in this instruction bulletin is not intended to explain all details or variations of the Powell equipment nor to provide for every possible contingency or h...

Page 12: ...cuum circuit breakers described in Ch 1 General Information A Scope This instruction bulletin provides 1 Safety guidelines 2 General descriptions of the operation and maintenance of the PowlVac ARG ARM Series 4 vacuum circuit breakers 3 Instructions for installation and placing the circuit breaker into service 4 Instructions for part replacement 5 Information for ordering renewal parts 6 Procedure...

Page 13: ...in for Powell equipment NOTICE For more information visit powellind com To contact the Powell Service Division call 1 800 480 7273 or 713 944 6900 or email info powellservice com For specific questions or comments pertaining to this instruction bulletin email documents powellind com with the IB number in the subject line D Associated Bulletins 01 4IB 51000C PowlVac Metal Clad Switchgear 5kV 15kV 0...

Page 14: ...torily through verification on any known voltage source N Exception No 1 An adequately rated permanently mounted test device shall be permitted to be used to verify the absence of voltage of the conductors or circuit parts at the work location provided it meets the all following requirements 1 It is permanently mounted and installed in accordance with the manufacturer s instructions and tests the ...

Page 15: ... example of a standard that contains information on capacity of temporary protective grounding equipment c Impedance Temporary protective grounding equipment and connections shall have an impedance low enough to cause immediate operation of protective devices in case of unintentional energizing of the electric conductors or circuit parts B Safety Guidelines Study this instruction bulletin and all ...

Page 16: ...uding excessive dust ash corrosive atmosphere vermin and insect infestations D Specific 1 DO NOT WORK ON AN ENERGIZED CIRCUIT BREAKER If work must be performed on a circuit breaker remove it from service and remove it from the metal clad switchgear 2 DO NOT WORK ON A CIRCUIT BREAKER WITH THE CONTROL CIRCUIT ENERGIZED 3 EXTREME CARE MUST BE EXERCISED TO KEEP ALL PERSONNEL TOOLS AND OTHER OBJECTS CL...

Page 17: ...e At the voltages specified for testing test personnel shall be in front of the circuit breaker such that the two layers of steel used in the frame and front cover construction are between the test personnel and the vacuum interrupters and that the test personnel be no closer than one meter 3 from the front of the circuit breaker THE CIRCUIT BREAKER SHALL BE EITHER FULLY OPEN OR FULLY CLOSED WHEN ...

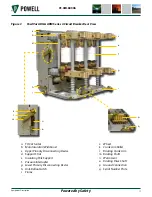
Page 18: ...moving contact assemblies through operating pushrods Figure 4 h p In the same metal enclosed compartment as the stored energy mechanism is the circuit breaker racking mechanism and interlocks which control the movement of the circuit breaker between the test disconnected and connected positions The racking mechanism provides the motion to engage disengage the primary disconnecting devices and to o...

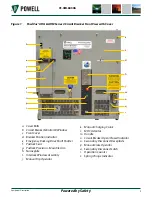
Page 19: ...w c Front Cover d Breaker Position Indicator e Emergency Racking Drive Shaft Shutter f Padlock Seal g Padlock Provision Movable Arm h Nameplate I Interlock Window Assembly j Manual Trip Operator k Manual Charging Crank l MOC Actuator m Handle n Circuit Breaker Open Closed Indicator o Secondary Disconnect Receptacle p Manual Close Operator q Secondary Disconnect Latch r Operation Counter s Spring C...

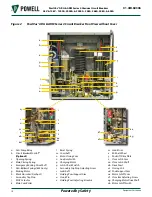
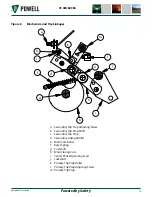
Page 20: ...orber Dashpot i Secondary Trip Prop j MOC Actuator k Main Cam Roller l Reset Spring m Camshaft n Main Closing Cam o Auxiliary Switch p Charging Motor q Latch Check Switch r Secondary Trip Prop Adjusting Screw s Jackshaft t Holding Pawl Support Arm u Crank Pin v Holding Pawl Adjusting Eccentric w Crank Arm x Ratchet Wheel y Pawl Lift Drive Plate z Close Latch Arm aa Close Latch Shaft ab Drive Pawl ...

Page 21: ... g a TOC Actuator b Main Insulator Wishbone c Upper Primary Disconnecting Device d Support Strut e Insulating Pole Support f Vacuum Interrupter g Lower Primary Disconnecting Device h Anti Rollout Latch i Frame J Wheel k Crank Arm Roller l Racking Crank Arm m Racking Shaft n Worm Gear o Racking Drive Shaft p Ground Connection q Serial Number Plate ...

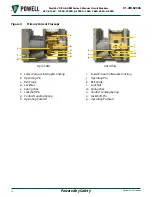
Page 22: ... Current Closeups Up to 50kA a b d e g c f h 63kA Only i j l m n k o p a Lower Vacuum Interrupter Casting b Operating Pin c Bell Crank d Lock Nut e Spring Yoke f Jackshaft Pin g Contact Loading Spring h Operating Pushrod i Lower Vacuum Interrupter Casting j Operating Pin k Bell Crank l Lock Nut m Spring Yoke n Contact Loading Spring o Jackshaft Pin p Operating Pushrod ...

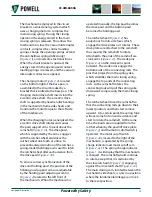
Page 23: ...pport arms are adjustable by the holding pawl adjusting eccentric Figure 2 v located to the left front of the mechanism When the mechanism is operated manually the top pawl becomes the drive pawl and the bottom pawl becomes the holding pawl The ratchet wheel Figure 2 x has projections from its side faces which engage the drive plates as it rotates These drive plates are attached to the camshaft th...

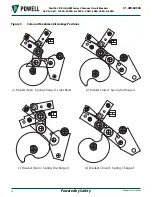
Page 24: ...acuum Circuit Breakers 5kV 15kV 1200A 2000A 3000A 25kA 36kA 50kA 63kA 01 4IB 60306 Figure 5 Cam and Fundamental Linkage Positions a Breaker Open Spring Charged Links Reset c Breaker Open Spring Discharged d Breaker Closed Spring Charged b Breaker Closed Spring Discharged ...

Page 25: ...j k a m n a Secondary Trip Prop Adjusting Screw b Secondary Trip Prop Shaft c Secondary Trip Prop d Secondary Linkage Roller e Main Cam Roller f Reset Spring g Camshaft h Main Closing Cam i Center Phase Operating Lever j Jackshaft k Primary Trip Prop Roller l Primary Trip Prop Adjusting Screw m Primary Trip Prop ...

Page 26: ... the lower primary disconnecting devices and engage an extension to the vacuum interrupter assembly thus moving the vacuum interrupter contact The bell cranks give an approximate 3 to 1 multiplication of the contact loading spring force enabling a lower spring rate to be used It also multiplies the contact movement by a factor of approximately 3 so that the mechanism linkages have relatively large...

Page 27: ...ks LS Makes LS Breaks LS Makes 52 b Breaks VCB Closed White Light Deenergized Motor M Energized Prevents Close Coil Energization Before Spring is Fully Charged Y Coil Energized Close Coil CC Deenergized 52 b Breaks 52 a Makes Y Contact Makes Close Spring Charged Y Coil Seals In Green Light Deenergized Trip Circuit Set Up Red Light Energized LS Makes LS Breaks LS Breaks LS Makes White Light Energiz...

Page 28: ...GE LIMIT SWITCH SHOWNW SPRING DISCHARGED LCS LATCH CHECK SWITCH SHOWNW SPRING DISCHARGED DEVICE IDs Y ANTI PUMP RELAY TC BREAKERTRIP COIL CC BREAKER CLOSE COIL M CHARGING MOTOR 52 a BREAKER AUXILIARY CONTACT NORMALLY OPEN 52 b BREAKER AUXILIARY CONTACT NORMALLY CLOSED SD BREAKER SECONDARY DISCONNECT TB TERMINAL BLOCK TRIP1 CLOSE RM RACKING MOTOR TO RATED CONTROL POWER TYPICAL UV UNDERVOLTAGETRIP C...

Page 29: ...otor when the main closing spring is fully charged and the stored energy mechanism is ready for a closing operation It is located at the bottom right of the mechanism and is supported by a bracket which is bolted to the circuit breaker base pan c Anti Pump Relay The anti pump relay Figure 2 a provides a logic function for the control circuit which prevents a continuous electrical close signal from...

Page 30: ...he aperture the circuit breaker is in the connected position When the breaker position indicator displays BREAKER TEST DISCONNECTED and this is fully visible in the aperture the circuit breaker is in the test disconnected position In positions other than the connected and test disconnected positions the breaker position indicator does not display an indication Refer to Ch 4 Installation E Insertin...

Page 31: ...operator which holds the breaker in a trip free condition The manual trip operator also actuates the latch check switch thus blocking any electrical closing signal 3 Blocking Interlock Access to the emergency racking drive is controlled by a blocking interlock The emergency racking access shutter can only be opened with the circuit breaker open Moving the emergency racking drive shaft shutter down...

Page 32: ...The secondary disconnect plug is attached to the switchgear and is located on the right side wall of the circuit breaker compartment This arrangement allows the secondary connection to be visible in all positions of the circuit breaker 3 MOC Mechanism Operated Cell Switch Actuator The MOC located in the switchgear is operated by a lever which extends from the circuit breaker operating mechanism Mo...

Page 33: ... Rated Circuit Breakers Connection to the vacuum interrupter stems is made by means of copper contact blocks The top of the vacuum interrupter is threaded and a copper contact block is screwed onto this stem The contact block and the vertical connector bars are bolted together and the vertical connector bars in turn are assembled to the upper primary disconnecting devices of the circuit breaker An...

Page 34: ...er is visible The circuit breaker is attached to the pallet by metal shipping brackets When these are removed the circuit breaker may be removed from the shipping pallet Refer to Ch 4 Installation B Handling for more information Figure 9 Circuit Breaker in Shipping Carton When a metal clad switchgear assembly is installed in a Power Control Room a circuit breaker housed in the lower circuit breake...

Page 35: ...ifted by an overhead crane using the two lifting points which have been provided for hooks at the top of the circuit breaker frame side sheets Figure 11 Figure 11 Circuit Breaker on Crane C Storage Shipping and storage of electrical equipment requires measures to prevent the deterioration of the apparatus over a long unused period The mechanical and dielectric integrity must be protected Electrica...

Page 36: ...argers UPS systems lighting installation hardware and air conditioning If prolonged storage is anticipated humidity controlling desiccant materials should be utilized Desiccant packets should be installed in all compartments and packing containers D Placing the Circuit Breaker Into Service Prior to shipment from the factory all circuit breaker functions are thoroughly checked The user must verify ...

Page 37: ...checked all of the primary phase to ground and phase to phase insulation After the high potential is removed an electrical charge may be retained by the vacuum interrupters Failure to discharge this residual electrostatic charge could result in an electrical shock All six primary disconnecting devices of the circuit breaker and the metallic mid band ring if present should be grounded and remain gr...

Page 38: ...ned specifically for PowlVac circuit breakers If this device is used refer to the instruction bulletin provided with the vacuum integrity tester Powell recognizes the widespread use of DC hipot equipment in the field and the desire to use this equipment to verify vacuum integrity However the capacitive component of the vacuum interrupter during DC testing may yield false negative test results whic...

Page 39: ... may be similarly tested at a voltage not to exceed 675V 50 or 60 Hz Be sure to remove any test jumpers and reconnect the charging motor when the tests are complete Remove all grounding conductors applied for this test before placing the circuit breaker back into service CAUTION 4 Mechanical Operation Check Keep personnel tools and other objects clear of mechanisms that are to be operated or relea...

Page 40: ...age via a secondary disconnect plug to the circuit breaker and the appropriate control switches to verify the close and open functions of the circuit breaker Specialized versions of the test cabinet may also contain circuits for circuit breakers equipped with dual shunt trip coils undervoltage devices or other options With the secondary disconnect plug installed in the circuit breaker under test o...

Page 41: ...ion and cautions before attempting to insert the circuit breaker into the metal clad switchgear equipment To insert the circuit breaker into the upper compartment a lifting device must be used Refer to the Lifting Device instruction bulletin for details on how to insert a circuit breaker into the upper compartment NOTICE Be sure that the racking crank arms at the sides of the circuit breaker point...

Page 42: ... damaged make no attempt to repair Contact Powell for further information Examine the circuit breaker compartment to see that it is clean and clear of debris that might interfere with circuit breaker travel Before inserting any circuit breaker into a compartment the user must verify that the circuit breaker rating meets or exceeds the metal clad switchgear rating CAUTION Before inserting a circuit...

Page 43: ...rank arms of the circuit breaker are in the fully withdrawn position pointing towards the movable primary disconnects Otherwise the primary disconnects shutters or the racking mechanisms may be damaged CAUTION Before racking a circuit breaker in or out of the compartment make sure that any position interlocks are unlocked and in the position to allow racking Otherwise the racking mechanism may be ...

Page 44: ... procedures NOTICE 4 Emergency Racking In Procedure In the event of an emergency such as loss of control power the ARG ARM circuit breakers are equipped with an emergency racking mechanism which enables racking the circuit breakers into or out of the connected position NOTICE The following emergency racking procedure is intended to be used only in the event of loss of control power or failure of t...

Page 45: ...acking travel the user will notice an increased amount of force If the operator continues to apply force a torque limiter on the racking handle will produce a sharp clicking sound indicating the torque limit is reached at 35 ft lb At this time cease from racking in any further d Once the circuit breaker has reached the connected position remove the racking handle visually verify the emergency rack...

Page 46: ...er compartment make sure the circuit breaker is in the open position and all springs are discharged CAUTION a Open the circuit breaker compartment door b Push the secondary disconnect latch Figure 1 q to the left This will unlock the secondary disconnect plug allowing it to be removed Remove the secondary disconnect plug Removal of the secondary disconnect plug will trip a closed breaker and disch...

Page 47: ...andle socket onto the racking drive shaft shutter The racking handle socket may be used to push down the shutter to gain access to the racking drive 3 Turn the racking handle clockwise until the breaker position indicator displays BREAKER TEST DISCONNECTED 4 Remove the racking handle and verify that the emergency racking drive shaft shutter has returned to its normal position Note This is the Test...

Page 48: ... have interrupted a fault current at or near its rating it is recommended that the circuit breaker be inspected and the necessary maintenance be performed as soon as practical Some atmospheric conditions such as extremes of dust moisture or corrosive gases might indicate inspection and maintenance at more frequent intervals Very clean and dry conditions combined with low switching duty will justif...

Page 49: ...erating pushrods should be cleaned Wipe clean with a dry lint free cloth or an industrial type wiper If dirt adheres and cannot be removed by wiping remove it with distilled water or a mild solvent such as denatured alcohol Be sure that the circuit breaker is dry before returning it to service Do not use any type of detergent to wash the surface of the insulators as detergent may leave an electric...

Page 50: ...ube 368A 1 tube of Mobilgrease 28 and 1 bottle of Anderol A456 oil A Grease should be lightly applied to those bearing surfaces that are accessible Inaccessible surfaces such as bearings may be lubricated with a light synthetic machine oil such as C Oil B Grease should be applied to the electrical contact surfaces Lubricate the stored energy mechanism and other specified parts in accordance with T...

Page 51: ...n operating pushrods Jackshaft Outer Bearing Support Figure 15 x C Oil Jackshaft Support Figure 14 i C Oil Main Closing Spring Guide Rod Figure 14 b C Oil Motor Cutoff Cam Figure 15 z A Grease Apply to peripheral surface only Motor Drive Shaft Coupling Figure 15 ad C Oil Motor Drive Shaft Roller Needle Bearings Figure 14 o C Oil Motor Drive Shaft Support Bearings Figure 15 aa C Oil Open Close Flag...

Page 52: ...h j l m n o p b Main Closing Spring Guide Rod g Fundamental Linkage Pin f Trip Shaft Bearing i Jackshaft Support h Pawl Support Arm d Primary Trip Prop Roller p Pawls o Motor Drive Shaft Roller Needle Bearing n Close Latch Shaft Face m Jackshaft Lever Pin l Ratchet Wheel e Primary Trip Prop Bearing c Spring Yoke Pin a Primary Disconnecting Device k Secondary Disconnect Receptacle j Crank Pin ...

Page 53: ...nism y Camshaft Needle Bearings w Flag Support Pin aa Motor Drive Shaft Support Bearings ac Close Shaft Support Bearing r Contact Block x Jackshaft Outer Bearings Support ad Motor Drive Shaft Coupling u Open Closed Flag Drive Lever Pin at Jackshaft t Primary Trip Prop s Secondary Linkage Roller ab Ground Connection q r s t u v y aa ac w z ab ad ae x ...

Page 54: ...Bolt c Lock Washer d Flat Washer e Spacer The procedure for spring removal is as follows a With the main closing spring discharged and the circuit breaker contacts open remove the bolt Figure 16 b at the top of the spring rod together with the flat washer Figure 16 c and lock washer Figure 17 c b Remove the horizontal bracket Figure 16 a at the top of the main closing spring by unfastening the two...

Page 55: ...dure 5 Mechanism Adjustments Several factory adjustments in the stored energy mechanism are described in this section NO ADJUSTMENT OF THESE SETTINGS IS REQUIRED FOR ROUTINE MAINTENANCE but they may need to be adjusted after a major overhaul or removal of the mechanism CAUTION Do NOT adjust these settings unnecessarily as damage to the circuit breaker may occur a Adjustment of Ratchet Wheel Holdin...

Page 56: ... primary trip prop adjusting screw Figure 18 d so that with the fundamental linkage in the reset position the clearance between the primary trip prop roller and the secondary trip prop is 0 005 to 0 015 The primary trip prop adjusting screw is accessible from the rear of the stored energy mechanism and is located inside the hole beside the lower middle insulator supporting the live part assembly 3...

Page 57: ...ng securely tighten the secondary trip prop adjusting screw locking nut 9 Manually charge the main closing spring using the manual charge handle per Ch 4 Installation D Placing the Circuit Breaker Into Service 4 Mechanical Operation Check 10 Manually CLOSE the circuit breaker 11 Using leaf type feeler gauges with a total of 0 090 thickness selected position the feeler gauge as shown in Figure 19 F...

Page 58: ...This process may take several attempts 16 Repeat steps 9 through 15 until the breaker does not trip with the 0 090 gauge inserted in the trip coil armature gap and does trip with the 0 030 gauge inserted into the trip coil armature gap 17 Manually CLOSE and TRIP the circuit breaker so that all springs are discharged 18 Perform the latch check switch adjustment per the procedure found in Ch 5 Maint...

Page 59: ... rotate the crank arms until the spring charge indicator displays CLOSING SPRING DISCHARGED 8 Reinstall the circuit breaker main closing spring e Adjustment of Close Latch Shaft The close latch shaft Figure 2 aa passes through the side sheets of the stored energy mechanism frame at the front of and below the cam shaft One end of the shaft is shaped to make a latch face and interferes with the clos...

Page 60: ...y Refer to Ch 4 Installation D Placing the Circuit Breaker Into Service 2 Vacuum Integrity for information on vacuum integrity and testing of vacuum interrupters 3 Mechanical Adjustment of Vacuum Interrupters There are no adjustments required for routine maintenance of a vacuum interrupter assembly There are several factory adjustments which will vary over the operating life of the vacuum interrup...

Page 61: ... values provided in this instruction bulletin for the specific type and rating of the circuit breaker being measured When making this test be sure that the test current passes through both main horizontal primary disconnecting devices of each pair or the resistance measurement will be affected This may be done by connecting the current source leads to two blocks of full round edge copper 1 thick b...

Page 62: ...lly renewal parts may not be identical to the original parts Tables E F and G list the recommended spare parts to be carried in stock by the user The recommended quantity is not specified This must be determined by the user based on the application As a minimum it is recommended that one set of parts be stocked per ten circuit breakers or less Powell recommends that only qualified technicians perf...

Page 63: ... only the upper ends of the fingers experience any wiping action the wear is normally confined to that end If the upper ends of the fingers show noticeable wear the finger assemblies can be reversed Loosen the bolt holding the rear mounting clip and remove the finger assembly Invert the assembly and place it in the mounting clips Tighten the bolt holding the rear mounting clip If copper is visible...

Page 64: ...ast 6 inches of clear space under the circuit breaker base pan b Remove the bolt holding the retaining clip to the ground connection mounting bracket and remove the retaining clip c Slide the assembly slightly forward so that the ends of the mounting rods on each side of the assembly is clear of the holes in the ground connection mounting bracket Press down on the assembly and remove it from botto...

Page 65: ...4 76 1200 N A 0209B4272G002 Contact Powell 05PV63ARM 4 76 2000 N A 0209B4272G002 05PV63ARM 4 76 3000 N A 0209B4272G002 15PV25ARM 15 1200 50952G01 0282A2700G002 60501G01 15PV25ARM 15 2000 50952G01 0209B4272G002 15PV25ARM 15 3000 50956G02 0209B4272G002 60500G03 15PV36ARM 15 1200 50952G01 0282A2700G002 60500G01 15PV36ARM 15 2000 50952G01 0209B4272G002 15PV36ARM 15 3000 50956G02 0209B4272G002 60500G03...

Page 66: ...4 Vacuum Circuit Breakers 5kV 15kV 1200A 2000A 3000A 25kA 36kA 50kA 63kA 01 4IB 60306 Figure 21 Primary Current Path Vacuum Interrupter Assembly Up to and Including 50kA Vacuum Interrupter Assembly 63kA Only Primary Disconnect Finger Cluster Sliding Contact Finger Assembly Up to and Including 50kA ...

Page 67: ... 1 One required per circuit breaker if the circuit breaker was originally equipped with this item All circuit breakers have a closing coil primary shunt trip coil charging motor and an anti pump relay assembly Secondary shunt trip coils and undervoltage device assemblies are optional see notes 2 7 2 Primary shunt trip coil is available as a 3 cycle and 5 cycle control device Trip coil assemblies m...

Page 68: ...uum Circuit Breakers 5kV 15kV 1200A 2000A 3000A 25kA 36kA 50kA 63kA 01 4IB 60306 Figure 22 Control Devices a Primary Shunt Trip Coil 3 cycle b Primary Shunt Trip Coil 5 cycle c Charging Motor Assembly d Closing Coil Assembly e Anti Pump Relay f Undervoltage Device Assembly g Racking Motor g a b c d e f ...

Page 69: ...us Parts Description Catalog Number Illustration Auxiliary Switch 102112PB Ground Connection 25kA 50951G02 36kA 50952G03 50kA 50952G02P 63kA Latch Check Switch BA 2RV2 A2 Motor Cutoff Switch Assembly 50756G03P Racking Motor 509140 Racking Motor Cutoff Switch Assembly BZ 2RW899 PowlVac Hardware Kit 60500G24 ...

Page 70: ...ARM Series 4 Vacuum Circuit Breakers 5kV 15kV 1200A 2000A 3000A 25kA 36kA 50kA 63kA 01 4IB 60306 Table H Miscellaneous Parts cont Description Catalog Number Illustration PowlVac Lubrication Kit Powlube 104 Operating Pushrod Assembly 25kA 50934G22 36kA 50934G23 50kA 50934G24 63kA 50934G25 ...

Page 71: ...well Electrical Systems Inc Service Division Houston PO Box 12818 Houston TX 77217 Tel 713 944 6900 Fax 713 948 4569 powellind com info powellind com 5kV 15kV 1200A 2000A 3000A 25kA 36kA 50kA 63kA 01 4IB 60306 PowlVac ARG ARM Series 4 Vacuum Circuit Breakers April 2018 ...

Reviews: