background image


2-2. Setup the UPS 
Step 1: UPS input connection 

Plug the UPS into a two-pole, three-wire, grounded receptacle only. Avoid using extension 
cords. 
 

Step 2: UPS output connection 

Simply plug devices to output sockets. During power failure, UPS will provide power to 
connected devices.   


Step 3: Communication connection 
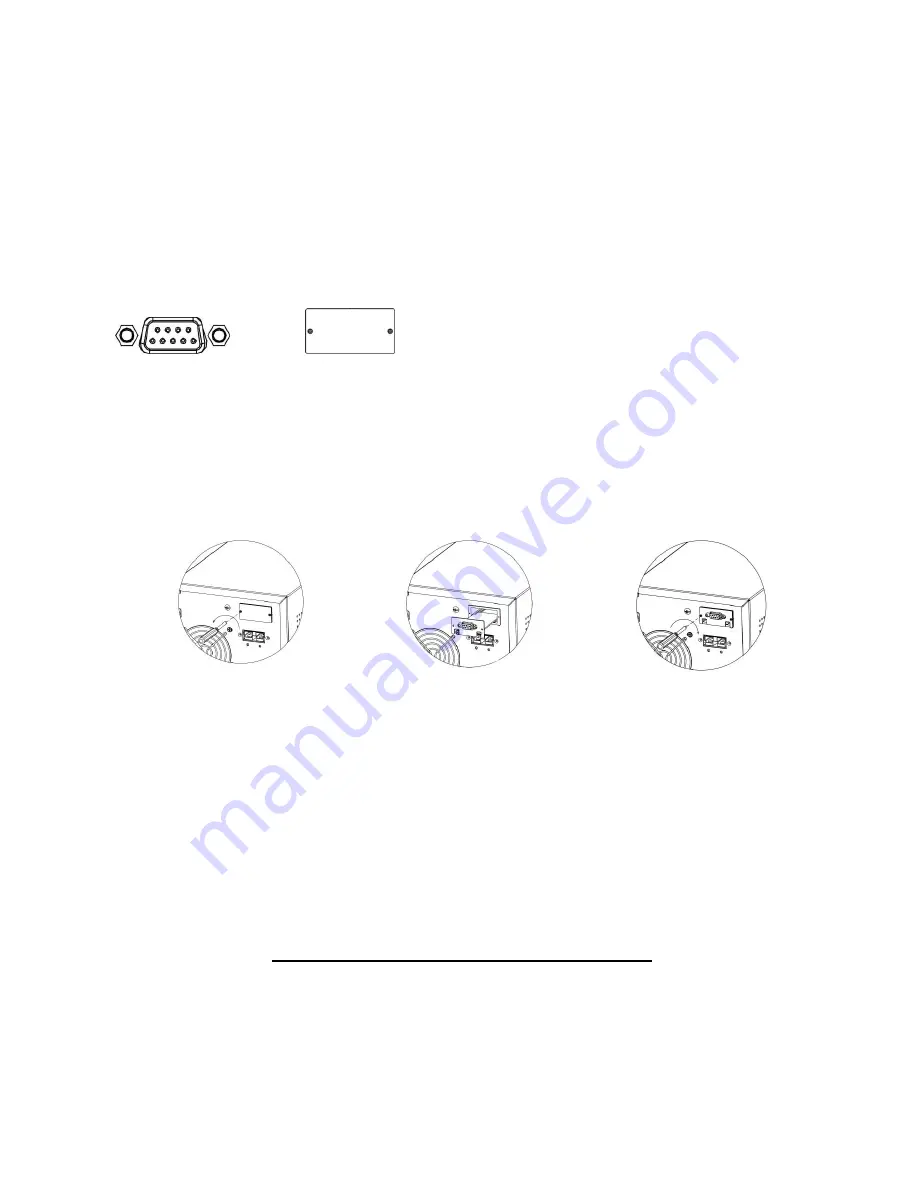
Communication port: 

RS-232 port                  Intelligent slot   


To allow for unattended UPS shutdown/start-up and status monitoring, connect the 
communication cable one end to the RS-232 port and the other to the communication port of 

your PC. With the monitoring software installed, you can schedule UPS shutdown/start-up and 
monitor UPS status through PC. 
 
This UPS is equipped with intelligent slot perfect for SNMP, RS-232, USB or AS-400 card. When 

installing with these communication card in the UPS, it will provide advanced communication 
and monitoring options. 
 

Step 1:


Step 2:


Step 3:


Remove cover of intelligent 
slot. 

Insert communication card 
into the slot 

Screw card tightly and 
complete installation. 


Step 4: Turn on the UPS   

Press the ON/Mute button on the front panel for two seconds to power on the UPS. 

Note: The battery charges fully during the first five hours of normal operation. Do not 

expect full battery run capability during this initial charge period. 
 

Step 5: Install software 

For optimal computer system protection, install UPS monitoring software to fully configure UPS 
shutdown. You may insert provided CD into CD-ROM to install the monitoring software. If not, 
please follow steps below to download and install monitoring software from the internet:


1. Go to the website 

http://www.power-software-download.com


2. Click ViewPower software icon and then choose your required OS to download the software.   
3. Follow the on-screen instructions to install the software. 
4. When your computer restarts, the monitoring software will appear as an orange plug icon 

located in the system tray, near the clock. 

Summary of Contents for FRUK19-3000HV-01V

Page 1: ...Online UPS FRUK19 3000HV 01V Uninterruptible Power Supply System User Manual...

Page 2: ...s 3 2 INSTALLATION AND SETUP 4 2 1 Rear Panel View 4 2 2 Setup the UPS 4 3 OPERATIONS 7 3 1 Button operation 7 3 2 LCD Panel 7 3 3 Audible Alarm 9 3 4 LCD display wordings index 9 3 5 UPS Setting 9 3...

Page 3: ...no one can step on or trip over them The UPS can be operated by any individuals with no previous experience Connect the UPS system only to an earthed shockproof outlet which must be easily accessible...

Page 4: ...must be kept well away from the batteries Caution risk of electric shock The battery circuit is not isolated from the input voltage Hazardous voltages may occur between the battery terminals and the...

Page 5: ...al package in a safe place for future use 2 1 Rear Panel View Diagram 1 Rear Panel Overlook Diagram 2 Output Terminal 1 Output receptacles 2 Output terminals 3 Bypass switch 4 AC input 5 Input breaker...

Page 6: ...options Step 1 Step 2 Step 3 Remove cover of intelligent slot Insert communication card into the slot Screw card tightly and complete installation Step 4 Turn on the UPS Press the ON Mute button on t...

Page 7: ...ttery capacity configuration in software To calculate accurate backup time of external batteries it s necessary to configure battery numbers in software The standard calculated capacity for one batter...

Page 8: ...he UPS Press and hold this button at least 2 seconds to turn off the UPS Confirm selection key Press this button to confirm selection in UPS setting mode Select Button Switch LCD message Press this bu...

Page 9: ...uency Load information Indicates the load level by 0 25 26 50 51 75 and 76 100 Indicates overload Indicates the load or the UPS output is short circuit Mode operation information Indicates the UPS con...

Page 10: ...content Meaning ENA Enable DIS Disable ESC Escape HLS High loss LLS Low loss BAT Battery CF Converter TP Temperature CH Charger FU Bypass frequency unstable EE EEPROM error BAH AH of battery 3 5 UPS...

Page 11: ...presents output frequency is 50HZ Default BAT 60 presents output frequency is 60HZ If converter mode enable you may choose the following output frequency CF 50 presents output frequency is 50HZ Defau...

Page 12: ...oint 230 264 setting the high voltage point from 230VAC to 264VAC Default 264VAC LLS Bypass low voltage point 170 220 setting the low voltage point from 170VAC to 220VAC Default 170VAC 09 Autonomy lim...

Page 13: ...mode Description LCD display Online mode When the input voltage is within acceptable range UPS will provide pure and stable AC power to output The UPS will also charge the battery at online mode ECO...

Page 14: ...ry voltage too high 27 Bus short circuited 05 x Battery voltage too low 28 Inverter soft start fail 11 x Over temperature 41 x Inverter voltage high 12 x Over load 43 3 8 Warning indicator Warning Ico...

Page 15: ...ealer Fault code is shown as 28 and the icon is lighting on LCD display and alarm is continuously sounding Battery voltage is too low or the charger is fault Contact your dealer The icon and is flashi...

Page 16: ...ults 1 The load is still supplied but directly from AC power via bypass 2 The load is no longer supplied by power Contact your dealer Battery backup time is shorter than nominal value Batteries are no...

Page 17: ...ler Storage Before storing charge the UPS 5 hours Store the UPS covered and upright in a cool dry location During storage recharge the battery in accordance with the following table Storage Temperatur...

Page 18: ...e AC Mode to Batt Mode Zero Inverter to Bypass 4 ms Typical Waveform Batt Mode Pure Sinewave EFFICIENCY AC Mode 80 81 Battery Mode 82 BATTERY Standard Model Battery Type 12V 9Ah Battery Numbers 6 Char...

Reviews: