background image

Page 33 of 35

Reference: 708052-1   

       Issue date: 23-Jul-2014      

Revision: B 

L.  ADJUSTABLE SUSPENDED SCAFFOLD SYSTEMS

 are to be installed and used in 

accordance with the manufacturer’s recommended procedures.  

M. ADJUSTABLE SUSPENDED PLATFORMS MUST NEVER BE OPERATED NEAR LIVE 

POWER LINES

 unless proper precautions are taken.  Contact the power service provider for 

advice.

N.  ALWAYS UTILIZE FALL ARREST EQUIPMENT

 when working on adjustable suspended 

scaffolds or when working near unguarded edges.

O.  DO NOT WORK FROM, INSTALL OR MOVE ADJUSTABLE SUSPENDED 

SCAFFOLDS

 if you are sick or impaired in any way.

P.  DO NOT WORK ON ADJUSTABLE SUSPENDED SCAFFOLDS

 when under the influence 

of alcohol or drugs.

Q.  DEBRIS SHOULD NOT BE STORED OR ALLOWED TO ACCUMULATE ON A 

PLATFORM.

R.  INDEPENDENT ADJUSTABLE SUSPENDED SCAFFOLDS ARE TO BE POSITIONED 

SO AS TO AVOID OVERLAPPING OR POSSIBLE INTERFERENCE FROM ANOTHER 

SCAFFOLD.

II.  GUIDELINES FOR ERECTION AND USE OF ADJUSTABLE SUSPENDED SCAFFOLD 

SYSTEMS

A.  RIGGING:

1.  UTILIZE FALL PROTECTION EQUIPMENT

 when rigging near unguarded edges.

2.  SUPPORTING DEVICES

 must be capable of supporting the hoist rated load with a safety 

factor of 4.

3.  ALL OVERHEAD RIGGING

 must be secured from unwanted movement in any direction.

4.  COUNTERWEIGHTS USED WITH OUTRIGGER BEAMS

 must be of a non-flowable 

material and must be secured to the beam to prevent accidental displacement.

5.  OUTRIGGER BEAMS THAT DO NOT USE COUNTERWEIGHTS

 must be installed 

and secured to the roof structure with bolts or other direct connections. Direct connections 

shall be evaluated by a competent person.

6.  TIE BACK ALL TRANSPORTABLE RIGGING DEVICES.

  Tieback shall be equivalent 

in strength to the suspension ropes.

7.  INSTALL TIEBACKS AT RIGHT ANGLES TO THE FACE OF THE BUILDING

 and 

secure them without slack, to a suitable anchor capable of supporting the hoist rated load with 

a safety factor of 4.

8.  IN THE EVENT THAT TIEBACKS CANNOT BE INSTALLED AT RIGHT ANGLES,


two tiebacks at opposing angles must be used to prevent movement.

9.  RIG AND USE HOISTING MACHINES DIRECTLY UNDER THEIR SUSPENSION 

POINTS

 to prevent movement or side loading.

Summary of Contents for ASTRO E1500

Page 1: ...ons is at the operator s own risk and may result in serious injuries Keep this manual with the hoist at all times Use only spare parts and recommended steel wire rope from Power Climber It is the resp...

Page 2: ...LLC 365 Upland Drive Seattle WA 98188 Customer Support North America Tel 1 800 560 2546 CLIMB or outside the U S 1 206 577 0101 Fax 1 866 470 8722 Email CustomerService PowerClimber com Web www PowerC...

Page 3: ...eneral Specifications 7 3 2 Safety Summary 8 3 3 Hazard Summary 11 3 4 Wire Rope Specifications 12 3 5 Hoist Components 15 3 6 Hoist Installation 16 4 SAFETY INSTRUCTIONS 18 4 1 Daily Tests 18 4 2 Dai...

Page 4: ...p action and follow the instructions before continuing Warns against possible immediate serious injury or death Warns against possible injury Warns against possible electrical shock hazard Must read t...

Page 5: ...s of this equipment must request current operating information prior to using this equipment Call your local Power Climber dealer This manual is included with each ASTRO E1500 Additional copies are av...

Page 6: ...overhead obstruction for special applications More versatile hoist ready for any application Eliminates possible loss damage because it is built in rather than an added on Saves money because it is l...

Page 7: ...r Lay IPS Improved Plow Steel or EIPS Extra Improved Plow Steel Preformed Galvanized or Bright User must verify that the wire rope meets or exceeds applicable codes for breaking strength safety factor...

Page 8: ...pment and prevent accidents NEVER operate equipment that you DO NOT understand You may cause accidents resulting in injury or death to you or people around you This instruction manual is not all inclu...

Page 9: ...NING Do not use suspended scaffolds unless a You are wearing a personal fall arrest system that meets or exceeds your application requirements b You have personally made sure that i the roof support s...

Page 10: ...under any circumstances rig a platform above electrical power lines 15 Push the operating switch by hand only Do not use foreign objects to operate the hoist 16 When not in use store hoist and stage...

Page 11: ...HAZARDS Crushing between the platform and the building or structure Cutting or severing between moving machine parts Loss of rigging stability because of one or more of the following Insufficient coun...

Page 12: ...serious risks to the hoist and other equipment being used HAZARD PREVENTION WIRE ROPE All electrical connections must be locked and supported by strain relief devices Make sure the electrical cord and...

Page 13: ...ols to prevent rusting 3 Always uncoil and carefully examine the wire rope before use Worn kinked bird caged or damaged wire rope cannot be repaired It must be replaced 4 Use a heavy duty thimble for...

Page 14: ...ith one or more of the following defects shall be removed and replaced immediately 1 Whenever there is severe corrosion Any development of slight corrosion shall be noted and watched closely 2 Wheneve...

Page 15: ...mination NOTE Do not expose the wire rope to fire temperatures above 200 F 93 3 C passage of electrical current or corrosive atmospheres and chemicals This exposure will make the wire rope unsafe Acid...

Page 16: ...Wire rope insertion points Overspeed brake test button Overspeed brake reset knob Up Down operation switch Emergency stop power cut off Indicator light Pendant receptacle Pendant sold separately Cont...

Page 17: ...42 VAC If the voltage is lower than 198 VAC when running Increase voltage with a transformer at the power source when voltage is low OR Use larger gauge or separate electrical cables to each hoist to...

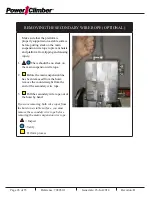
Page 18: ...into hoist Operate the hoist in the UP direction while pushing the rope into the hoist Make sure the wire rope runs freely through the Wire Rope Exit Spring REEEVING SECONDARY WIRE ROPE OPTIONAL Push...

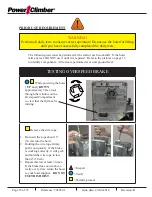
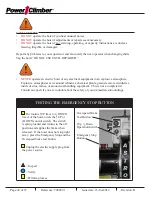
Page 19: ...nents All tests are performed at or near ground level TESTING OVERSPEED BRAKE While powering the hoist UP and DOWN approximately 3 feet look through the window on the Overspeed Compartment to view tha...

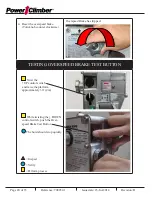
Page 20: ...knob counter clockwise TESTING OVERSPEED BRAKE TEST BUTTON Twist the UP control switch and raise the platform approximately 3 ft 9m While twisting the DOWN control switch push the Over speed Brake Te...

Page 21: ...n in either direction To reset pull button up TESTING THE CONTROLLED DESCENT FEATURE Raise the hoist approximately 3 feet 0 9m Disconnect the power supply During this test or when you are actually usi...

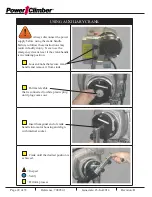
Page 22: ...in bodily injury Never use the emergency decent lever if the crank handle is in cranking position Loosen knobs that secure crank handle and remove it from studs Pull metal cable that is connected to w...

Page 23: ...a dirty environment that contains epoxy paint cement sand blast residue or corrosive material inspect the operation of the secondary overspeed brake several times per day Protective hoist covers are r...

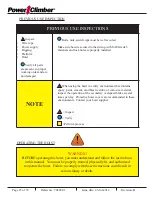
Page 24: ...ments or repairs seem necessary DO NOT operate the hoist if any warning operating or capacity instructions are unclear missing illegible or damaged Report any problems to your supervisor and also noti...

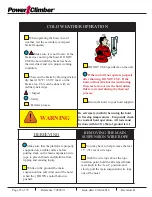
Page 25: ...rected during the thaw out process Return the hoist to your hoist supplier WARNING Be extremely careful when using the hoist in freezing temperatures Frequently check for normal hoist operation All te...

Page 26: ...rom tipping and causing injury 1 There should be no slack on the main suspension wire rope 2 Before the main suspension line has been removed from the hoist remove the counterweight from the end of th...

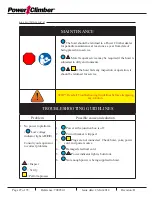
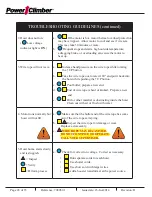
Page 27: ...should be returned for service STOP Read all Troubleshooting Guidelines before attempting any solution TROUBLESHOOTING GUIDELINES Problem Possible cause and solution 1 No power to platform Low voltage...

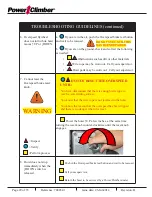
Page 28: ...it back into the hoist while pushing the UP button c Poor bullet prepare a new end d End of wire rope is bent or kinked Prepare a new end e Dirt or other material is obstructing inside the hoist Clean...

Page 29: ...brake reset knob WARNING DO NOT RESET THE OVERSPEED UNTIL You have determined that there is enough wire rope to reach a safe landing surface You know that the wire rope is not jammed in the hoist You...

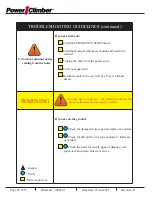
Page 30: ...ug the hoist from the power cord Call your supervisor Return the hoist to be serviced by a Power Climber dealer WARNING You may have a rope jam Any attempt to operate the hoist could cause serious inj...

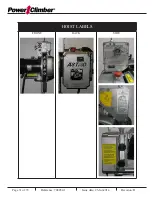
Page 31: ...Page 31 of 35 Reference 708052 1 Issue date 23 Jul 2014 Revision B HOIST LABELS FRONT BACK SIDE...

Page 32: ...le suspended scaffold systems C SURVEY THE JOB SITE A competent person shall survey the job site for hazards such as exposed electrical wires obstructions and unguarded roof edges or openings D INSPEC...

Page 33: ...CAFFOLD SYSTEMS A RIGGING 1 UTILIZE FALL PROTECTION EQUIPMENT when rigging near unguarded edges 2 SUPPORTING DEVICES must be capable of supporting the hoist rated load with a safety factor of 4 3 ALL...

Page 34: ...r damage 7 WIRE ROPES USED WITH TRACTION HOISTS MUST HAVE PREPARED ENDS Follow hoist manufacturer s recommendations 8 USE THIMBLES AT ALL WIRE ROPE SUSPENSION TERMINATIONS 9 USE J BOLT WIRE ROPE CLAMP...

Page 35: ...10 UTILIZE FULL BODY HARNESSES of the proper size and fit 11 UTILIZE SHOCK ABSORBING LANYARD attached to the D ring at the center of your back between the shoulder blades 12 INSPECT FALL PROTECTION AN...

Page 36: ...TURE ALONG ITS ENTIRE LENGTH 4 PREVENT THE WIRE ROPE END FROM BECOMING GROUNDED 5 INSULATE EACH HOIST WITH A PROTECTIVE COVER 6 INSULATE TIE BACK WIRE ROPES AT THE CONNECTION POINTS Since field condit...

Reviews: