


Maintenance
Needle wear
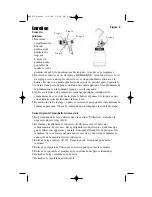
1. Visually inspect the needle tip for wear. Needle wear will cause the
paint pattern to be uneven. If needle wear is noted, replace the needle.
2. Unscrew and remove the adjusting screw. NOTE: Before unscrewing
the adjusting screw, place a mark on the adjusting screw where the
end of the housing intersects it. This will make re-adjusting the gun
easier after maintenance.
3. Using a pair of pliers or other suitable device, carefully pull and twist
the needle until it has been removed.
4. With an identical replacement needle, by hand, carefully insert it into
the housing and push until the tip has exited the hole in the air nozzle.
5. Replace the adjusting screw and readjust its setting to the position it
was in before removal. (See note for step 2.)
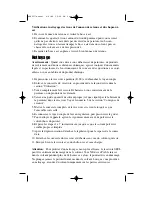
Canister gasket wear
1. Remove the cover assembly from the canister (#B-02) as described in
Operation.
2. Visually inspect the cover (#B-04) gasket for even depressions,
scratches, cracks and general appearance. The gasket is not replaceable.
If wear is noted, replace the cover as follows.
3. Remove the centrepost (#B-10) assembly. Retain the nut for
reassembly.
4. Remove the regulator assembly. Retain the nut for reassembly.
5. Remove and replace the cover with identical parts.
6. Reassemble the centrepost assembly to the cover.
7. Reassemble the regulator assembly to the cover.
Check and clean air cap / retainer ring holes
1. Unscrew the retainer ring and remove the air nozzle.
2. Verify the 4 holes around the needle hole are not blocked or restricted
by paint residue. If necessary, clean the holes by soaking the air nozzle
in solvent and blowing clear with pressurized air.
3. Replace the air nozzle and tighten the retainer ring.
8006577manual 4/4/06 12:28 PM Page 7


