background image

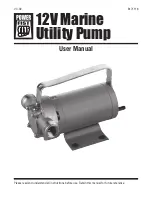
12V Marine Utility Pump

6

For technical questions call: 1-800-665-8685

8171118

V 3.02

ASSEMBLY AND OPERATION

NOTE: If you are mounting the utility pump permanently on a surface, make sure the surface is square 

or rectangular only. Do not attempt to mount the utility pump on a rounded surface. (Hardware for 

permanent mounting not included.)

NOTE: Always connect the red power cord on the utility pump to the positive (+) side of the craft’s 12 volt 

DC electrical system. Always connect the black power cord on the utility pump to the negative (-) side of 

the craft’s 12 volt DC electrical system.

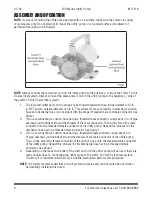
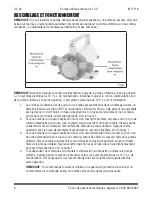
1.  The inlet and outlet ports on the pump are both dual threaded with an inside diameter of 3/8 

in. NPT and an outside diameter of 3/4 in. This allows for more versatility in selecting a suction 

hose and discharge hose (not included) with the proper threaded male or female connector. See 

figure 1.

2.  If you are connecting a suction hose having a threaded male connector, wrap about 4 in. of pipe 

seal tape (not included) around the threads of the male connector. Then firmly screw the male 

connector into the threaded female connector of the utility pump. Repeat this process for the 

discharge hose having a threaded male connector. See figure 1.

3.  If you are connecting a suction hose having a threaded female connector, wrap about 4 in. 

of pipe seal tape (not included) around the threads of the male connector of the utility pump. 

Then, firmly screw the female connector of the suction hose onto the threaded male connector 

of the utility pump. Repeat this process for the discharge hose having a threaded female 

connector. See figure 1.

4.  Depending on the make and model of the craft on which the utility pump will be used, there are 

many variations as to connecting the utility pump to the craft’s 12 volt DC electrical system. 

Therefore it is recommended that only a qualified technician perform this procedure.

NOTE: It is highly recommended that a circuit protection device and control switch be used when 

permanently installing this pump.

Fig.1

Summary of Contents for 8171118

Page 1: ...User Manual 8171118 V 3 02 Please read and understand all instructions before use Retain this manual for future reference 12V Marine Utility Pump...

Page 2: ...NS WARNING Read and understand all instructions before using this device The operator must follow basic precautions to reduce the risk of personal injury and or damage to the device Before allowing so...

Page 3: ...de both frontal and side protection Protect your hands with suitable gloves Protect your head from falling objects by wearing a hard hat Wear an ANSI approved dust mask or respirator when working arou...

Page 4: ...but not to the rated capacity This could result in the vessel not being able to clear water from the bilge fast enough 7 This utility pump is designed for intermittent use only Do not use the utility...

Page 5: ...source conforms to the requirements of your equipment 3 When wiring an electrically driven device follow all electrical and safety codes as well as the most recent Canadian Electrical Code CE and the...

Page 6: ...on hose having a threaded male connector wrap about 4 in of pipe seal tape not included around the threads of the male connector Then firmly screw the male connector into the threaded female connector...

Page 7: ...charge hoses and any other condition that may affect the safe and efficient operation of the utility pump If abnormal noise or vibration occurs have the problem corrected before further use Do not use...

Page 8: ...tor 10 Adjust Plate 11 C Clip 12 Armature 13 C Clip 14 Adjust Plate 17a Sealed Ball Bearing 18 Front Cover 19 Retaining Ring 20 Seal Spring Washer PARTS LIST PARTS BREAKDOWN No Description 21 Felt 22...

Page 9: ...devez lire et comprendre toutes les instructions avant d utiliser l appareil Conservez ce manuel afin de pouvoir le consulter plus tard Manuel d utilisateur 8171118 V 3 02 Pompe utilitaire marine de...

Page 10: ...ons avant d utiliser cet appareil L utilisateur doit respecter les pr cautions de base afin de r duire le risque de blessure ou de dommage l appareil Avant de permettre quelqu un d autre d utiliser ce...

Page 11: ...lat rale Prot gez vous les mains l aide de gants appropri s Prot gez vous la t te de la chute d objets en portant un casque de protection Portez un masque antipoussi res ou un appareil respiratoire ap...

Page 12: ...e mais non au d bit nominal prescrit L embarcation pourrait ne pas tre capable d vacuer l eau suffisamment vite de la cale 7 Cette pompe utilitaire a t con ue pour un usage intermittent seulement N u...

Page 13: ...rme aux exigences de votre quipement 3 Au moment du c blage d un appareil lectrique respectez tous les codes de l lectricit et de s curit ainsi que les versions les plus r centes du Code canadien de l...

Page 14: ...1 2 Si vous branchez un tuyau d aspiration muni d un raccord m le filet enroulez environ 4 po de ruban d tanch it pour tuyau non compris autour des filets du raccord m le Vissez ensuite solidement le...

Page 15: ...autre condition qui pourrait affecter la s curit et l efficacit de fonctionnement du compresseur En cas de bruit anormal ou de vibrations rem diez au probl me avant de continuer utiliser l outil N uti...

Page 16: ...Pince en C 12 Armature 13 Pince en C 14 Plaque de r glage 17a Roulement billes scell 18 Couvercle avant 19 Anneau de retenue 20 Rondelle ressort d tanch it LISTE DES PI CES R PARTITION DES PI CES No D...

Reviews: