V1.0
2-3/4 Ton Pallet Jack
8442923
Visit www.princessauto.com for more information
7
ASSEMBLY & INSTALLATION
Letter references in parenthesis (A) refer to the included Identification Key.
Dashed numbers in parenthesis (Fig. 1-1) refer to a specific point in an
illustration or image.
TOOLS REQUIRED FOR ASSEMBLY
•
Allen Key (8 mm) • Flat Head Screwdriver
ASSEMBLY
1.
Put the base of the handle tube (Fig.
1-1) on the pressure plate (Fig. 1-2).
Align the holes (Fig. 1-3) at the base
of the handle with the holes in the
pressure plate. The chain should drop
through the middle hole of the shaft
(Fig. 2-1).
2. Use a screwdriver to pry the lever
plate (Fig. 2-2) up and slip the bolt
head under the notch in the lever
plate. Do not adjust the nut unless
the pallet jack doesn’t work properly.
CAUTION! Do not loosen or over tighten the
lock nut (#13). The nut is pre-locked onto
the bolt at the factory.
3.
Secure the handle to the pallet jack by
the three screws (Fig. 1-3) and spring
washers (Fig. 1-4).
IMPORTANT! It is a good idea to remove any
air bubbles that might have accumulated in
the hydraulic system during shipping (see
Bleeding the Hydraulic System).
OPERATION
This pallet jack is designed for use with open style pallets or skids only.
Closed style pallets must be placed on top of fork prior to use.
1.
Insert the fork into the pallet.
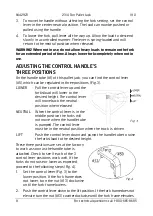
2. To raise the fork, push control lever all the way down, and pump the
handle until the desired fork height is reached.
Fig. 1
Fig. 2


