8699159
4-1/2 in. Metal Cutting Band Saw
V4.1
24
For technical questions call 1-800-665-8685
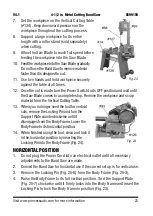
5. Secure the workpiece in the Vise Assembly (Fig. 25-5). Support a large
workpiece for its entire length with a roller stand (sold separately)
when cutting.
6. Adjust the Stock Stop If cutting several workpieces to the same length
(Fig. 25-6).
7. Once all necessary adjustments to the Band Saw are made, plug the Power
Cord into the nearest electrical outlet.
8. Check the Band Saw for correct Saw Blade (Fig 25-4) tension or machine
vibration. Turn off and unplug the Band Saw and correct any problems
before using
9. Begin cutting by turning the Power Switch (Fig. 25-2) to its ON position.
Remove the Locking Pin and slowly lower the Body Frame until the Saw
Blade is just above the workpiece cut line.
10. Allow the Saw Blade to reach full speed before feeding the Saw Blade into
the workpiece.
11. Slowly lower the Body Frame, while it gradually feeds the Saw Blade into
the workpiece. Do not force the Band Saw to remove material faster than it
is designed to cut.
IMPORTANT! When in the horizontal cutting mode only, the Switch
Push-Off Tip (Fig. 25-1) will automatically turn the Power Switch to its
OFF position and shut off the Band Saw Motor when the cut has been
completed.
12. Once the cut is made, check to make sure the Power Switch is in its
OFF position.
13. Wait until the Saw Blade comes to a complete stop. Raise the Body Frame to
its full vertical position. Turn the Support Plate clockwise until it firmly locks
into the Body Frame and insert the Locking Pin to lock Body Frame in position.
14. Remove the workpiece from the Vise assembly and scrap material from the
Machine Bed (#122) of the Band Saw. Then, slowly lower the Body Frame
to its horizontal position.
15. When finished using the tool, clean and lock it in the horizontal position by
inserting the Locking Pin into the Body Frame (Fig. 24).

