background image

V1.0 

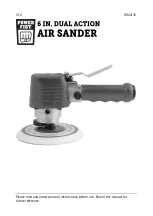
6 in. Dual Action Air Sander 

8844136 

Visit www.princessauto.com for more information 

2.  Screw the coupler plug into the tool's air inlet and tighten with a 

wrench until snug. 

3. 

Run the compressor at a low volume and check the connection for air 
leaks. Do not use the tool until all air leaks are repaired or the faulty 
component is replaced.


IMPORTANT! Vibration may cause failure if a quick coupler is connected directly 
to the air tool. To overcome this, connect a leader hose to the tool. A quick 
coupler may then be used to connect the leader hose to the air line hose. 

OPERATION 

Selecting the correct size and type of abrasive grit is extremely important in 
achieving a high-quality sanded finish. To produce the best finish possible, 
start with a coarse grit sanding paper and gradually change to finer and 
finer grit sandpapers. A final sanding with a well-worn fine sandpaper will 
produce a professional looking finish. 
1. 

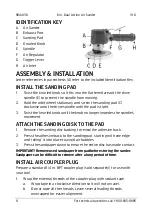
Adjust the air regulator (F) to increase or decrease the disc speed. 

2.  Squeeze the trigger gently until it has attained full speed. 
3. 

Start the sander off the work and then apply it flatly to the workpiece.  

4. 

Move the sander slowly back and forth in wide overlapping areas. Let 
the sander do the work. 

5. 

When finished sanding, lift sander off the work before releasing the 
trigger. 

PRESSURE DROP 

Apply the air consumption and pressure rate numbers to the tool’s air inlet, not 
the compressor’s outlet. Calculate the pressure drop for your air supply set-up 
and increase the compressor outlet pressure to compensate. Make sure you do 
not exceed the maximum pressure for any part of your air supply system.  
Installing a pressure gauge at the tool inlet is the best way to measure the 
air pressure and adjust the compressor’s output. 

CARE & MAINTENANCE 

1. 

Maintain the tool with care. A tool in good condition is efficient, easier 
to control and will have fewer problems. 

2. 

Inspect the tool fittings, alignment and hoses periodically. Have damaged 
or worn components repaired or replaced by an authorized technician. 
Only use identical replacement parts when servicing. 

Summary of Contents for 8844136

Page 1: ...V1 0 8844136 Please read and understand all instructions before use Retain this manual for future reference ...

Page 2: ...y of property damage injury or death if certain instructions are not followed DANGER This notice indicates an immediate and specific hazard that will result in severe personal injury or death if the proper precautions are not taken WARNING This notice indicates a specific hazard or unsafe practice that could result in severe personal injury or death if the proper precautions are not taken CAUTION ...

Page 3: ... properly in a safe and dry location to prevent rust or damage Lock tools away and keep out of the reach of children 4 Do not install or use in the presence of flammable gases dust or liquids PERSONAL SAFETY WARNING Wear personal protective equipment approved by the Canadian StandardsAssociation CSA or American National Standards Institute ANSI PERSONAL PROTECTIVE EQUIPMENT 1 Always wear impact sa...

Page 4: ... Keep your fingers away from the trigger switch while carrying the tool attaching an air hose or an accessory Lock the trigger switch safety if available 5 Avoid unintentional starts Be sure that the regulator throttle switch is in the neutral or OFF position when not in use and before connecting it to any air source 6 Never point the air stream or tool at any point of your body other people or an...

Page 5: ...ol The tool may eject an attached wrench or a key and cause an injury to you or a bystander 10 Before using the tool on a workpiece test the tool by running it at the highest speed rating for at least 30 seconds in a safe position Stop immediately if there is any abnormal vibration or wobbling Check the tool to determine the cause 11 Never force the tool Excessive pressure could break the tool res...

Page 6: ...ther than an air compressor could cause an explosion and serious personal injury 7 Turn OFF the valve and discharge any remaining air pressure after each use or before adjusting the tool 8 Do not leave the air tool unattended with its compressed air supply on Turn off the compressed air supply and bleed the air tool of any remaining compressed air before leaving the air tool unattended 9 Serious i...

Page 7: ...VIBRATION PRECAUTIONS 1 This tool vibrates during use Repeated or long term exposure to vibration may cause temporary or permanent physical injury Take frequent breaks when using the tool 2 If you feel any medical symptoms related to vibrations such as tingling numbness and white or blue fingers seek medical attention as soon as possible 3 Wear suitable gloves to reduce the effects of vibration 4 ...

Page 8: ...nob until the knob no longer impedes the spindle s movement ATTACH THE SANDING DISK TO THE PAD 1 Remove the sanding disc backing to reveal the adhesive back 2 Press the adhesive back to the sanding pad starting with one edge and rolling it into place to avoid air bubbles 3 Press the sandpaper down to ensure the entire disc has made contact IMPORTANT Remove used sandpaper from pad before storing th...

Page 9: ... air regulator F to increase or decrease the disc speed 2 Squeeze the trigger gently until it has attained full speed 3 Start the sander off the work and then apply it flatly to the workpiece 4 Move the sander slowly back and forth in wide overlapping areas Let the sander do the work 5 When finished sanding lift sander off the work before releasing the trigger PRESSURE DROP Apply the air consumpti...

Page 10: ... an internal coating of grease to prevent corrosion during shipping and storage Remove this grease by adding a generous amount of air tool oil in the air inlet and then run the tool under no load until the exhaust is clear 2 Manually add a drop or two of air tool oil into the tool s coupler plug before each use and after every hour of continuous use The tool will not work properly without lubricat...

Page 11: ...nternal parts 1 Open the air regulator to desired airflow 2a Have a qualified technician service the tool 2b Replace tool or parts Tools will not run Air flows freely from exhaust Damage or excessive wearing of internal parts 1 Have a qualified technician service the tool 2 Replace tool or parts Tool will not shut off 1 Throttle valve o ring dislodged from inlet valve seat 2 Trigger mechanism jamm...

Page 12: ... DESCRIPTION QTY 1 Main housing 1 2 Top cover 1 3 Spring 1 4 O ring 1 5 Valve stem 1 6 O ring 1 7 O ring 1 8 O ring 1 9 Valve sleeve 1 10 Trigger stand 1 11 Screw 1 12 Nut 1 13 Trigger 1 14 Spacer 1 15 Nut 1 16 Air regulator 1 17 E clip 1 18 O ring 1 19 Air inlet 1 20 E clip 1 21 Bearing 2 22 Plate 2 23 Cylinder 1 ...

Page 13: ...e 5 28 Work spindle 1 29 Woodruff Key 1 30 Gasket 1 31 Front cover 1 32 Set screw 2 33 Set screw 2 34 Washer 5 35 Nut 1 36 Washer 2 37 Orbit wheel 1 38 Set screw 1 39 Bushing 1 40 Lever 1 41 Washer 1 42 Cushion 1 43 Screw 1 44 Set screw 1 45 Bearing 1 46 Washer 1 47 E ring 1 48 Bearing seat 1 49 Handle grip 1 50 O ring 4 51 Sanding pad 1 ...

Page 14: ...V1 0 8844136 Vous devez lire et comprendre toutes les instructions avant d utiliser l appareil Conservez ce manuel afin de pouvoir le consulter plus tard ...

Page 15: ... à la propriété de blessure ou de décès si on ne respecte pas certaines instructions DANGER Cet avis indique un risque immédiat et particulier qui entraînera des blessures corporelles graves ou même la mort si on omet de prendre les précautions nécessaires AVERTISSEMENT Cet avis indique un risque particulier ou une pratique non sécuritaire qui pourrait entraîner des blessures corporelles graves ou...

Page 16: ...mpte de toute distraction Placez les lampes de façon à ne pas travailler dans l ombre 2 Assurez vous que les personnes qui ne portent pas l équipement de sécurité approprié ne se trouvent pas à proximité de l aire de travail 3 Rangez les outils correctement dans un lieu sécurisé et sec Gardez les outils hors de la portée des enfants 4 N installez pas et n utilisez pas d outils électriques en prése...

Page 17: ...rticules PRÉCAUTIONS PERSONNELLES Gardez le contrôle de l outil de vos mouvements et de l environnement de travail pour éviter les blessures ou le bris de l outil 1 N utilisez pas l outil si vous êtes fatigué ou sous l effet de drogues d alcool ou de médicaments 2 Évitez de porter des vêtements ou des bijoux pouvant se prendre dans les pièces mobiles d un outil Gardez les cheveux longs recouverts ...

Page 18: ... a été conçu 2 N utilisez pas l outil si des pièces présentent des dommages ou sont déplacées Réparez ou remplacez les pièces 3 N utilisez pas d outil électrique muni d un interrupteur d alimentation ou d une commande qui fait défaut Un outil électrique qui ne réagit pas aux commandes est dangereux et pourrait provoquer des blessures graves Un technicien qualifié doit réparer l outil électrique et...

Page 19: ...ettez jamais l outil en marche lorsqu il est en contact avec la pièce à travailler 15 Ne déposez pas l outil jusqu à ce que l accessoire ait complètement cessé de tourner L accessoire peut toucher la surface de la pièce et se libérer entraînant ainsi des blessures pour l utilisateur et les gens qui se trouvent dans l aire de travail PRÉCAUTIONS RELATIVES AUX OUTILS PNEUMATIQUES 1 Utilisez uniqueme...

Page 20: ...resseur Portez toujours des lunettes de sécurité approuvés OSHA afin de vous protéger les yeux lorsque vous utilisez le compresseur d air 10 Arrêtez toujours le compresseur d air et évacuez complètement la pression du réservoir avant de tenter de procéder à l entretien ou de fixer des outils pneumatiques Évacuez doucement la pression du système PRÉCAUTIONS RELATIVES AUX TUYAUX À AIR 1 Inspectez le...

Page 21: ...son usage Une exposition répétitive ou prolongée aux vibrations peut causer des blessures temporaires ou permanentes Prenez souvent des pauses lorsque vous utilisez cet outil 2 Si vous ressentez des symptômes reliés aux vibrations comme un fourmillement un engourdissement des doigts blancs ou bleus consultez un médecin le plus tôt possible 3 Portez des gants appropriés pour réduire les effets des ...

Page 22: ...s tournez le patin ponceur C dans le sens horaire sur la broche d entraînement jusqu à ce qu il soit bien serré 3 Tournez le bouton moleté jusqu à ce que le bouton n entrave plus le mouvement de la broche FIXATION DU DISQUE ABRASIF SUR LE PATIN 1 Retirez le renfort du disque abrasif pour exposer l endos adhésif 2 Pressez l endos adhésif sur le patin ponceur en commençant par un rebord puis fixez l...

Page 23: ...e qualité il est extrêmement important de choisir la bonne grosseur et le type approprié de grain abrasif Pour produire le meilleur fini possible commencez par un papier abrasif à gros grains et progressivement utilisez des papiers abrasifs à grains de plus en plus fins Enfin un dernier ponçage avec un papier abrasif fin bien usé donnera un fini d apparence professionnelle 1 Réglez le régulateur p...

Page 24: ...z à ce que l étiquette et la plaque signalétique demeurent intactes sur l outil Elles comportent des renseignements importants Si elles sont illisibles ou manquantes communiquez avec Princess Auto Ltd pour les remplacer AVERTISSEMENT Seul un personnel d entretien qualifié doit effectuer la réparation de l outil Un outil mal réparé peut présenter un risque pour l utilisateur et ou pour les autres L...

Page 25: ...rmément dans l outil Rangez l outil dans un endroit propre et sec MISE AU REBUT Recyclez votre outil endommagé dans une installation prévue à cet effet s il est impossible de le réparer DÉPANNAGE Si l outil ne fonctionne pas correctement ou si des pièces sont manquantes visitez un magasin Princess Auto Ltd afin de trouver une solution Si ce n est pas possible demandez à un technicien qualifié de r...

Page 26: ...mplacez l outil ou les pièces Il est impossible d arrêter l outil La soupape d accélérateur à joints toriques est sortie de la soupape d admission à siège 1 Remplacez les joints toriques de la soupape d accélérateur 2 Nettoyez le mécanisme de gâchette et lubrifiez le ensuite Perte de puissance ou fonctionnement irrégulier 1 Écoulement excessif sur la conduite d air Raccords de tuyau de taille ou d...

Page 27: ...er principal 1 2 Couvercle supérieur 1 3 Ressort 1 4 Joint torique 1 5 Tige de soupape 1 6 Joint torique 1 7 Joint torique 1 8 Joint torique 1 9 Manchon de valve 1 10 Support de détente 1 11 Vis 1 12 Écrou 1 13 Gâchette 1 14 Entretoise 1 15 Écrou 1 16 Régulateur pneumatique 1 17 Pince en E 1 18 Joint torique 1 19 Entrée d air 1 20 Pince en E 1 21 Roulement 2 22 Plaque 2 23 Cylindre 1 ...

Page 28: ...29 Clavette disque 1 30 Joint d étanchéité 1 31 Couvercle avant 1 32 Vis de pression 2 33 Vis de pression 2 34 Rondelle 5 35 Écrou 1 36 Rondelle 2 37 Roue orbitale 1 38 Vis de pression 1 39 Douille 1 40 Levier 1 41 Rondelle 1 42 Coussinet 1 43 Vis 1 44 Vis de pression 1 45 Roulement 1 46 Rondelle 1 47 Anneau en E 1 48 Siège du roulement 1 49 Prise de poignée 1 50 Joint torique 4 51 Patin ponceur 1...

Reviews: