


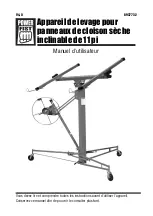


8937732
11 ft Drywall Hoist with Tilting Action
V4.0
8
For technical questions call 1-800-665-8685
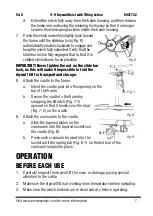
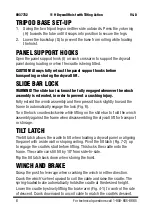
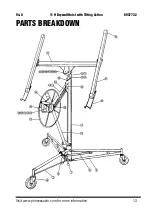
TRIPOD BASE SET-UP
1. Swing the two tripod legs on either side outwards. Press the yoke ring
(H) towards the tube until it snaps into position to secure the legs.
2. Lower the backstop (G) to prevent the base from rolling while loading
the hoist.
PANEL SUPPORT HOOKS
Open the panel support hook (I) on each crossarm to support the drywall
panel during loading or when the cradle is being tilted.
CAUTION! Always fully retract the panel support hooks before
transporting or storing the drywall lift.
SLIDE BAR LOCK
WARNING! The slide bar lock must be fully engaged whenever the winch
assembly is extended, in order to prevent a crushing injury.
Fully extend the winch assembly and then press it back slightly toward the
frame to automatically engage the lock (Fig. 6).
Turn the lock counterclockwise while lifting on the slide bar to fold the winch
assembly against the frame when disassembling the drywall lift for transport
or storage.
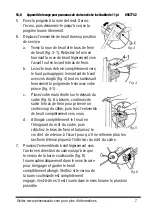
TILT LATCH
The tilt latch allows the cradle to tilt when loading a drywall panel or aligning
the panel with a side wall or sloping ceiling. Pivot the tilt latch (Fig. 7-2) up
to engage the cradle’s stud before lifting. This locks the cradle onto the
frame. The cradle can still tilt by 10º from side-to-side.
Flip the tilt latch back down when storing the hoist.
WINCH AND BRAKE
Grasp the post for leverage when cranking the winch in either direction.
Crank the winch’s wheel upward to coil the cable and raise the cradle. The
spring-loaded brake automatically holds the cradle at the desired height.
Lower the cradle by slowly lifting the brake arm (Fig. 4-1) to control the rate
of descent. Crank downward to uncoil cable to match the cradle’s descent.


