V1.0
8944159
Please read and understand all instructions before use. Retain this manual for future reference.
SPECIFICATIONS
Capacity
77 lb
Overall Dimensions
30-3/4L x 2-3/8W x 5-7/8H in.
Material
Aluminum/nylon/rubber
Colour/Finish
Silver/black
Mounting
Optional U-bolt or T-bolt
SAFETY
WARNING! Read and understand all instructions before
using this device. The operator must follow basic
precautions to reduce the risk of personal injury and/or
damage to the equipment.
Keep this manual for safety warnings, precautions, operating
or inspection and maintenance instructions.
1.
Use the correct device for the job. This device was
designed for a specific function. Do not modify or alter
this device or use it for an unintended purpose.
2. Do not operate any device when tired or under the
influence of drugs, alcohol or medications.
3. Speeds over 75 mph (120 km/h), abrupt turns, high winds
or rough road conditions may cause the skis/snowboards
to flex in the racks. This can cause damage to the
skis/snowboard, the rack or the car roof.
4. Do not exceed the maximum weight capacity.
5. Make sure you are aware of the additional height the
racks add to your vehicle to avoid overhead impacts with
garages or low structures when in use.
6. Do not park in a head or tailwind, as this can apply stress
to the end of the skis or snowboards and cause damage.
UNPACKING
WARNING! Do not operate the device if any part is
missing. Replace the missing part before operating.
Failure to do so could result in a malfunction and
personal injury.
Remove the parts and accessories from the packaging and
inspect for damage. Make sure that all items in the
Identification Key are included.
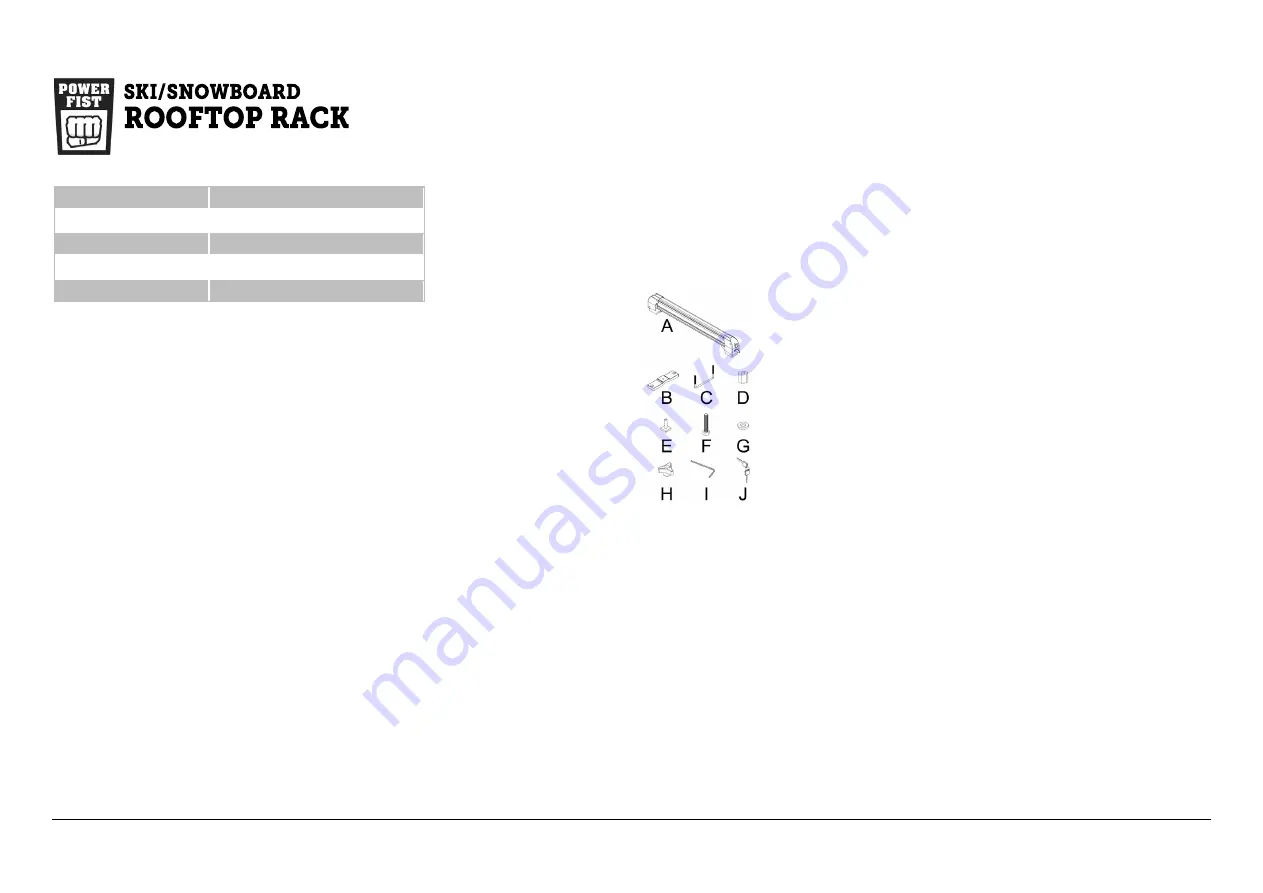
IDENTIFICATION KEY
A Rack (2)
B
Brace (4)
C
U-Bolt (4)
D Nut, M6 (4)
E
T-Bolt (4)
F
Bolt, M6x16 (4)
G Washer
Φ
6X16X1.5 (8)
H Knob (8)
I
Hex Key
J
Keys (1 set)
ASSEMBLY/INSTALLATION
Space the cross braces as far apart as possible to support the
skis or snowboards.
1.
Unlock each rack’s (A)the upper arm and swing it up out
of the way.
2. T-Bolt Installation:
a. Insert a T-bolt (E) through the bottom bolt hole at
each end. Screw the M6 nut (D) onto the T-bolt.
b. Align and slide each T-bolt flange into the cross brace’s
center slot. Tighten both nuts with the hex key (I).
3. Brace Installation:
a. Insert an M6x16 bolt (F) through a brace (B). The
brace’s middle must be higher than the ends.
b. Insert the protruding bolt through each bottom bolt
hole at each end of the rack.
c. Secure an M6 nut (D) to the bolt with a hex key (I).
d. Place the rack onto the cross piece. Insert a U-bolt
(C) through each side of the brace from underneath.
Slide a washer (G) onto each end of the U-bolt and
secure with knobs (H) until tight.
4. Close the upper arm and lock.
5. Install the second rack in the same manner as the first.
Make sure both racks are aligned with each other.
OPERATION
The rack can hold up to 6 pairs of skis, 4 snow boards or 2
snowboards and 2 pairs of skis.
1.
Unlock and open the upper arm.
2. Place the skis or snowboards across both racks.
a. Stack each ski bottom to bottom. Make sure the
bottom ski’s buckle doesn’t touch the roof.
b. Make sure the skis won’t be struck by the rear hatch
door when opened.
3. Close each upper arm and lock both racks.
CARE & MAINTENANCE
1.
Maintain the device with care. A device in good condition is
efficient, easier to control and will have fewer problems.
2. Inspect the device components periodically. Repair or
replace damaged or worn components. Only use identical
replacement parts when servicing.
WARNING! Only qualified service personnel should
repair the device. An improperly repaired device may
present a hazard to the user and/or others.


