V4.0
OBD2 Multi-Function Digital Heads Up Display
8964330
Visit www.princessauto.com for more information
5
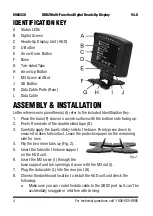
b. Make sure the HUD unit will not obstruct your vision when driving.
c. Do not place it in a location that will take your attention away from the
road.
d. The digital screen is dimmer in bright light. Position it so the screen is
shaded if possible.
9. Clean the chosen location to remove anything that can affect the double-
sided tape adhesion.
10. Remove the protective paper from the double-sided tape and press the
base against the dashboard.
11. Loosen the screw slightly to
adjust the HUD unit position,
then retighten the screw.
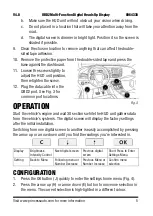
12. Plug the data cable into the
OBD2 port. See Fig. 3 for
common port locations.
OPERATION
Start the vehicle’s engine and wait 30 sections while the HUD unit gathers data
from the vehicle’s systems. The digital screen will display the factory settings
after the initial installation.
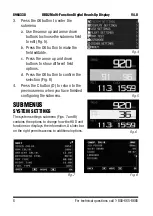
Switching from one digital screen to another is easily accomplished by pressing
the arrow up or arrow down until you find the readings you’re interested in.
Display
Brightness
Intensity Control
Next digital screen Previous digital
screen
Short Press to Enter
Settings Menu
Setting
Back to Menu
Following menu or
Number Decrease
Previous Menu or
Number Increase
Confirm menu
selection
CONFIGURATION
1. Press the OK button (J) quickly to enter the settings home menu (Fig. 4).
2. Press the arrow up (H) or arrow down (E) button to move one selection in
the menu. The current selection is high-lighted in a different colour.
Fig. 3


