background image

5.

Only use accessories that are specifically designed for use with the tool.
Ensure the accessory is tightly installed.

6.

Only use an accessory that exceeds the Speed rating (see Specifications)

7.

Before using the tool on a workpiece, test the tool by running it at the
highest speed rating for at least 30 seconds in a safe position. Stop
immediately if there is any abnormal vibration or wobbling. Check the tool
to determine the cause.

8.

Never touch the tool accessory or workpiece during or immediately after
use. They may be hot and could inflict a burn injury.

9.

Never use a tool with a cracked or worn tool accessory. Change the tool
accessory before using it.

10. Do not place the tool down until the tool’s accessory has stopped moving.

The accessory may catch the surface of work material and wrench itself
free, causing injury to the user or others in the work area.

AIR TOOL PRECAUTIONS

1.

Use only clean and dry compressed air as a power source. Contaminated
or moist air will gradually damage the tool.

2.

Install an in-line shutoff valve or regulator to allow immediate control over
the air supply in an emergency, even if a hose is ruptured.

3.

Discontinue tool use if it does not work properly or air is leaking. Tag or
mark the tool as ‘defective’ or ‘out of service’ until repaired.

4.

Check the manufacturer’s maximum pressure rating for air tools and
accessories. Compressor outlet pressure must be regulated to never
exceed the maximum pressure rating of the tool (see Specifications).
Exceeding the maximum PSI rating can create a bursting hazard, causing
injury and property damage.

5.

Attach all accessories properly to the tool before connecting the air
supply. A loose accessory may detach or break during operation.

6.

Never use oxygen, combustible gas or any other bottled gas as a power
source. Any power source other than an air compressor could cause an
explosion and serious personal injury.

7.

Turn OFF the valve and discharge any remaining air pressure after each
use or before adjusting the tool.

8.

Do not leave the air tool unattended with its compressed air supply on.
Turn off the compressed air supply and bleed the air tool of any remaining
compressed air before leaving the air tool unattended.

9007816

STRAIGHT-GRIP AIR SCREWDRIVER

V1.0

www.princessauto.com / 1-800-665-8685

Page 6

Summary of Contents for 9007816

Page 1: ...V1 0 9007816 Please read and understand all instructions before use Retain this manual for future reference ...

Page 2: ...This page is intentionally left blank ...

Page 3: ...INITIONS Please familiarize yourself with the hazard notices found in this manual A notice is an alert that there is a possibility of property damage injury or death if certain instructions are not followed DANGER This notice indicates an immediate and specific hazard that will result in severe personal injury or death if the proper precautions are not taken WARNING This notice indicates a specifi...

Page 4: ... of work performed 2 The tool may contain high pressure Use safety glasses and gloves for protection during operation Keep hands clear of the exposed rubber portions of the hose 3 Wear the appropriate type of full face shield in addition to safety googles as the work can create chips abrasive or particulate matter 4 Wear protective clothing designed for the work environment and tool 5 The air sour...

Page 5: ...pecific function Do not modify or alter this tool or use it for an unintended purpose 2 Do not use the tool if any parts are damage broken or misplaced Repair or replace the parts 3 Hold the tool correctly be ready to counteract normal or sudden movements and have both hands available 4 The tool is not insulated against contact with live electrical conduits or sources POWER TOOL PRECAUTIONS 1 Do n...

Page 6: ...egulator to allow immediate control over the air supply in an emergency even if a hose is ruptured 3 Discontinue tool use if it does not work properly or air is leaking Tag or mark the tool as defective or out of service until repaired 4 Check the manufacturer s maximum pressure rating for air tools and accessories Compressor outlet pressure must be regulated to never exceed the maximum pressure r...

Page 7: ...se to create a protective trench 3 Prevent damage to the air hose by observing the following a Never carry the tool by the air hose b Keep the air hose behind the tool and out of the tool s work path c Keep the air hose away from heat oil sharp edges or moving parts d Do not wrap the air hose around the tool as sharp edges may pierce or crack the air hose Gently coil the hose and either hang on a ...

Page 8: ...ve cap when you are ready to install the air plug INSTALL AIR COUPLER PLUG Prepare a standard 1 4 in NPT coupler plug included for use with your tool 1 Wrap the external threads of the coupler plug with sealant tape a Wrap tape in a clockwise direction so it will not unravel b Do not tape all the threads Leave several leading threads unwrapped for easier alignment 2 Screw the coupler plug into the...

Page 9: ...rce to the tool s air coupler plug 5 Before using the tool on a workpiece test the tool by running it at the highest speed rating for at least 30 seconds in a safe position Stop immediately if there is any abnormal vibration or wobbling Check the tool to determine the cause 6 Move the forward reverse switch on the bottom left L and the chuck will rotate clockwise Move the switch right R and the ch...

Page 10: ...Only use identical replacement parts when servicing 3 Only use accessories intended for use with this tool Follow instructions for changing accessories 4 Keep the tool handles or gripping surfaces clean and dry 5 Maintain the tool s labels and name plates These carry important information If unreadable or missing contact Princess Auto Ltd for replacements WARNING Only qualified service personnel s...

Page 11: ... Run the tool for approximately 30 seconds to ensure the oil is evenly distributed throughout the tool Store it in a clean and dry location DISPOSAL Recycle a tool damaged beyond repair at the appropriate facility Contact your local municipality for a list of disposal facilities or by laws for electronic devices batteries oil or other toxic liquids TROUBLESHOOTING Visit a Princess Auto Ltd locatio...

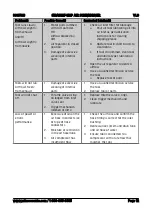
Page 12: ...rts Tools will not run Air flows freely from exhaust 1 Damage or excessive wearing of internal parts 1 Have a qualified technician service the tool 2 Replace tool or parts Tool will not shut off 1 Throttle valve o ring dislodged from inlet valve seat 2 Trigger mechanism jammed or dirty 1 Replace throttle valve o rings 2 Clean trigger mechanism and lubricate Loss of power or erratic performance 1 E...

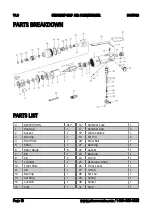
Page 13: ...Pin 1 12 Bearing 1 13 Set Ring 1 14 Cushion 1 15 Cam 1 16 Hammer Case 1 17 Hammer Dog 2 18 Work Spindle 1 19 Set Pin 2 20 Steel Ball 1 21 Bushing 1 22 Gasket 1 23 Bushing 1 24 O ring 1 25 Decoration Ring 1 26 Front Cover 1 27 Circlip 1 28 Set Cap 1 29 Spring 1 30 Spacer 1 31 Ring 1 V1 0 STRAIGHT GRIP AIR SCREWDRIVER 9007816 Page 13 www princessauto com 1 800 665 8685 ...

Page 14: ...rward Reverse Switch 1 40 Air Regulator 1 41 O Ring 1 42 Spring 2 43 Steel Ball 2 44 O Ring 1 45 Air Inlet 1 46 Screw 1 47 Pin 1 48 Trigger 1 49 Hang Ring 1 50 Pin 1 51 Air Coupler Plug 1 52 Screwdriver Bit 1 9007816 STRAIGHT GRIP AIR SCREWDRIVER V1 0 www princessauto com 1 800 665 8685 Page 14 ...

Page 15: ...This page is intentionally left blank ...

Page 16: ...This page is intentionally left blank ...

Page 17: ...V1 0 9007816 Vous devez lire et comprendre toutes les instructions avant d utiliser l appareil Conservez ce manuel afin de pouvoir le consulter plus tard ...

Page 18: ...Cette page a été laissée blanche intentionnellement ...

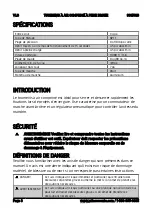
Page 19: ...outes les instructions avant d utiliser cet outil L opérateur doit respecter les précautions élémentaires pour réduire le risque de blessure corporelle ou de dommage à l équipement DÉFINITIONS DE DANGER Veuillez vous familiariser avec les avis de danger qui sont présentés dans ce manuel Un avis est une alerte indiquant qu il existe un risque de dommage matériel de blessure ou de mort si on ne resp...

Page 20: ...National Standards Institute ANSI ÉQUIPEMENT DE PROTECTION INDIVIDUELLE AVERTISSEMENT Portez de l équipement de protection individuelle homologué par l Association canadienne de normalisation CSA ou l American National Standards Institute ANSI 1 Portez toujours des lunettes antiprojections qui offrent une protection frontale et latérale pour les yeux L équipement de protection des yeux devrait êtr...

Page 21: ...ncher à une source d air 6 Ne dirigez jamais le jet d air ou les outils vers votre corps d autres individus ou des animaux Les débris et la poussière projetés à grande vitesse peuvent causer des blessures 7 Des blessures graves ou même la mort peuvent survenir en cas d inhalation de l air comprimé Le jet d air peut contenir du monoxyde de carbone des vapeurs toxiques ou des particules solides N in...

Page 22: ...ésente un fonctionnement difficile sous charge cela signifie qu une pression excessive est exercée 4 Gardez vos mains et vos doigts éloignés de l aire de travail Le contact de toute partie du corps avec l outil peut causer des blessures 5 Utilisez uniquement des accessoires qui ont été spécifiquement conçus en fonction de l outil Assurez vous aussi que l accessoire est solidement installé 6 Utilis...

Page 23: ...ltez Spécifications Si on dépasse la pression nominale maximale il pourrait en résulter un risque d explosion capable d entraîner des blessures et des dommages aux biens 5 Avant de relier l alimentation en air fixez correctement tous les accessoires sur l outil Un accessoire mal attaché pourrait se détacher et se briser durant l utilisation 6 N utilisez jamais d oxygène de gaz combustible ou tout ...

Page 24: ...oit à l intérieur d un conduit renforcé ou placez des planches des deux côtés du tuyau à air afin de créer un couloir protecteur 3 Prévenez les dommages au tuyau à air en respectant les consignes suivantes a Ne transportez jamais l outil par le tuyau à air b Gardez le tuyau d air derrière l outil et hors du trajet de l outil c Gardez le tuyau d air à l écart des sources de chaleur de l huile des b...

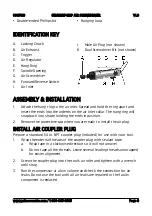
Page 25: ...ATION A Mandrin de verrouillage B Échappement d air C Gâchette D Régulateur pneumatique E Anneau de suspension F Ouverture de l arbre G Tournevis à air comprimé H Interrupteur de marche avant arrière I Entrée d air J Raccord mâle non illustré K Embout de tournevis double non illustré ASSEMBLAGE ET INSTALLATION 1 Fixez l anneau de suspension à l entrée d air Écartez et maintenez l anneau puis insér...

Page 26: ...elié directement à l outil pneumatique Pour contourner ce problème reliez un tuyau de guidage à l outil Vous pouvez alors utiliser un raccord rapide pour relier le tuyau de guidage à la conduite d air UTILISATIONS AVERTISSEMENT Relâchez immédiatement la gâchette si le foret devient coincé ou bloqué Le couple de l outil est si important que cela peut tordre votre bras et vous blesser L outil peut v...

Page 27: ...ompre et provoquer des blessures 10 Appuyez sur l interrupteur de démarrage pour permettre à l air de circuler 11 Appliquez la puissance par pulsations courtes pour éviter d émousser la tête de la vis 12 Remplacez l embout de tournevis au besoin en tirant le capuchon de réglage vers l avant pour retirer l embout et en insérer un autre 13 Lorsque vous n avez plus besoin de l outil arrêtez le compre...

Page 28: ...IS Utilisez uniquement une huile pour outil pneumatique pour lubrifier l outil Les autres lubrifiants ne conviennent pas puisqu ils endommageront l outil et causeront un mauvais fonctionnement durant l utilisation AVIS N utilisez jamais une huile pénétrante pour lubrifier l outil L huile pénétrante agit à la façon d un solvant qui dissout la garniture de graisse de l outil qui peut endommager les ...

Page 29: ...r dans une installation prévue à cet effet Communiquez avec votre municipalité locale afin de connaître la liste des sites de mise au rebut ou les règlements en ce qui concerne les appareils électroniques les batteries l huile ou les autres liquides toxiques DIAGNOSTIC DE PANNE Si l outil ne fonctionne pas correctement ou si des pièces sont manquantes visitez un magasin Princess Auto Ltd afin de t...

Page 30: ...brement de l échappement 1 Dommages ou usure excessive des pièces internes 1 Demandez à un technicien qualifié de réparer l outil 2 Remplacez l outil ou les pièces Il est impossible d arrêter l outil 1 La soupape d accélérateur à joints toriques est sortie de la soupape d admission à siège 2 Mécanisme de détente grippé ou souillé 1 Remplacez les joints toriques de la soupape d accélérateur 2 Netto...

Page 31: ...e réglage 1 14 Coussinet 1 15 Caméra témoin 1 16 Boîtier du marteau 1 17 Bague de marteau 2 18 Broche de travail 1 19 Goupille à demeure 2 20 Bille en acier 1 21 Bague 1 22 Joint d étanchéité 1 23 Bague 1 24 Joint torique 1 25 Anneau décoratif 1 26 Couvercle avant 1 27 Anneau élastique 1 28 Capuchon de réglage 1 29 Ressort 1 30 Entretoise 1 31 Anneau 1 V1 0 TOURNEVIS À AIR COMPRIMÉ À PRISE DROITE ...

Page 32: ... avant arrière 1 40 Régulateur pneumatique 1 41 Joint torique 1 42 Ressort 2 43 Bille en acier 2 44 Joint torique 1 45 Entrée d air 1 46 Vis 1 47 Goupille 1 48 Gâchette 1 49 Anneau de suspension 1 50 Goupille 1 51 Prise d air 1 52 Embout de tournevis 1 9007816 TOURNEVIS À AIR COMPRIMÉ À PRISE DROITE V1 0 www princessauto com 1 800 665 8685 Page 16 ...

Reviews: