background image

9039595 

Air Engraving Pen 

V1.0 

For technical questions call 1-800-665-8685 

5. 

Lift the tool from the material’s surface once a cut is complete. 

6. 

Turn the tool’s body to the left until the tool stops vibrating, once the task is 
complete,  

7. 

Disconnect the tool from the air source and purge any remaining air from the tool.  

CARE & MAINTENANCE 

1. 

Maintain the tool with care. A tool in good condition is efficient, easier to control 
and will have fewer problems. 

2. 

Inspect the tool fittings, alignment, hoses and power supply cord periodically. 
Have damaged or worn components repaired or replaced by an authorized 
technician. Only use identical replacement parts when servicing. 

3. 

Maintain the tool’s labels and name plates. These carry important information. If 
unreadable or missing, contact Princess Auto Ltd. for replacements. 

WARNING! Only qualified service personnel should repair the tool. An  

AIR TOOL LUBRICATION 

NOTICE! Only use air tool oil to lubricate the tool. Other lubricants are not 
suitable and will damage the tool or cause a malfunction during use. 
NOTICE! Never use a penetrating oil to lubricate an air tool. Penetrating oil acts 
as a solvent that will dissolve the tool’s grease packing and may damage the o-
rings, causing the tool to seize or malfunction. 
1. 

All air tools have an internal coating of grease to prevent corrosion during 
shipping and storage. Remove this grease by adding a generous amount of air tool 
oil in the air inlet and then run the tool under no load until the exhaust is clear. 

2. 

Manually add a drop or two of air tool oil into the tool’s coupler plug before each 
use and after every hour of continuous use. The tool will not work properly 
without lubrication and parts will wear prematurely. 

3. 

Avoid adding too much air tool oil as this can cause premature power loss and 
eventual tool failure. A qualified technician will need to take the tool apart and 
clean out the excess oil.  

4. 

Apply a generous amount of air tool oil to the tool before storing it for an 
extended period of time (overnight, weekend, etc.). Run the tool for approximately 
30 seconds to ensure the oil is evenly distributed throughout the tool. Store it in a 
clean and dry location. 
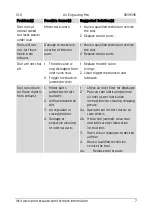
TROUBLESHOOTING 

Visit a Princess Auto Ltd. location for a solution if the tool does not function 
properly or parts are missing. If unable to do so, have a qualified technician service 
the tool. 


Summary of Contents for 9039595

Page 1: ...V1 0 9039595 Please read and understand all instructions before use Retain this manual for future reference ...

Page 2: ...jury or death if the proper precautions are not taken CAUTION This notice indicates a potentially hazardous situation that may result in minor or moderate injury if proper practices are not taken NOTICE This notice indicates that a specific hazard or unsafe practice will result in equipment or property damage but not personal injury INTRODUCTION The air engraving pen is ideal for engraving wood me...

Page 3: ...t of your body other people or animals Debris and dust ejected at high speed can cause an injury 4 Serious injury or death may occur from inhaling compressed air The air stream may contain carbon monoxide toxic vapors or solid particles Never inhale compressed air directly from the pump or air tool SPECIFIC SAFETY PRECAUTIONS WARNING DO NOT let comfort or familiarity with product gained from repea...

Page 4: ... source before installing or servicing the tool AIR HOSE PRECAUTIONS 1 Inspect the tool s air hose for cracks fraying or other faults before each use Discontinue use if the air hose is damaged or hissing is heard from the air hose or couplers Replace the defective air hose 2 Prevent damage to the air hose by observing the following a Never carry the tool by the air hose b Keep the air hose away fr...

Page 5: ...sealant tape a Wrap tape in a clockwise direction so it will not unravel b Do not tape all the threads Leave several leading threads unwrapped for easier alignment 2 Screw the coupler plug into the tool s air inlet and tighten with a wrench until snug 3 Run the compressor at a low volume and check the connection for air leaks Do not use the tool until all air leaks are repaired or the faulty compo...

Page 6: ...g oil to lubricate an air tool Penetrating oil acts as a solvent that will dissolve the tool s grease packing and may damage the o rings causing the tool to seize or malfunction 1 All air tools have an internal coating of grease to prevent corrosion during shipping and storage Remove this grease by adding a generous amount of air tool oil in the air inlet and then run the tool under no load until ...

Page 7: ...valve seat 2 Trigger mechanism jammed or dirty 1 Replace throttle valve o rings 2 Clean trigger mechanism and lubricate Tool runs slowly Air flows slightly from exhaust 1 Motor parts jammed with dirt particles 2 Airflow blocked by dirt 3 Air regulator in closed position 4 Damage or excessive wearing of internal parts 1 Check air inlet filter for blockage 2 Pour air tool lubricating oil into air in...

Page 8: ...V1 0 9039595 Vous devez lire et comprendre toutes les instructions avant d utiliser l appareil Conservez ce manuel afin de pouvoir le consulter plus tard ...

Page 9: ...uctions DANGER Cet avis indique un risque immédiat et particulier qui entraînera des blessures corporelles graves ou même la mort si on omet de prendre les précautions nécessaires AVERTISSEMENT Cet avis indique un risque particulier ou une pratique non sécuritaire qui pourrait entraîner des blessures corporelles graves ou même la mort si on omet de prendre les précautions nécessaires ATTENTION Cet...

Page 10: ...National Standards Institute ANSI ÉQUIPEMENT DE PROTECTION PERSONNELLE 1 Portez toujours des lunettes antiprojections qui offrent une protection frontale et latérale pour les yeux L équipement de protection des yeux devrait être conforme à la norme CSA Z94 3 07 ou ANSI Z87 1 fonction du type de travail effectué 2 Portez des vêtements de protection conçus pour l environnement de travail et pour l o...

Page 11: ...ment un air comprimé propre et sec comme source d énergie L air contaminé ou humide endommagera progressivement l outil 2 Installez une soupape d arrêt ou un régulateur sur la conduite afin de permettre une commande immédiate de l alimentation en air en cas d urgence même si un tuyau se fend 3 Arrêtez d utiliser l outil s il ne fonctionne pas correctement ou s il présente des fuites d air 4 Consul...

Page 12: ...l par le tuyau d air b Gardez le tuyau d air à l écart des sources de chaleur de l huile des bords coupants ou des pièces mobiles 3 Un conduite d air endommagée ou débranchée sous pression peut se comporter à la façon d un fouet et infliger des blessures corporelles ou endommager l aire de travail Fixez le tuyau d air du compresseur à une structure fixe ou permanente au moyen de serre câbles ou d ...

Page 13: ...uille Les petits conduits d évacuation doivent toujours être découverts POSE DU RACCORD PNEUMATIQUE Préparez un raccord pneumatique standard NPT de 1 4 po vendu séparément convenant à votre outil 1 Enveloppez les filets externes du raccord de ruban d étanchéité a Enveloppez le ruban dans le sens horaire de façon qu il ne se déroule pas b Ne recouvrez pas tous les filets de ruban Laissez le raccord...

Page 14: ...les composants endommagés ou usés Employez seulement des pièce autorisées 3 Veillez à ce que l étiquette et la plaque signalétique demeurent intactes sur l outil Elles comportent des renseignements importants Si elles sont illisibles ou manquantes communiquez avec Princess Auto Ltd pour les remplacer AVERTISSEMENT Seul un personnel d entretien qualifié doit effectuer la réparation de l outil Un ou...

Page 15: ...huile est répartie uniformément dans l outil Rangez l outil dans un endroit propre et sec DÉPANNAGE Si l outil ne fonctionne pas correctement ou si des pièces sont manquantes visitez un magasin Princess Auto Ltd afin de trouver une solution Si ce n est pas possible demandez à un technicien qualifié de réparer l outil Problème s Cause s possible s Solution s proposée s L outil fonctionne à vitesse ...

Page 16: ...s pièces internes 1 Vérifiez si le filtre d entrée d air est bloqué 2 Versez de l huile pour outils pneumatiques dans l entrée d air conformément aux instructions de lubrification pour enlever la graisse de garniture 2a Actionnez l outil en pulsions courtes pour enlever les débris 2b Si l outil est toujours bouché nettoyez le et lubrifiez le de la façon décrite dans les instructions de lubrificati...

Reviews: