background image

18

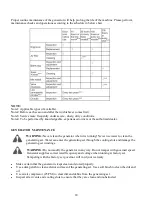
Proper routine maintenance of the generator will help prolong the life of the machine. Please perform
maintenance checks and operations according to the schedule in below chart.

NOTE:

Note1: Applicable types (if available).
Note2: Before each season and after then (whichever comes first).
Note3: Service more frequently under severe , dusty, dirty conditions.
Note4: To be performed by knowledgeable, experienced owners or the authorized dealer.

GENERATOR MAINTENANCE

WARNING:

Never clean the generator when it is running! Never use water to clean the

generating set. Water can enter the generating set through the cooling slots and damage the
generating set windings.

WARNING:

Do not modify the generator in any way. Do not tamper with governed speed.

Generator supplies correct rated frequency and voltage when running at factory set.
Tampering with the factory set governor will void your warranty.

Make certain that the generator is kept clean and stored properly.

Use a damp cloth to clean exterior surfaces of the generating set. Use a soft brush to clean the dirt and
oil.

Use an air compressor (25 PSI) to clear dirt and debris from the generating set.

Inspect all air vents and cooling slots to ensure that they are clean and unobstructed.

Summary of Contents for PS5040

Page 1: ... Generator Model PS5040 Have product questions or need technical support Please scan the QR code to enter our official website and contact us Website www powersmartusa com Toll free 1 800 791 9458 M F 9 5 EST Email support amerisuninc com Website ...

Page 2: ...2 ...

Page 3: ...ram 22 Exploded view parts list 23 Warranty statement 28 TECHNICAL DATA 4400W Open Frame Inverter Generator Engine type Spark plug gap Displacement Fuel tank capacity Oil capacity Rated wattage Starting wattage Rated voltage Rated current Frequency Phase USB output voltage Dimensions L x W x H Noise rating Weight Model PS5040 4 stroke OHV single cylinder with forced air cooling system 0 6 0 8 mm 0...

Page 4: ... regular unleaded gasoline and may include the following emission control systems EM Engine Modifications and TWC Three Way Catalyst if so equipped SAFETY INFORMATION Before operating this generator read and observe all warnings cautions and instructions on the generator and in this Owner s Manual NOTE The following safety information is not meant to cover all possible conditions and situations th...

Page 5: ...ctive harm WARNING This generator may emit highly flammable and explosive gasoline vapors which can cause severe burns or even death if ignited A nearby open flame can lead to explosion even if it isn t directly in contact with gasoline Do not operate near open flame Do not smoke near generator Always operate on a firm level surface Always turn generator off before refueling Allow generator to coo...

Page 6: ... contains important instructions for the PowerSmart 4400W generator that should be followed during installation and maintenance of the generator Generators vibrate in normal use During and after the use of the generator inspect both the generator as well as extension and power supply cords for damage resulting from vibration Have damaged items repaired or replaced as necessary Do not use plugs or ...

Page 7: ...erator outside and away from windows doors and vents Ground Consult with local electrician to determine grounding requirements before operation Clearance Keep all objects at least 5 feet 1 5m from generator Heat from the muffler and exhaust gas can ignite combustible objects Electric shock alert Beware of electric shock hazard Fire Explosion Fuel and its vapors are extremely flammable and explosiv...

Page 8: ...8 KNOWING YOUR GENERATOR Use the illustrations below to become familiar with the locations and functions of the various components and controls of this generator ...

Page 9: ... state When the generating set has no output and the overload indicator is on please take the following steps 1 Lower the total power of the connected electric devices to the rated output range of generating set 2 Check the air intake for impurities and check the control parts for abnormal situation Handle immediately if necessary 3 Press the reset button Oil alarm lamp yellow When the oil level d...

Page 10: ... these steps properly can damage the generator or shorten its lifespan Unpacking Unpack the generator and all its parts Do not discard the carton or any packaging until the generator is completely assembled Step 1 ADD OIL WARNING This engine is not filed with oil before send out to the factory User must add the proper amount of oil before operating the generator for the first time Any attempt to c...

Page 11: ...en flame can lead to explosion even if not directly in contact with gasoline Use clean fresh regular unleaded gasoline with a minimum octane rating of 87 Do not mix oil with gasoline Always wipe up any spilled fuel To add gasoline follow these steps 1 Make sure the generator stopped and it is on a level surface 2 Unscrew fuel cap and set aside NOTE The fuel cap may be tight and hard to unscrew 3 S...

Page 12: ...xists in the generator or in connected electrical devices especially when the unit is equipped with a wheel kit Proper grounding also helps dissipate static electricity which often builds up in ungrounded devices A ground terminal on the frame of the generator has been provided on the generator end For remote grounding connect of a length of heavy gauge 4mm2 copper wire between the generator groun...

Page 13: ...may leak into the home ALWAYS use a battery powered or battery backup CO alarm in the home If you start to feel sick dizzy or weak after the generator has been running move to fresh air RIGHT AWAY See a doctor You may have carbon monoxide poisoning WARNING This generator produces powerful voltage which can result in electrocution ALWAYS ground the generator before using it see the Ground the Gener...

Page 14: ... the switch to ON position The switch button according to the open position and then seize the starter handle and slow pulling until there is a sense of resistance so far and quickly pull to start See fig 6 WARNING Rapid retraction of the starter cord will pull hand and arm towards the engine faster than you can let go Unintentional startup can result in entanglement traumatic amputation or lacera...

Page 15: ...es start the smallest one first and the largest one last DANGER To reduce the risk of electrical shock DO NOT use electrical cords that are worn frayed bare or otherwise damaged DO NOT touch bare wires or receptacles DO NOT handle generating set or electrical cords while standing in water while barefoot or while hands or feet are wet LOADING CAPACITY WARNING Do not overload the generating set Exce...

Page 16: ...enerating set is in a good running state before connecting it to other generating sets The total power of electric devices should not exceed rated power of generating set When electric motor starts the overload indicator red will light up and normally it will stop within 4 seconds If it cannot stop please call 800 791 9458 Mon Fri 9 5 EST or email support amerisuninc com for customer service Durin...

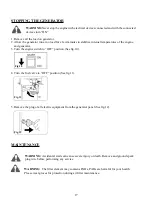
Page 17: ...or 3 Turn the engine switch to OFF position See fig 10 4 Turn the fuel valve to OFF position See fig 11 5 Remove the plug of all electric equipment from the generator panel See fig 12 MAINTENANCE WARNING Accidental starts can cause severe injury or death Remove and ground spark plug wire before performing any service WARNING The filter element may contains PAHs PAHs are harmful for your health Ple...

Page 18: ...ver use water to clean the generating set Water can enter the generating set through the cooling slots and damage the generating set windings WARNING Do not modify the generator in any way Do not tamper with governed speed Generator supplies correct rated frequency and voltage when running at factory set Tampering with the factory set governor will void your warranty Make certain that the generato...

Page 19: ...move the oil dipstick See fig 13 4 Remove the oil drain plug and allow the oil to drain completely 5 Unscrew the oil gauge after tightening the drain bolts 6 Add recommended oil to the upper limit see add oil instruction above 7 Reinstall and fully tighten the dipstick Dispose of used oil at an an approved waste management facility AIR FILTER Routine maintenance of the air cleaner helps maintain p...

Page 20: ...bolt holding the cover plate which retains the end of the spark arrester to the muffler 3 Remove the spark arrester screen 4 Carefully remove the carbon deposits from the spark arrester screen with a wire brush See fig 16 5 Replace the spark arrester if it is damaged 6 Reinstall the spark arrester in the muffler and attach with the two screws STORAGE TRANSPORT PROCEDURES STORAGE WARNING Gasoline i...

Page 21: ...hile it is on vehicle Take the generating set off the vehicle and use it in a well ventilated place Avoid a place exposed to direct sunlight when putting the generating set on a vehicle If the generating set is left in an enclosed vehicle for many hours high temperature inside the vehicle could cause fuel to vaporize resulting in a possible explosion Do not drive on a rough road for an extended pe...

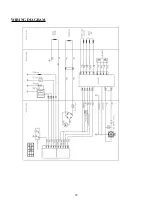
Page 22: ...22 WIRING DIAGRAM ...

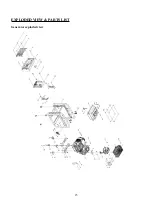
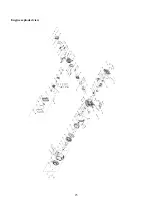
Page 23: ...23 EXPLODED VIEW PARTS LIST Generator exploded view ...

Page 24: ...fler Plate 1 33 100093523 Damping Pad 1 11 100011570 0001 Bolt M6 12 6 34 100099954 Insulation Foam 1 12 100098960 Decorating parts 2 35 100137347 0001 Ignition Module 1 13 100136320 Fuel Switch 1 36 100011250 0002 Bolt M5 14 1 14 100005138 Clamp 1 37 100000655 Clip 1 15 100095915 0002 Fuel Tank 1 38 100011260 0005 Bolt M6 10 3 16 100005159 Clamp 1 39 100121844 0001 Electric Starter Base 1 17 1000...

Page 25: ...25 Engine exploded view ...

Page 26: ...37 100087055 Air Filter Cover 1 12 100004599 Intake Valve Seal 1 38 100004949 Bolt 1 13 100002464 0001 Bolt M8 60 4 39 100011463 0002 Nut M6 2 14 100079792 Cylinder Head 1 40 100155656 Gasket Cylinder Head 1 15 100055588 0009 Bolt M6 20 3 41 100010558 Pin φ10 16 2 16 100010387 Stud M8 34 2 42 100077152 Push Rod 2 17 100009376 Spark Plug 1 43 100004262 Tappet 2 18 100061091 Stud M6 98 2 44 10071398...

Page 27: ...005 Dipstick 1 78 100011459 0003 Nut M14 1 5 1 61 100011215 0001 Bolt M6 12 3 79 100130836 0001 Recoil Starter 1 62 100139133 Governor Gear Bracket 1 80 100128650 Blower Housing 1 63 100122098 Muffler Bracket 1 81 100136927 Recoil Starter 1 64 100130838 Crankcase 1 82 100011565 0001 Bolt M6 10 3 65 100010272 Earth Bolt 2 83 100054365 Bush φ6 5 φ15 7 1 66 100010459 Washer φ10 1 5 φ16 2 84 100011266...

Page 28: ... make a claim under this Limited Warranty you must return the entire power tool product transportation prepaid to PowerSmart The owner must include a legible copy of the original receipt which shall list the date of purchase along with the company s name where the product was purchased THIS LIMITED WARRANTY DOES NOT APPLY TO ANY ACCESSORY ITEMS INCLUDED WITH THE TOOL SUCH AS CIRCULAR SAW BLADES OT...
Reviews: