background image

4

English

ASSEMBLY INSTRUCTIONS

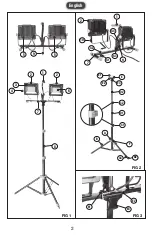
settInG Up anD aDJUstInG tHe 
tRIpoD (FIG 2)

1. 

Loosen the tripod locking knob (F). 

2. 

Push down the leg connector (A) until the legs (B) are 

fully extended and firmly tighten the locking knob (F). 

3. 

Adjust  the  height  of  the  tripod  by  unlocking  the  flip 

locks (C1 & C2) and raising the center poles (D1 & D2) 

of  tripod.  Lock  the  flip  locks  when  the  tripod  reaches 

desired height. 

4. 

Loosen the twist collar (C3) and adjust the extendable 

leg (B2) to level the tripod on uneven surfaces. Tighten 

the collar (C3) after leveling. 

NOTe:

 The maximum height of this tripod is 65".

attacHInG tHe WoRk LIGHt 
asseMBLY to tHe tRIpoD (FIG 3)

1. 

Place the work light assembly on top of the tripod.  

2. 

Use the bracket locking system (E1, E2 and E3) to secure 

the work light assembly to the tripod as shown in FIG 3. 

NOTe:

 Make sure the two locking brackets (E1) are over the 

raised metal plate in the middle of the stand. 

OPERATION

aDJUstInG tHe LIGHt DIRectIon

Your work light can be tilted vertically up to 30° down or 

90° up. 

To Adjust the Light Direction,

 loosen the side locking 

knobs (4-FIG 1). Adjust the work light head to desired 

position, and retighten knobs. 

sWItcH actIon

Each  of  the  work  light  head  is  equipped  with  an  On/Off 

switch (5-FIG 1) located on the back side of the work light. 

Press the switch once to turn the work light on and press 

the switch a second time to turn it off. Always turn the work 

light off before unplugging.

MAINTENANCE


WaRnInG:


Always make sure the work light 

is  unplugged  and  completely  cool  before  attempting  to 

clean it.  

Your work light requires very little care and maintenance. 

Simply clean the lens regularly with a non-abrasive cleaner. 

WARRANTY

This  product is warranted free from defects in material and 

workmanship for 

5 (Five)

 years after date of purchase. This 

limited warranty does not cover normal wear and tear or 

damage from neglect or accident. The original purchaser is 

covered by this warranty and it is not transferable. Prior to 

returning your product to store location of purchase, please 

call the Toll-Free Help Line for possible solutions.

 HELP LINE

For questions about this or any other 

PowerSmith

®


product, 

Please call Toll-Free:


888-552-8665. 

Or visit our website: 


www.

powersmithproducts.com

Summary of Contents for PWLD200T

Page 1: ...ASSISTANCE SANS FRAIS LÍNEA DE AYUDA GRATUITA www powersmithPRODUCTs com The images are for illustration purpose only Actual product may vary for different models Les images sont à titre d illustration seulement Le produit réel peut varier pour différents modèles Las imágenes son sólo para fines ilustrativos El producto real puede variar para diferentes modelos SAVE THIS MANUAL FOR FUTURE REFERENC...

Page 2: ...FIG 1 FIG 2 5 9 5 1 2 3 4 7 6 8 2 E1 D2 D1 E E3 E2 C1 F B A C2 B2 E1 E3 E2 FIG 3 10 G2 G3 G4 G1 1 2 H 7 C3 2 English ...

Page 3: ... of safety Use only with an extension cord for outdoor use such as an extension cord of cord type SW SW A SOW SOW A STW STW A STOW STOW A SJW SJW A SJOW SJOW A SJTW SJTW A or SJTOW SJTOW A Do not look directly at the lighted lamps to avoid eye injuries Always keep the work light away from any flammable surface or materials Always check damaged or worn out parts before using the work light Broken p...

Page 4: ...djust the Light Direction loosen the side locking knobs 4 FIG 1 Adjust the work light head to desired position and retighten knobs SWITCH ACTION Each of the work light head is equipped with an On Off switch 5 FIG 1 located on the back side of the work light Press the switch once to turn the work light on and press the switch a second time to turn it off Always turn the work light off before unplug...

Page 5: ... de terre doit être fourni sur les circuits ou les prises de courants utilisés pour cette lampe de travail pour emplacement mouillé Les embases de connecteur sont dotées d une protection de fuite à la terre et peuvent être utilisées pour cette mesure de sécurité N utiliser qu avec des cordons prolongateurs prévus pour un usage extérieur comme ceux des types suivants SW SW A SOW SOW A STW STW A STO...

Page 6: ...ue métallique surélevée au milieu du pied FONCTIONNEMENT RÉGLAGE DE LA DIRECTION DU FAISCEAU LUMINEUX La tête de la lampe de travail peut être basculée à la verticale jusqu à un angle de 30 degrés vers le bas ou de 90 degrés vers le haut Pour régler la direction du faisceau lumineux desserrer les boutons de verrouillage latéral 4 FIG 1 Régler la tête de la lampe de travail à la position désirée pu...

Page 7: ... es necesario efectuar reparaciones consulte con un electricista profesional No use un lavador a presión para limpiar este producto No modifique la luz de trabajo de ninguna manera La modificación no autorizada puede impedir el funcionamiento y la seguridad y podría afectar la vida útil del producto Hay aplicaciones específicas para las que fue diseñada la luz de trabajo Almacene la luz de trabajo...

Page 8: ...placa de metal elevado en el centro del soporte UTILIZACIÓN AJUSTE DEL SENTIDO DE LA LUZ La cabezadelaluzdetrabajopuedeinclinarseverticalmente hasta 30 hacia abajo o 90 hacia arriba Para ajustar el sentido de la luz afloje las perillas de traba lateral 4 FIG 1 Ajuste la cabeza de la luz de trabajo a la posición deseada y vuelva a apretar las perillas Este producto está garantizado libre de defecto...

Page 9: ...9 NOTES ...

Page 10: ...Richpower Industries Inc 736 Hampton Road Williamston SC USA www richpowerinc com 2021 08 V01 ...

Reviews: