background image

Page 5 — English

oPerAtioN

wArNiNG:

Do not allow familiarity with products to make you care-
less. Remember that a careless  fraction of a second is 
sufficient to inflict severe injury.

wArNiNG:

Always remove battery pack from the tool when you are 
assembling parts, making adjustments, cleaning, or when 
not in use. Removing battery pack will prevent accidental 
starting that could cause serious personal injury.

wArNiNG:

Always wear eye protection with side shields marked to 
comply with ANSI Z87.1. Failure to do so could result in 
objects being thrown into your eyes, resulting in possible 
serious injury.

APPLiCAtioNs

You may use this product for the purposes listed below:

 

Drilling and driving screws in all types of wood products 
(lumber, plywood, paneling, composition board, and hard 
board), ceramics, plastics, fiberglass, laminates, metals

vAriAbLe sPeeD switCH triGGer

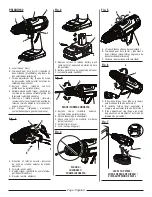
See Figure 1, page 8.

The variable speed switch trigger delivers higher speed with 
increased trigger pressure and lower speed with decreased 
trigger pressure.
To turn the drill 

oN

, depress the switch trigger. To turn it 

oFF

, release the switch trigger and allow the chuck to come 

to a complete stop.

Note:

  A whistling or ringing noise coming from the switch 

during use is a normal part of the switch function.

DireCtioN oF rotAtioN seLeCtor

(ForwArD/reverse/CeNter LoCK)

See Figure 1, page 8.

Set the direction of rotation selector in the 

oFF

 (center lock) 

position to lock the switch trigger and help prevent accidental 
starting when not in use.

Position the direction of rotation selector to the left of the 
switch trigger for forward drilling. Position the selector to the 
right of the switch trigger to reverse the direction.

Note: 

The drill will not run unless the direction of rotation 

selector is pushed fully to the left or right.

NOTICE: 

To prevent gear damage, always allow the chuck to 
come to a complete stop before changing the direction 
of rotation. 

wArNiNG:

Battery tools are always in operating condition. Lock the 
switch when not in use or carrying at your side, when 
installing or removing the battery pack, and when install-
ing or removing bits.

iNstALLiNG/removiNG bAtterY PACK

See Figure 2, page 8.

  Lock the switch trigger.

  Insert the battery pack into the product as shown.

  Make sure the latches on each side of the battery pack 

snap in place and that battery pack is secured in the 
product before beginning operation.

  Depress the latches to remove the battery pack.

iNstALLiNG/removiNG bits

See Figures 3 - 4, page 8.

The arrows on the keyless chuck indicate which direction 
to rotate the chuck body to tighten or release the drill bit.
Do not use a wrench to tighten or loosen the chuck jaws.

  to install bits, 

lock the switch trigger.


Open or close the chuck jaws until the opening is slightly 
larger than the bit size you intend to use. 


Raise the front of the drill slightly and insert the drill bit. 

wArNiNG:


Make sure to insert the drill bit straight into the chuck 
jaws. Do not insert the drill bit into the chuck jaws at an 
angle then tighten. This could cause the drill bit to be 
thrown from the drill, resulting in possible serious per-
sonal injury or damage to the chuck.


Grasp and hold the collar of the chuck with one hand. 
With your other hand, rotate the chuck body to close and 
tighten the chuck jaws. 

wArNiNG:


Do not hold the chuck body with one hand and use the 
power of the drill to tighten the chuck jaws on the drill 
bit. The chuck body could slip in your hand, or your 
hand could slip and come in contact with the rotating 
drill bit. This could cause an accident resulting in serious 
personal injury.

 

to remove bits, 

lock the switch trigger and open the 

chuck jaws.

 

The bit provided with the drill can be placed in the storage 
area, located on the base of the drill.

Summary of Contents for PSL0DD182

Page 1: ...NSULTAS CONSERVER CE MANUEL POUR FUTURE RÉFÉRENCE To register your POWERSTROKE product please visit http register powerstroketools com Pour enregistrer votre produit de POWERSTROKE s il vous plaît la visite http register powerstroketools com Para registrar su producto de POWERSTROKE por favor visita http register powerstroketools com TABLE OF CONTENTS General Power Tool Safety Warnings 2 3 Drill D...

Page 2: ...ve equipment such as dust mask non skid safety shoes hard hat or hearing protection used for appropriate conditions will reduce personal injuries Prevent unintentional starting Ensure the switch is in the off position before connecting to power source and or battery pack picking up or carrying the tool Carrying power tools with your finger on the switch or energising power tools that have the swit...

Page 3: ...ould be charged in a location where the temperature is more than 50 F but less than 100 F To reduce the risk of serious personal injury do not store outside or in vehicles Under extreme usage or temperature conditions battery leakage may occur If liquid comes in contact with your skin wash immediately with soap and water If liquid gets into your eyes flush them with clean water for at least 10 min...

Page 4: ...d orbits etc per minute The following signal words and meanings are intended to explain the levels of risk associated with this product SYMBOL SIGNAL MEANING DANGER Indicates an imminently hazardous situation which if not avoided will result in death or serious injury WARNING Indicates a potentially hazardous situation which if not avoided could result in death or serious injury CAUTION Indicates ...

Page 5: ... to the left or right notice To prevent gear damage always allow the chuck to come to a complete stop before changing the direction of rotation WARNING Battery tools are always in operating condition Lock the switch when not in use or carrying at your side when installing or removing the battery pack and when install ing or removing bits INSTALLING REMOVING BATTERY PACK See Figure 2 page 8 Lock th...

Page 6: ...s hold tool by insulated gripping surfaces handle when performing the operation to prevent a shock to the operator Depress the switch trigger to start the drill Move the bit into the workpiece applying only enough pressure to keep the bit cutting or driving the screw Do not force the drill or apply side pressure to elongate a hole Let the tool do the work WARNING When drilling be prepared for bind...

Page 7: ...pendant l utilisation d un outil électrique peut entraîner des blessures graves Utiliser l équipement de sécurité Toujours porter une protection oculaire L équipement de sécurité tel qu un masque filtrant de chaussures de sécurité d un casque ou d une protection auditive utilisé dans des conditions appropriées réduira le risque de blessures Éviter les démarrages accidentels S assurer que le commut...

Page 8: ...ique et de blessures graves Toujours porter une protection oculaire munie d écrans latéraux certifiée conforme à la norme ANSI Z87 1 lors du montage des pièces du fonctionnement de l outil ou au moment de l entretien Le respect de cette consigne réduira les risques de blessures graves Protection respiratoire Porter un masque facial ou un masque antipoussière si le travail produit de la poussière L...

Page 9: ...n garde suivants et leur signification ont pour but d expliquer le degré de risques associé à l utilisation de ce produit SYMBOLE SIGNAL SIGNIFICATION DANGER Indique une situation extrêmement dangereuse qui si elle n est pas évitée aura pour conséquences des blessures graves ou mortelles AVERTISSEMENT Indique une situation potentiellement dangereuse qui si elle n est pas évitée pourrait entraîner ...

Page 10: ...vée HI 2 pour un perçage rapide ou pour d autres applications AVERTISSEMENT Ne pas laisser la familiarité avec l produit faire oublier la prudence Ne pas oublier qu une fraction de seconde d inattention peut entraîner des blessures graves AVERTISSEMENT Toujours retirer la bloc pile de l outil au moment d assembler des pièces d effectuer des réglages et de procéder au nettoyage ou lorsque l outil n...

Page 11: ... un foret de petite taille avant d élargir le trou avec un foret de plus grande taille NOTE L utilisation de la perceuse à faible vitesse de façon continue peut entraîner une surchauffe Si la perceuse surchauffe la refroidir en la laissant tourner à vide et à la vitesse maximum AVIS Ne jamais changer de gamme de vitesse lorsque l outil est en fonctionnement Le non respect de cette mise en garde po...

Page 12: ...de causar lesiones corporales serias Use equipo de seguridad Siempre póngase protección ocular El uso de equipo de seguridad como mascarilla para el polvo calzado de seguridad casco y protección para los oídos en las circunstancias donde corresponda disminuye el riesgo de lesiones Evite un arranque accidental de la unidad Asegúrese de que el interruptor esté en la posición de apagado antes de cone...

Page 13: ...a a la intemperie ni en el interior de vehículos En condiciones extremas de uso o temperatura las baterías pueden emanar líquido Si el líquido llega a tocarle la piel lávese de inmediato con agua y jabón Si le entra líquido en los ojos láveselos con agua limpia por lo menos 10 minutos y después busque de inmediato atención médica Con el cumplimiento de esta regla se reduce el riesgo de lesiones co...

Page 14: ...nuto Revoluciones carreras velocidad superficial órbitas etc por minuto Las siguientes palabras de señalización y sus significados tienen el objeto de explicar los niveles de riesgo relacionados con este producto SÍMBOLO SEÑAL SIGNIFICADO PELIGRO Indica una situación peligrosa inminente la cual si no se evita causará la muerte o lesiones serias ADVERTENCIA Indica una situación peligrosa posible la...

Page 15: ... para taladrar hacia adelante Ubique el selector a la derecha del gatillo del interruptor para taladrar hacia atrás NOTA El taladro no funciona a menos que se empuje el selector de dirección de giro completamente a la izquierda o derecha FUNCIONAMIENTO AVISO Para evitar dañar el engranaje antes de cambiar el sentido de rotación siempre permita que se detenga completamente el portabrocas ADVERTENCI...

Page 16: ...uar una operación para evitar una descarga eléctrica al operador Oprima el gatillo del interruptor para encender el taladro Introduzca la broca en la pieza de trabajo aplicando la presión suficiente para manterner el corte de la broca No fuerce el taladro ni aplique presión lateral para ovalar el orificio Permita que la producto realice el trabajo ADVERTENCIA Al taladrar esté preparado por si se a...

Page 17: ...val cover the battery pack s terminals with heavy duty adhesive tape Do not attempt to destroy or disassemble battery pack or remove any of its compo nents Batteries must be recycled or disposed of properly Also never touch both terminals with metal objects and or body parts as short circuit may result Keep away from children Failure to comply with these warnings could result in fire and or seriou...

Page 18: ...G C E A B F A direction of rotation selector sélecteur de sens de rotation selector de marcha adelante B forward avant atrás C Switch trigger gâchette de commutateur gatillo del interruptor D reverse arrière adelante B D A C C B E A D Fig 3 Fig 4 Fig 5 A keyless chuck mandrin sans clé portabrocas de apriete sin llave B unlock desserage desasegurar C chuck jaws mors du mandrin mordazas del portabro...

Page 19: ...Page Página 9 NOTES NOTAS ...

Page 20: ...ing drilling and other construction activities may contain chemicals including lead known to the State of California to cause cancer birth defects or other reproductive harm Wash hands after handling Some examples of these chemicals are lead from lead based paints crystalline silica from bricks and cement and other masonry products and arsenic and chromium from chemically treated lumber Your risk ...

Reviews: