background image

5

4111-0008 — April 2017

June 2017

PRECAUTIONS

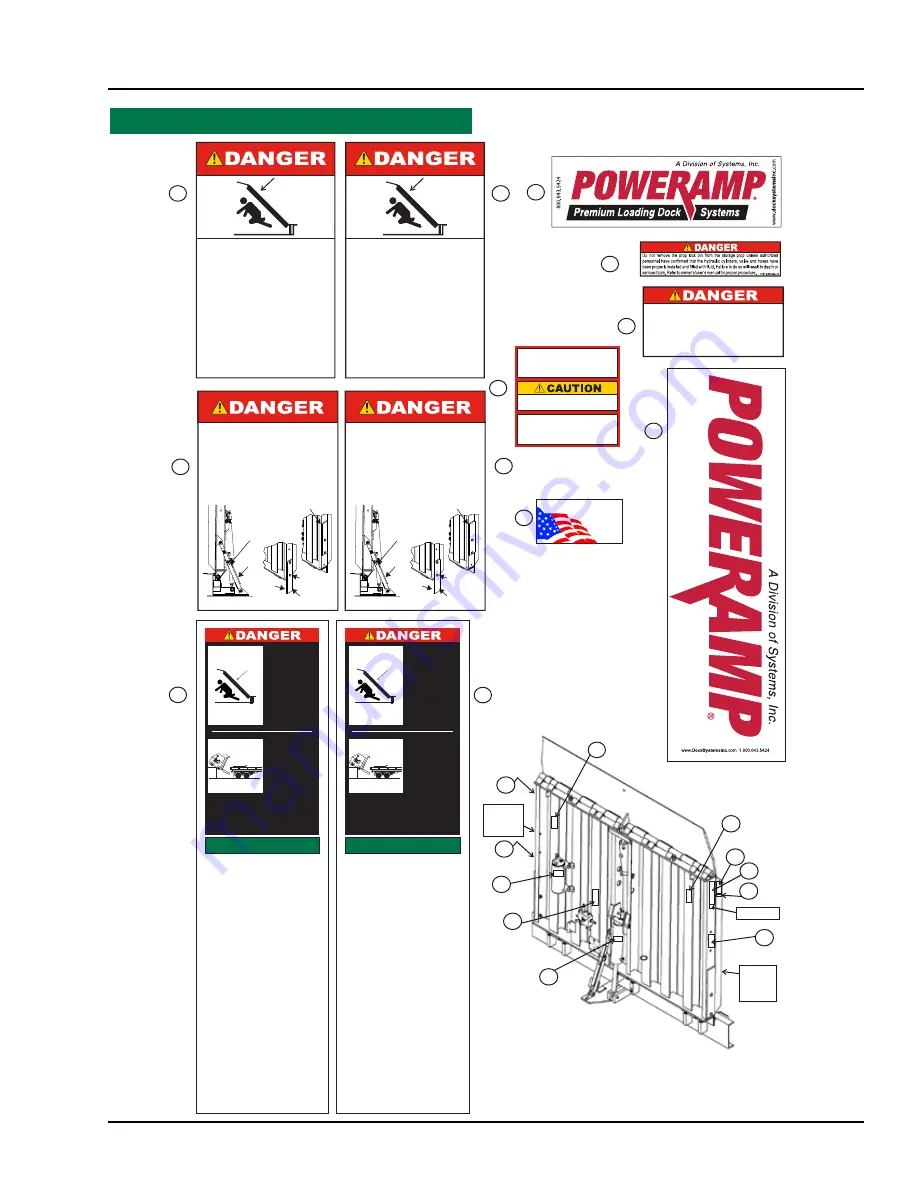
Precautionary Decal’s

2

3

4

5

6

1

1

2

7

8

4

2

2

5

7

6

1

3

VS

 Se

rie

s

1

9

8

8

PROUDLY 

MADE

IN

USA

SYSTEMS, INC.

GERMANTOWN, WI

MALVERN, AR

9

.

CRUSH HAZARD

Before doing any maintenance, repair or adjustments on the 
dock leveler, first store the leveler in a vertical position with lip 
extended, then ensure all maintenance props are in 
maintenance positions and properly secured, and then 
properly secure the storage prop with the prop lock pin.

DO NOT remove the prop lock pin from the storage prop until 
you are sure the hydraulic system is in proper working condition 
and all maintenance props are in maintenance positions and 
properly secured. After prop lock pin is removed from the 
storage prop all maintenance props may be returned to 
storage positions. DO NOT stand in front of the dock leveler. 
Reach from side of the leveler.

DO NOT force the prop lock pin out of the storage prop. If the 
pin does not slide freely, support the leveler securely using other 
means and determine the cause of the interference.

Failure to follow these instruction will result in death or serious 
injury.

Refer to owner’s/user’s manual for proper procedure.

1751-0130 Rev D

FIG.“A”

FIG.“B”

CRUSH HAZARD
DO NOT WORK UNDER OR IN FRONT OF DOCK 
LEVELER

  unless ALL props have been properly 

positioned and secured. First position side 
maintenance prop(s)  and secure with screw and 
nut as shown in figure “A” below. Then position 
storage prop and secure with prop lock pin as 
shown in figure “B” below. Failure to do so will result 
in death or serious injury. Refer to owner’s/user’s 
manual for proper procedure.

Prop Lock

Pin

Storage

Prop

Stored

Position

Maintenance

Position

Screw and Nut

Maintenance

Prop

1751-0230 Rev E


A

B

TOLERANCES

(UNLESS OTHERWISE NOTED)

FRACTIONAL:  

1/32"

DECIMAL:
     .00  = 

.01"

     .000 = 

.005"

ANGULAR:  

1


MATERIAL

DRAWN BY

CHECKED BY

DRAWING NO.

DATE

mikemartin

2/4/2015

vs prop


P  O  W  E  R  A  M  P

M  C  G  U  I  R  E

D  L  M 

S    Y    S    T    E   M    S,    I    N   C.

L  o  a  d  i  n  g   D  o  c  k   E  q  u  i  p  m  e  n  t 

This print is the property of Systems, Inc. and represents a proprietary article in which Systems, Inc. retains any and all 

patent and other rights, including exclusive rights of use and/or manufacture and/or sale. Possession of this print does 

not convey any permission to reproduce, print or manufacture the article or articles shown therein, such permission to be 

granted only by written authorization signed by an officer or other authorized agent of Systems, Inc. thereof. 


STOCK NO.


CRUSH HAZARD

DO NOT REMOVE 

hydraulic cylinder until leveler is 

safely supported by maintenance prop. Refer to 

owner’s/user’s manual for proper maintenance 

procedure. Failure to comply will result in death or 

serious injury.

1751-0138 Rev B

ATTENTION INSTALLER:

Replace rear plug with

breather cap

Do not overfill

Oil should fill ½ site glass

Use ULTRA VIS HVI 15 or

MIL SPEC 5606

Questions Call: 800.643.5424

1751-0490 Rev B

Serial Tag

Left

Outside

Beam

Right

Outside

Beam

Decal 2 with have two positions, one on the left outside beam as shown and one on the right outside beam in the same position

Decal 8 will have two positions, one on the left outside beam as shown and one on the right outside beam in the same position

Decal 3 will be positioned on the upper most corner of the right outside beam (mirror position of decal 7)


CRUSH HAZARD

DO NOT WALK IN 
FRONT OF DOCK 
LEVELER until you:


Restore the dock 
leveler to its safe 
stored ver tical 
position with lip 
extended.

Unsupported dock 
levelers can lower 
unexpectedly.

Before allowing 
vehicle to leave 
the dock always:


Ensure that no equipment material or 

people are on dock leveler.


Restore dock leveler to its safe stored 

vertical position with lip extended.

OPERATION

1. Read and follow all instructions and warnings in the 

owner’s/user’s manual.

2. Use of dock leveler restricted to authorized 

personnel.

3. Always chock transport vehicle wheels or engage 

vehicle restraint before operating dock leveler or 
beginning to load or unload.

4. Never use hands or equipment to move the ramp or 

lip.

5. Before activating dock leveler:

 

Ensure transport vehicle is backed in against 
bumpers.

 

Remove any end loads if required.

 

Check transport vehicle alignment to avoid lip 
interference. If lip does not lower to transport 
vehicle bed, reposition transport vehicle.

6. Ensure that transport vehicle bed supports extended 

lip or the leveler frame supports the ramp before 
driving on ramp.

7. Stay clear of hinges and front and sides of moving 

dock leveler.

8. Never use damaged or malfunctioning dock leveler. 

Report problems immediately to supervisor.

MAINTENANCE/SERVICE

1. Read and follow all instructions, warnings and 

maintenance schedules in the owner’s/user’s 
manual.

2. Maintenance/service of dock leveler restricted to 

authorized personnel.

3. Place barriers on the driveway and on dock floor to 

indicate service work is being performed.

4. DO NOT SERVICE LEVELER unless dock leveler is 

securely supported by all prop.

a. First, ensure all maintenance props are in 

maintenance positions and properly secured.

b.  Then engage prop lock pin in storage prop.

5. Turn off power and use OSHA lockout/tagout 

procedures.

Failure to follow posted instructions 

will result in death or serious injury.

Call 1.800.643.5424 for replacement placards, warning labels, or owner’s/user’smanuals

1751-0807 Rev C

SAFETY INFORMATION

Summary of Contents for VS series

Page 1: ...94 N11481 McCormick Drive Germantown WI 53022 800 643 5424 fax 262 257 7399 www poweramp com techservices poweramp com Printed in U S A Copyright 2017 Manual No 4111 0008 April 2017 June 2017 VS SERIES Dock Leveler Owner s User s Manual ...

Page 2: ...rvice 16 Operation Theory 18 Operating Instructions 19 Ramp Loading Unloading Instructions 20 End Loading Unloading Instructions 21 Maintenance Service Dock Leveler 22 Periodic Maintenance 23 Adjustments Adjust PPAC Pressure Relief 26 Adjust Main Pressure Relief 27 Purging Hydraulic System 17 Limit Switch 28 Rod Eye Adjustment 17 Troubleshooting Troubleshooting 31 Parts Misc Parts 34 Frame and Pla...

Page 3: ...ymbol The use of the word NOTICE indicates information considered important but not hazard related to prevent machine or property damage Indicates a type of safety sign or separate panel on a safety sign where safety related instructions or procedures as described Do not start the equipment until all unauthorized personnel in the area have been warned and have moved outside the operating zone Remo...

Page 4: ...et clear of pinch points Avoid putting any part of your body near moving parts Chock restrain all transport vehicles Never remove the wheel chocks until loading or unloading is finished and transport driver has been given permission to drive away Do not use a broken or damage dock leveling device Make sure proper service and maintenance procedures have been performed before using Make sure lip ove...

Page 5: ...eling device if transport vehicle is too high or too low Do not overload the dock leveling device Do not operate any equipment while under the influence of alcohol or drugs Do not leave equipment or material unattended on dock leveling device Operational Precautions ...

Page 6: ...isher of the proper type nearby when grinding or welding A B TOLERANCES UNLESS OTHERWISE NOTED FRACTIONAL 1 32 DECIMAL 00 01 000 005 ANGULAR 1 MATERIAL DRAWN BY CHECKED BY DRAWING NO DATE mikemartin 2 4 2015 vs prop P O W E R A M P M C G U I R E D L M S Y S T E M S I N C L o a d i n g D o c k E q u i p m e n t This print is the property of Systems Inc and represents a proprietary article in which ...

Page 7: ... other authorized agent of Systems Inc thereof STOCK NO CRUSH HAZARD DO NOT REMOVE hydraulic cylinder until leveler is safely supported by maintenance prop Refer to owner s user s manual for proper maintenance procedure Failure to comply will result in death or serious injury 1751 0138 Rev B ATTENTION INSTALLER Replace rear plug with breather cap Do not overfill Oil should fill site glass Use ULTR...

Page 8: ... and the manufacturer s specific instructions provided with the dock leveling device Maintaining updating and retraining all operators on safe working habits and operation of the equipment regardless of previous experience should be done on a regular basis and should include an understanding and familiarity with all functions of the equipment Owners users shall actively maintain update and retrain...

Page 9: ...rmance with an absolute minimum of maintenance Its revolutionary hydraulic system efficiently controls and operates every function To obtain maximum performance and longest possible use a simple program of preventive maintenance is recommended 9 When goods are transferred between the loading dock and the transport vehicle this vehicle shall have the brakes and wheel chocks or positive restraints t...

Page 10: ...ylinders Powerpack may be mounted on underside of leveler or remotely A Lip B Deck C Lip Cylinder D Flow Control Valve E Hoist Cylinder F Storage Prop Yoke G Prop Kicker Behind Prop Assy H Storage Prop Assembly with Prop Lock Pin included I Hinge Pins J Stored Limit Switch K Maintenance Props 2 H C F D A B E J I G K K ...

Page 11: ...o pit floor distance B on both sides of the rear embed channel and at front if applicable Measure pit floor taper rear to front cannot exceed 1 2 total taper Measure pit length distance C at both sides Measure corner to corner criss cross distance D at both sides Take measurements at dock floor level and at pit floor level NOTE If any measurement are off by more than 1 8 in 3 18 mm in depth width ...

Page 12: ...xclusive rights of use and or manufacture and or sale Possession of this print does not convey any permission to reproduce print or manufacture the article or articles shown therein such permission to be granted only by written authorization signed by an officer or other authorized agent of Systems Inc thereof STOCK NO FIG A FIG B File Name 1751 0230 Rev E Decal Size 3 75 x 6 25 CRUSH HAZARD DO NO...

Page 13: ...reely on the mounting cap screw DO NOT over tighten 3 Attach lifting chain to lifting bracket s A and to a lifting device i e hoist or fork truck having the appropriate lifting capacity and reach NOTE Overall length of lifting chain and bracket A must be kept to a minimum to prevent interference between the lifting equipment and the building ceiling or door as the dock leveler is lowered into the ...

Page 14: ...ck Floor D Rear Embed Frame E Embed Frame Storage Prop F Pyramid Preferred G Stepped Acceptable H Offset Not Acceptable I Straight Not Acceptable The minimum size of the shim that contacts the leveler frame i e the top shim of each shim stack must be at least 4 1 2 x 4 1 2 in 114 3 x 114 3 mm to support the full width of the hoist cylinder storage prop weldment Use the thickest shim stock possible...

Page 15: ...ler down centering the leveler s three hinges with the embeds hinges Insert the pins Start with the outside first second install the center pin and than the last hinge pin Optional Use a bottle jack to align the rear of the dock leveler to the embed channel A Rear Embed C Maintenance Props E Lifting Lug B Dock Leveler D Hinge Pins F Storage Prop The dock leveler is heavy Use a lifting device and c...

Page 16: ...l connections to the pit junction box must be performed by a certified electrician and conform to all local and applicable national codes When drilling access hole in the control box DO NOT penetrate too deep components may be damaged DO NOT turn control upside down to drill any access holes To prevent damaged to electrical components from debris cover components prior to drilling Seal all conduit...

Page 17: ...n and placement of product placards Make sure placard is in plain view of dock leveler and or vehicle restraint operations Suggested placement of placard is near control box attached to electrical conduit by using nylon tie If there is no control box present mount placard on wall to the immediate left of leveler at eye level Placard placement shown as reference only ...

Page 18: ...VIS HVI 15 or MIL SPEC 5606 Questions Call 800 643 5424 1751 0490 Rev B Following start up or if the platform is raised using an external lifting device or the hydraulic system is opened to atmosphere air will enter into the hydraulic system Whenever this happens purge air from hydraulic system fully DO NOT grind or weld if hydraulic fluid or other flammable liquid is present on the surface to be ...

Page 19: ...ting pin 4 Remove one of two screws holding the stored limit switch Swivel stored limit switch away from storage prop SEE PAGE 28 5 Open down speed flow control valve counter clockwise Write down the adjustment Down speed control valve is located on hoist cylinder SEE PAGE 28 6 Restore power to the leveler Confirm the BLUE Leveler Stored indicator light is no longer illuminated 7 Cycle the hoist c...

Page 20: ...ock height the leveler goes into float mode You will also hear the motor make a different sound and you no longer need to hold the LOWER button This feature is designed into the operation of the leveler to allow for the floating vertical motion of the transport vehicle during loading and unloading To lower the lip the vertical leveler must not be in the stored position Depress the LOWER L button a...

Page 21: ... any equipment while under the influence of alcohol or drugs DO NOT leave equipment or material unattended on the dock leveler Stay clear of dock leveler when transport vehicle carrier is entering or leaving dock area DO NOT move or use the dock leveler if anyone is under or in front of leveler Keep hands and feet clear of pinch points Avoid putting any part of your body near moving parts Only tra...

Page 22: ...ake sure that the lip is fully extended and supported on the transport vehicle along the entire width of the platform with at least 4 in 102 mm of lip contacting the transport vehicle bed 7 When loading or unloading is finished raise the platform by depressing and holding RAISE B button When fully raised the leveler will shut off and the Blue LEVELER STORED light will come on 8 Remove chocks from ...

Page 23: ... Instruct driver to remain at the dock until the loading or unloading process has been completed 3 Chock the transport vehicle wheels or use the vehicle restraint if available 4 Depress the LOWER B platform will lower once the unit is out of the stored position depress the LIP D button the lip will lower 5 Continue to depress the LOWER B button until the unit goes into float mode to the lip keeper...

Page 24: ...d locking device to lock the maintenance prop in the service position Only the person servicing the equipment should have the key to unlock the maintenance prop Unless the dock leveler is equipped with a tethered remote two people are required to engage the maintenance prop one person to operate the unit the other person to engage the maintenance prop Always post safety warnings and barricade the ...

Page 25: ...e mixed together Mixing with fluids that do not meet or exceed MIL H 5606 G may damage the equipment and WILL void warranty Use of hydraulic fluids with equivalent specifications to those listed here are acceptable A Lip Hinge Area C Storage Prop E Lip Cylinder B Platform Pins D Hoist Cylinder Use of fluids that do not have equivalent specifications to those in the following list will result in ab...

Page 26: ...2 DECIMAL 00 01 000 005 ANGULAR 1 MATERIAL DRAWN BY CHECKED BY DRAWING NO DATE mikemartin 2 4 2015 vs prop P O W E R A M P M C G U I R E D L M S Y S T E M S I N C L o a d i n g D o c k E q u i p m e n t This print is the property of Systems Inc and represents a proprietary article in which Systems Inc retains any and all patent and other rights including exclusive rights of use and or manufacture ...

Page 27: ...luid level The fluid level should be approximately 2 in 51 mm N from top of reservoir M 5 Add hydraulic fluid if necessary Use only recommended fluid Pg 23 6 Install breather cap 7 Turn ON electrical power to the leveler 8 Lower the unit then extend the lip to the raised position A low fluid level or the use of hydraulic fluids not equivalent to the fluid types recommended will cause abnormal oper...

Page 28: ...r D Hex Adjusting Screw E Jam Nut F Acorn Nut When service under the dock leveler is required always lock all electrical disconnects in the OFF position after raising the platform and engaging the maintenance prop Always post safety warnings and barricade the work area at dock level and ground level to prevent unauthorized use of the dock leveler before maintenance is complete A B C F E D ...

Page 29: ...nut F 4 Adjust slotted head adjusting screw D as follows Turn clockwise to increase pressure relief Turn counterclockwise to decrease pressure relief 6 While holding the adjusting screw tighten jam nut 7 Turn ON electrical power to the dock leveler 8 Check leveler operation 9 Repeat steps 1 8 as necessary Adjust Unit Pressure Pressure Relief Pressure Relief Jam Nut Slotted Adjusting Screw Slotted ...

Page 30: ...tions 1 Loosen the allen head set screw 2 To decrease the lowering speed turn knurled knob screw A clockwise 3 To increase the lowering speed turn knurled adjusting screw A counterclockwise 4 Tighten the set screw when once desired down speed has been set ADJUSTMENTS Stored Limit Switch Adjustment Follow all safety precautions 1 Loosen Set Screw 2 With roller arm contacting storage prop rotate adj...

Page 31: ... 2 to 1 approximately of movement in the storage prop 5 When the play in the prop is correct only 1 1 2 threads max will be exposed through the yoke If more threads exposed the storage prop must be shorted 6 Raise side maintenance props 7 Turn on electrical power remove lockout tagout devices When service under the dock leveler is required always lock all electrical disconnects in the OFF position...

Page 32: ...rd PPE Personal Protection Equipment Required De energize equipment before working on or inside Do not open cover without appropriate PPE Refer to NFPA 70E for PPE requirements This panel may contain more than one power source Hazardous Voltage Will Result in Death or Serious Injury 1751 0736 Rev A When service under the dock leveler is required always lock all electrical disconnects in the OFF po...

Page 33: ...hase reversed Reverse any two legs at the branch circuit disconnect Single phase units only Platform does not rise or lower Motor energizes but does not run Line voltage too low Check wiring to motor for high resistance Check for loose or corroded connections Check if gauge of wires to motor are of correct size and specification for load requirement Replace if necessary Defective motor centrifugal...

Page 34: ...e in the Maintenance section Contaminated hydraulic system Clean and inspect valves Flush contaminated oil from hydraulic system Fill system with new oil See Periodic Maintenance in the Maintenance section Damaged or restricted hydraulic hose s Replace damaged hose s Remove restriction Pressure relief set too low Increase pressure relief See Adjust Main Pressure Relief in the Adjustment section NO...

Page 35: ...with new or good working valve Pump Motor must be running Lip does not lower C D and E Coils not energized All three valves must be energized Check power to the all spool valves they should have a magnetic pull Pump Motor must be running Bad spool valve Remove and clean spool valves or replace with new or good working valves Pump Motor must be running Platform does not lower Blue stored light not ...

Page 36: ...RTS Item Quantity Part Number Description A 2 2101 0027 Screw 10 32 UNF x 1 75 Lg B 1 0961 0130 Arm Limit Switch C 1 0961 0186 Limit Switch Storage Limit Switch Click for manuals and videos http www docksystemsinc com Parts Service A C B ...

Page 37: ...2101 0153 Bolt 1 4 UNC 1 2 Lg B 3 2101 0005 Washer Lock 1 4 C 1 8581 0023 Solenoid Prop Kicker Solenoid Prop Kicker Item Quantity Part Number Description A 1 2751 0042 J Box Fiber Glass 5 x 5 Includes Cover B 1 0961 0054 Mercury Switch C 1 3051 0025 Rectifier Bridge J Box A B C B C A ...

Page 38: ...ete A 1 9222 0097 Yoke Upper Arm Prop B 3 0522 0005 Clevis Pin 3 4 Dia x 2 Lg C 1 Upper Weldment D 1 Lower Weldment E 1 2101 0254 Prop Lock Pin and Clip F 3 2101 0045 Cotter Pin G 1 2101 0093 Washer Flat H 1 1751 0229 Decal Storage Prop Assembly Not Sold Separate A D C E B F File Name 1751 0229 Rev E Decal Size 4 x 1 H G ...

Page 39: ...112 0595 1112 7 WIDE 16 0595 0393 0595 1113 0595 1113 18 0595 0394 0595 1114 0595 1114 20 0595 0395 0595 1115 0595 1115 VERTICAL PLATFORMS 2003 to Present B 6 WIDE 40K 45K 50K 5 9515 0843 9515 1077 9515 1121 6 9515 0844 9515 1074 9515 1124 8 9515 1065 9515 1071 CALL 6 5 WIDE 5 9515 0845 9515 1078 9515 1122 6 9515 0846 9515 1075 9515 1125 8 9515 1066 9515 1072 CALL 7 WIDE 5 9515 0849 9515 1079 9515...

Page 40: ...38 4111 0008 April 2017 June 2017 PARTS Lip and Platform Q N I H D E F A B C G M K L O W V U J T Y X P S R ...

Page 41: ...rop H 4 2101 0262 Bolt 5 8 11 UNC X 1 75 Grade 8 I 4 2101 0042 Nut 5 8 11 UNC Grade 5 J 1 0525 0085 Lip Cylinder Without Fittings 0526 0016 Lip Cylinder With Fittings K 1 9202 0004 Pin Lip Cyl 3 4 Dia x 4 3 8 Lg L 2 2101 0049 Hairpin Clip M 1 2401 0004 Grommet N 1 0525 0125 Hoist Cylinder 8 Lg 10 or 12 Pits 0525 0126 Hoist Cylinder 8 Lg 15 Pits 0525 0127 Hoist Cylinder 5 or 6 Lg Platforms O 1 9202...

Page 42: ...eler Hydraulic Components PARTS N R E O C D I H L S T B P A M F G Q Sight Glass Fluid should cover half the sight glass Fluid level must be checked with leveler in the stored position with the lip folded Fill reservoir thru allen plug not the breather ...

Page 43: ...99 Breather Reservoir E 4 2101 0011 Hex Head Capscrew F 4 2101 0058 Lock Washer G 4 2101 0060 Flat Washer H 1 9394 0014 Motor Assembly 115V 1 Ph 9394 0015 Motor Assembly 460V 3 Ph 9394 0033 Motor Assembly 208V 1 Ph 9394 0034 Motor Assembly 230V 1 Ph 9394 0035 Motor Assembly 575V 3 Ph 9394 0043 Motor Assembly 208V 3 Ph 9394 0044 Motor Assembly 230V 3 Ph I 1 9301 0268 Pump 1 75GPM L 1 9904 0090 Hose...

Page 44: ...42 4111 0008 April 2017 June 2017 Centra Power Hydraulic Components PARTS A B E D F G I H C ...

Page 45: ...0525 0125 Hoist Cylinder 8 Lg 10 or 12 Pits C 1 9904 0059 Hose 35 00 Lg 6 JIC Swivel Both Ends 5 6 LG 9904 0137 Hose 60 00 Lg 6 JIC Swivel Both Ends 8 LG D 1 9904 0083 Hose 44 00 Lg 6 JIC Swivel Both Ends E 1 9904 0059 Hose 35 00 Lg 6 JIC Swivel Both Ends F 1 9904 0082 Hose 21 00 Lg 8 JIC Swivel Both Ends G 1 9904 0090 Hose 17 50 Lg 8 JIC Swivel Both Ends H 1 8585 0089 Vertical Valve Assembly I 1 ...

Page 46: ... 0526 0016 Lip Cylinder With Fittings B 1 0525 0127 Hoist Cylinder 5 or 6 Lg 0525 0126 Hoist Cylinder 8 Lg 15 Pits 0525 0125 Hoist Cylinder 8 Lg 10 or 12 Pits C 1 1 9904 Hose 1 9904 Hose 1 9904 Hose Centra Power KS4 Hydraulic Components PARTS 1 Provide length and diameter of hose when calling or faxing orders A B C ...

Page 47: ...45 4111 0008 April 2017 June 2017 This page was left intentional left blank PARTS ...

Page 48: ...rtridge 2 Way N C Poppet Delta E 1 8581 0105 Valve Cartridge Relief F 1 Valve Manifold G 1 Fitting Plug H 2 9301 0111 Fitting 6 ORB X 8 JIC I 3 9301 0113 Fitting 90 Deg 6 ORB X 6 JIC J 4 8581 0004 Delta Coil 115V Includes 1 2 UNF Jam Nut K 2 4301 0003 Cable Assy 24 Lg Two Coil M 1 8581 0139 Orifice Check Lip Flow Control VS Manifold C K H H Pump Psi Return To Tank K E F G D D Lower Platform E Lowe...

Page 49: ...tridge Flow 2GPM E 3 9301 0116 Fitting Elbow 90 Deg Male F 1 9301 0120 Fitting Elbow 45 Deg Male 8 ORB X 8 JIC H 1 8581 0004 Delta Coil 115V Includes 1 2 UNF Jam Nut I 1 4301 0004 Cable Assembly 48 Lg Includes Screw A H Included in 8583 0045 Not Sold Separate PARTS Centra Power Manifold D B C I H E E E F A 2 Return To Pump Station 1 Pressure From Pump Station 4 Pressure To Dock leveler 3 Return Fr...

Page 50: ...81 0088 Valve Cartridge Fixed 2 GPM Flow Control Valve H 3 9301 0113 Fitting Elbow 90 Deg Male 6 ORB X 6 JIC I 2 9301 0116 Fitting Elbow 90 Deg Male 8 ORB X 8 JIC J 5 8581 0004 Delta Coil 115V Includes 1 2 UNF Jam Nut K 2 4301 0003 Cable Assembly Dual Coil 24 LG L 2 0521 0015 Fitting Conn Male 3 8 NPT x 8 JIC M 2 0521 0032 Fitting Conn Swivel 3 8 NPT x 8 JIC Swivel N 2 8581 0001 Valve Ball Bronze ...

Page 51: ...e Cartridge 4 Way H 1 8581 0088 Valve Cartridge Fixed 2 GPM Flow Control Valve I 5 9301 0113 Fitting Elbow 90 Deg Male 6 ORB X 6 JIC J 2 9301 0116 Fitting Elbow 90 Deg Male 8 ORB X 8 JIC K 5 8581 0004 Delta Coil 115V Includes 1 2 UNF Jam Nut L 2 4301 0003 Cable Assembly Dual Coil 24 M 1 8581 0148 Plug Cavity 3 Way Special A L Included in 8585 0099 HB REMOVE LARGE PLUG 9301 0229 REMOVE SMALL PLUG B...

Page 52: ...e property of Systems Inc and represents a proprietary article in which Systems Inc retains any and all patent and other rights including exclusive rights of use and or manufacture and or sale Possession of this print does not convey any permission to reproduce print or manufacture the article or articles shown therein such permission to be granted only by written authorization signed by an office...

Page 53: ...51 4111 0008 April 2017 June 2017 PARTS This page was left intentional left blank ...

Page 54: ... 8 Lg 15 Pits 0525 0127 Hoist Cylinder 5 or 6 Lg Platforms G 1 9303 0025 Down Speed Control Valve Assy Provide dock leveler serial number when calling or faxing orders Control Box Size Decal Size 4 x 2 File Name 1751 0138 Rev A DANGER CRUSH HAZARD DO NOT REMOVE hydraulic cylinder until leveler is safely supported by maintenance prop Refer to owner s user s manual for proper maintenance procedure F...

Page 55: ...4 Seal Kit 1992 and earlier 0525 0059 Seal Kit 1992 and newer D 1 0525 0085 Lip Cylinder Without Fittings E F 0526 0016 Lip Cylinder With Fittings E F E 1 9301 0109 Fitting Connector Str F 1 0521 0005 Fitting Breather Brass Not Shown Lip Cylinder Repair Parts Provide dock leveler serial number when calling or faxing orders Not Sold Separately 13 75 C E A SECTION A A 2 3 D B F ...

Page 56: ...54 4111 0008 April 2017 June 2017 PARTS Remote Mount Power Pack Assembly Y X Z AB AC AA N P V U S T T R Q W A D E F B M C J K G H Return Pressure ...

Page 57: ... 8 JIC Male P 1 0521 0014 Ball Check Q 1 9301 0024 Guide Check Ball R 1 9302 0009 Spring Relief Valve S 1 9303 0003 Screw Adjusting T 2 9301 0014 Washer Nylon 11 16 in OD x 1 2 in ID U 1 9301 0015 Nut Jam 1 2 20 UNF V 1 9301 0016 Nut Acorn 1 2 20 UNF W 1 0521 0016 45 Elbow 3 8 NPT Male x 8 JIC Male X 1 9301 0009 Strainer Suction Y 1 9301 0082 Magnet Z 1 9301 0008 Pipe Nipple 3 8 NPT x 3 in AA 2 93...

Page 58: ...56 4111 0008 April 2017 June 2017 NOTES ...

Page 59: ...er if more information is required When ordering use part numbers and description to help identify the item ordered Do not use item numbers These are only for locating the position of the parts Always give dock leveler MODEL NUMBER and or SERIAL NUMBER For service call or contact Systems Inc P O Box 309 Germantown WI 53022 Phone 800 643 5424 Fax 262 255 5917 Dock Leveler Information Model ________...

Page 60: ...pment or parts bearing the cost for the parts labor and transportation This shall be exclusive remedy for all claims whether based on contract negligence or strict liability WARRANTY LIMITATIONS THE ABOVE WARRANTIES ARE IN LIEU OF ANY OTHER WARRANTIES WHETHER EXPRESSED OR IMPLIED INCLUDING BUT NOT LIMITED TO ANY IMPLIED WARRANTY OF MERCHANTABILITY OR FITNESS FOR A PARTICULAR PURPOSE SYSTEMS INC AN...

Reviews: