background image


6

Maintenance 


  WARNING!

 Disconnect spark plug wire from spark plug and release air pressure from system before performing 

maintenance.  

  NOTE:

 All compressed air systems contain maintenance parts (e.g. lubricating oil, filters, separators) which are 

periodically replaced. These used parts may be, or contain, substances that are regulated and must be disposed 
of in accordance with local, state, and federal laws and regulations. 

  NOTE:

 Take note of the position and locations of parts during disassembly to make reassembly easier. The 

assembly sequences and parts illustrated may differ for your particular unit. 
 

Daily or before each 
operation 

Check lubrication levels. Fill as needed. 

Drain receiver tank condensation. 

Check for unusual noise or vibration. 

Ensure belt guards and covers are securely in place. 

Ensure area around compressor is free from rags, tools, debris, and flammable or explosive 

materials. 

Weekly 

Check safety/relief valves by pulling rings. Replace safety/relief valves that do not operate freely. 

Inspect air filter element. Clean if necessary. 

Monthly 

Inspect for air leaks. Squirt soapy water around joints during compressor operation and watch for 

bubbles. Tighten fittings if necessary. 

Clean exterior. 

3 months or 500 
hours 

Change petroleum lubricant while crankcase is warm. 

12 months or 1000 
hours 

Replace air filter element. 


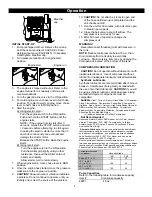
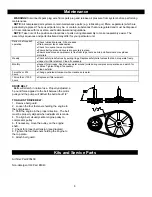
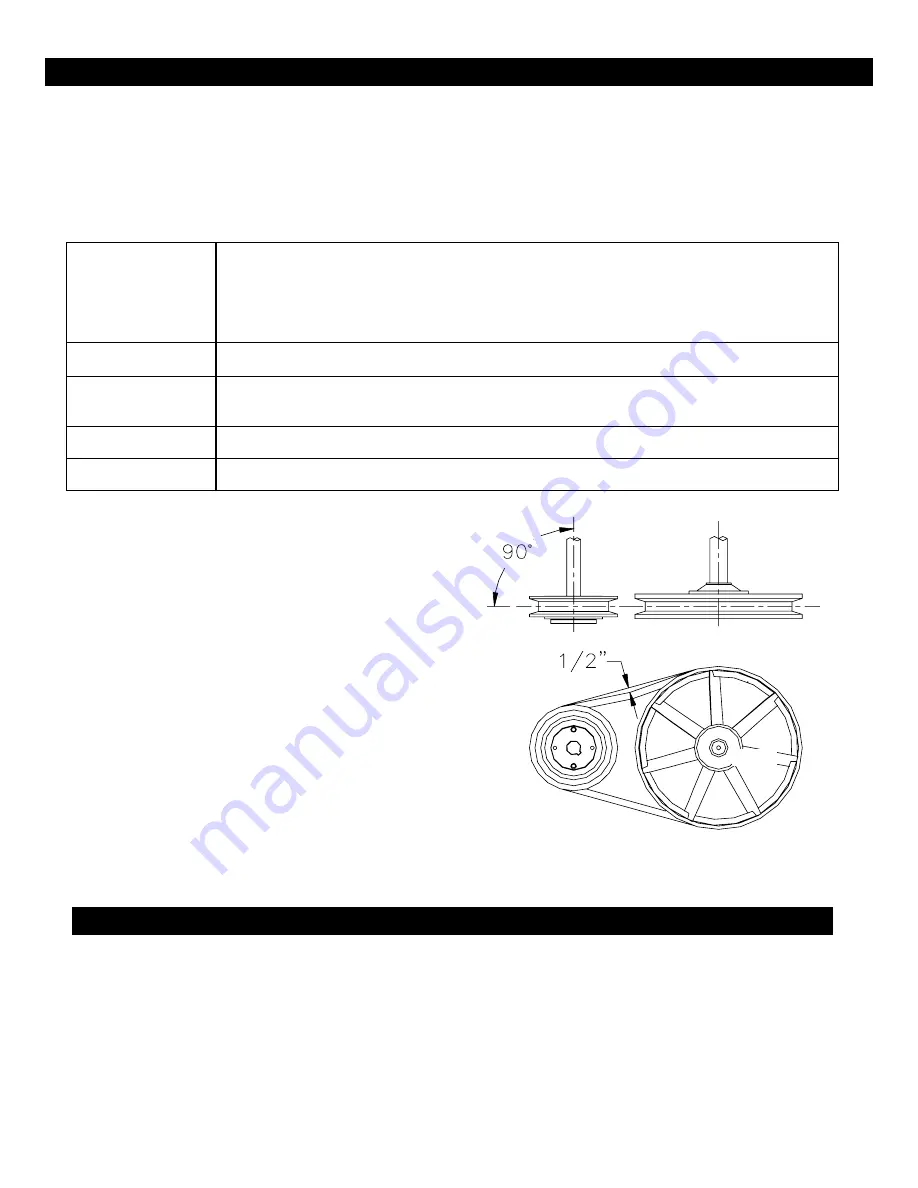
DRIVE BELT 

  Belts will stretch in normal use. Properly adjusted, a 
5 pound force applied to the belt between the motor 
pulley and the pump will deflect the belt about 1/2”. 
 

TO ADJUST DRIVE BELT:


1.  Remove belt guard.   
2.  Loosen the four fasteners holding the engine to 
the compressor.   
3.  Shift the engine in the proper direction.  The belt 
must be properly aligned when adjustment is made.   
4.  To align belt, visually center engine pulley to 
compressor pulley. 
6.  If necessary, move the pulley on the engine 
shaft.   
7. Check for proper belt tension (see diagram). 
8. Tighten the four fasteners holding the engine to 
the top plate. 
9.  Attach belt guard. 


Kits and Service Parts


Air filter: Part #35409 
 
Non-detergent Oil: Part #4043 


00882 

Summary of Contents for M46851C

Page 1: ...ing any obligation to install them on units previously sold Quick Facts Engine Oil Engine is shipped without oil Fill before starting Use SAE 10W 30 motor oil Pump Oil Check pump oil level before star...

Page 2: ...R use air tools or attachments without first determining the maximum pressure recommended for that equipment NEVER point air nozzles or sprayers toward people or animals NEVER touch the compressor pum...

Page 3: ...certified tank 9 Pump Oil Drain Drain the pump oil from this plug 10 Lifting Eyes Also use as tie down locations 11 Discharge Tube This tube carries compressed air from the pump to the check valve Thi...

Page 4: ...caustic acid can emit explosive gases and can cause electric shock Caution must be exercised when making connections to a battery to avoid shock and contact with the acid and to prevent any sparking t...

Page 5: ...nts with pressure in the tank NOTE Reduce tank pressure below 10 psi then drain moisture from tank daily to avoid tank corrosion Drain moisture from tank by opening the drain petcock located at the bo...

Page 6: ...f valves by pulling rings Replace safety relief valves that do not operate freely Inspect air filter element Clean if necessary Monthly Inspect for air leaks Squirt soapy water around joints during co...

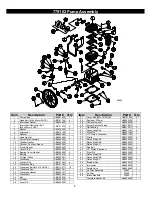
Page 7: ...189 1 14 Drain valve 779577 1 15 Discharge tube 780837 1 16 5 8 comp nut 34724 2 17 5 8 comp sleeve 34723 2 18 5 8 comp elbow 34937 1 Ref Description Part Qty 19 Pump B4900 779102 1 20 Intake manifold...

Page 8: ...1 1 22 Crankcase Gasket AB4950101 1 23 Crankshaft AB4961200 1 24 Nut AB9128234 4 25 Oil Seal AB9163010 1 26 Cover D E AB2060590 1 Item Description Part Qty 27 Cover Bolt M6 x 15 SHCS AB9101094 8 28 Fl...

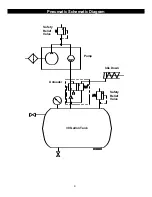
Page 9: ...9 Pneumatic Schematic Diagram Safety Relief Valve Pump Idle Down Unloader Safety Relief Valve 30 Gallon Tank...

Page 10: ...bricant G Belt tension too tight or sheaves not aligned Check tension alignment H Air leaks in discharge piping Check tubing connections Tighten joints or replace as required I Compressor components l...

Page 11: ...arranty This warranty covers parts only It will not provide for replacement of complete products due to defective parts Components not manufactured by Powerhorse are guaranteed by their manufacturer a...

Page 12: ...12 Manufactured by Northern Tool Equipment Co 2800 SouthCross Drive West P O Box 1499 Burnsville MN 55337 0499...

Reviews: