background image

11

2. 

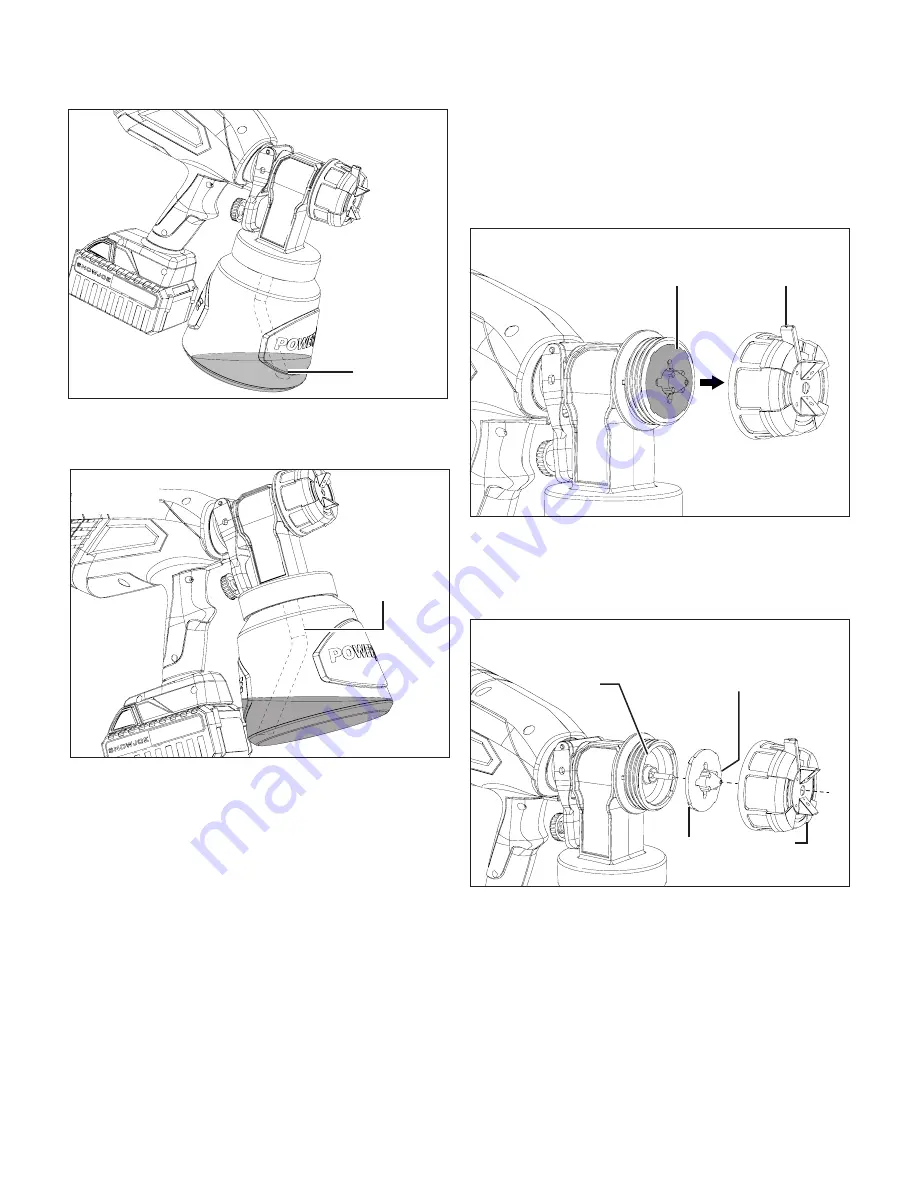
To spray in an upward direction, the angled end of the 

suction tube should be pointing toward the rear of the gun 

(Fig. 12).

m

WARNING!


Never tilt the sprayer at an angle greater 

than 45°. Material could get into the turbine and damage 


the sprayer.

Change the Nozzle Tip

The machine comes with 3 nozzle tips:

• 

White – 

1.5 mm orifice. Pre-assembled in the gun

• 

Black – 

1.8 mm orifice. Packed separately

• 

Red – 

2.2 mm orifice. Packed separately

When selecting the appropriate nozzle tip for a specific job, 

consider the spray material you will be using. Generally, 

heavier coatings will require a larger orifice size than lighter 

ones. For example, primers are usually thicker than the 

accompanying paint so you should use the black 1.8 mm 


tip to prime most surfaces. Most painters will stay in the  

range of 1.2 mm to 2.0 mm unless the paint being applied  

is specialized.

To change the nozzle tip, follow the instructions below: 

1. 

Make sure the tool is switched off and the battery is 

removed from the compartment. 

2. 

Unscrew and remove the tip collar slowly, be careful that 

the small parts may fall out, and remove the nozzle tip 

inside (Fig. 13).  

3. 

Assemble the desired nozzle tip by aligning the 4 tabs on 

the tip with the notches on the sprayer and inserting the 

middle needle in the middle hole of the nozzle tip. Press 

firmly until the nozzle tip sit securely in position. Replace 

the tip collar and tighten securely (Fig. 14).  

Adjusting the Spray Patterns

The spray pattern shape can be adjusted by turning the ears 

of the air cap to either the vertical, horizontal, or diagonal 

positions. The positions of the air cap and the corresponding 

spray pattern shapes are illustrated below (Fig. 15).
Test each pattern and use whichever pattern is suitable for 

your application. 

Fig. 11

Suction tube 

pointing 

forward

Fig. 12

Suction tube 

pointing to 

rear

Fig. 13

Tip collar

Nozzle tip

Fig. 14

Tab

Notch

New nozzle tip

Tip collar

Summary of Contents for 24V-PS1

Page 1: ...quipment such as dust mask non skid safety shoes hard hat or hearing protection used for appropriate conditions will reduce personal injuries 6 Remove accessories or attachments before turning paint sprayer on 7 If devices are provided for the connection of dust extraction and collection facilities ensure these are connected and properly used Use of dust collection can reduce dust related hazards ...

Page 2: ...h batteries that are safe durable and have a high energy density The battery cells have a wide range of safety devices Each individual cell is initially formatted and its electrical characteristic curves are recorded This data is then used exclusively to be able to assemble the best possible battery packs Despite all the safety precautions caution must always be exercised when handling batteries T...

Page 3: ...etal object makes a connection between the positive and negative contacts on the battery pack Do not place a battery pack near anything that may cause a short circuit such as paper clips coins keys screws nails and other metallic objects A short circuited battery pack poses a risk of fire and severe personal injury Store your battery pack and charger in a cool dry place Do not store the battery pa...

Page 4: ...exposed to heat during the charging process as the battery cells may have suffered dangerous damage 11 Do not use batteries that have suffered curvature or deformation during the charging process or those that exhibit other atypical symptoms gassing hissing cracking etc 12 Never fully discharge the battery pack maximum recommended depth of discharge is 80 A complete discharge of the battery pack w...

Page 5: ... For protection against injury wear safety goggles WARNING Do not expose the unit to rain or wet conditions Keep dry Symbols Symbols Descriptions Descriptions Indoor use only Only use battery charger indoors Respirators protective clothing and gloves will reduce the possibility of personal injuries WARNING Risk of Explosion Do not spray flammable liquids DISPOSAL Waste produced by electrical machi...

Page 6: ...ontainer 6 Suction tube inside 7 1 5 mm nozzle tip White 8 Battery compartment 9 1 8 mm nozzle tip Black 10 2 2 mm nozzle tip Red 11 Push lock button 12 Push button for battery indicator 13 Battery indicators 14 Handle 15 On Off switch 16 Flow control knob 17 Switch trigger lever 18 Quick release knob 19 Air Vent 20 Turbine 21 24V iON lithium ion charger 24VCHRG AC 22 Charger plug 23 Charge socket...

Page 7: ...o use your new cordless paint sprayer The packaging is made of recyclable materials Properly dispose of these materials in accordance with local regulations IMPORTANT The equipment and packaging material are not toys Do not let children play with plastic bags foils or small parts These items can be swallowed and pose a suffocation risk Assembly mWARNING Do not insert the battery until assembly is ...

Page 8: ...se the battery charge indicator lights to determine when to charge your iON 24VBAT lithium ion battery pack You can top off your battery pack s charge before starting a big job or after a long day of use Charging the Battery 1 Press the push lock buttons on the battery to pull the battery pack out of the equipment Fig 3 2 Check that the mains voltage is the same as that marked on the rating plate ...

Page 9: ...This is the Runout Time Fig 6 3 For proper runout time of specific material refer the thinning table below THINNING TABLE Material Reference Runout Time Oil enamel 25 40 seconds Oil based primer 30 45 seconds Latex No thinning required Oil stain No thinning required Clear sealer No thinning required Polyurethane No thinning required Varnish 20 50 seconds mWARNING Do not spray material that has a r...

Page 10: ...d container and attach the lid securely to the top of the container Tighten securely Check the lid to make sure it s threaded on squarely and securely before picking up the sprayer Fig 9 Align the Suction Tube Before reattaching the paint container adjust the direction of the suction tube based on the direction of the painting project Fig 10 A properly directed suction tube will use the paint mate...

Page 11: ...ialized To change the nozzle tip follow the instructions below 1 Make sure the tool is switched off and the battery is removed from the compartment 2 Unscrew and remove the tip collar slowly be careful that the small parts may fall out and remove the nozzle tip inside Fig 13 3 Assemble the desired nozzle tip by aligning the 4 tabs on the tip with the notches on the sprayer and inserting the middle...

Page 12: ...pray on scrap cardboard and similar material first Begin with largest flow setting If less flow is desired adjust the flow control knob slowly until the appropriate flow amount is achieved Basic Spray Process mWARNING DO NOT insert the battery until all settings are done and you are ready to use the paint sprayer Do not squeeze the On Off switch until you are ready to spray mWARNING Always do a te...

Page 13: ... Ensure the surface to be sprayed is free of dust dirt and grease Ensure spray area is clean and free of dust that could be blown onto the newly sprayed surface Cover area that not intended to be sprayed Keep the nozzle at a minimum of 2 inch 5 cm and a maximum of 12 inch 30 cm away from the surface Fig 20 To get an even spray distribution keep your arm at the same distance and avoid moving the wr...

Page 14: ... and properly dispose of the cleaning solution Refill the container with new cleaning solution 4 Reattached the container on the sprayer Insert the battery and spray the solution through the gun in a safe area Refill and repeat spray process until the solvent being sprayed is clean and clear 5 Stop the sprayer and remove the battery Press the On Off switch so that the material inside the spray gun...

Page 15: ...rosion of terminals may occur As with other battery pack types permanent capacity loss can result if the pack is stored for long periods of time at high temperatures over 120ºF 49ºC 3 iON 24VBAT lithium ion battery packs maintain their charge during storage longer than other battery pack types As a general practice it is best to unplug the battery charger and remove the battery pack when they are ...

Page 16: ...5 of the FCC Rules These limits are designed to provide reasonable protection against harmful interference in a residential installation This equipment generates uses and can radiate radio frequency energy and if not installed and used in accordance with the instructions may cause harmful interference to radio communications However there is no guarantee that interference will not occur in a parti...

Page 17: ... nozzle The spray is not fine a Viscosity of material is too high b Spray tip orifice is too large c Material volume setting too high d Nozzle clogged e Air filter clogged f Too little pressure build up in container a Thin the material properly b Change to a smaller nozzle tip c Decrease the spray amount by adjusting the flow control knob d Clean the nozzle with the supplied needle clean out tool ...

Page 18: ...attery Runtime Max 7 5 min 24VBAT LTX 24V iON 2 0 Ah Lithium iON Battery Battery Charge Time Max 24VCHRG AC 1 hr 20 min 24VCHRG QC 55 min 24VCHRG DPC 55 min Battery Runtime Max 10 min 24VBAT LTE 24V iON 2 5 Ah Lithium iON Battery Battery Charge Time Max 24VCHRG AC 1 hr 40 min 24VCHRG QC 1 hr 20 min 24VCHRG DPC 1 hr 10 min Battery Runtime Max 12 5 min 24VBAT LT 24V iON 4 0 Ah Lithium iON Battery Ba...

Page 19: ... the owner s manual Snow Joe Sun Joe will not be responsible for the cost of any unauthorized warranty repairs This warranty does not cover any cost or expense incurred by the purchaser in providing substitute equipment or service during reasonable periods of malfunction or non use of this product while waiting for a replacement part or unit under this warranty Wearing parts like belts augers chai...

Page 20: ...snowjoe com ...

Reviews: