background image

5 - ENG

Spraying Instructions

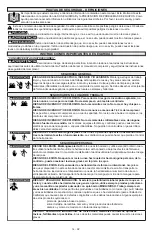
Risk of fire or explosion. Never spray flammable liquids in a confined area.

Do not smoke while spraying. Do not spray where sparks or flames are present.

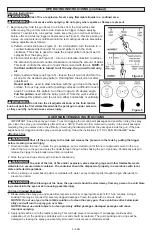
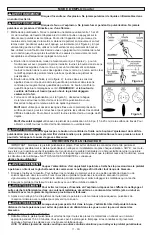
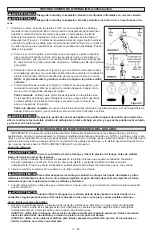
7.  Begin spraying. Hold the gun about 6 to 9 inches from the work surface and      

Figure 4

Figure 5


  while moving the gun from side to side, depress the trigger to begin applying  

  material. To avoid blobs, runs and lap marks, keep the gun in motion at all times  

  before, after and while the trigger is depressed (see Figure 4). Practice painting on  

  a piece of scrap material or cardboard until the test coating results are acceptable,  

  making adjustments as follows:   


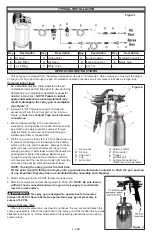
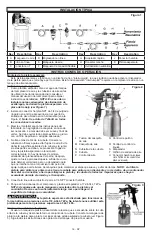
a.  Pattern control knob (see Figure 2) - for a full pattern, turn the knob in  a  

    counterclockwise direction and for a round pattern, turn the knob  

    clockwise. This knob is used to create the proper pattern of paint as it is  

    sprayed from the spray gun. 

  b.  Fluid control knob (see Figure 2) - turn in a clockwise direction to reduce  

    the amount of paint and counter clockwise to increase the amount of paint.  

    This knob controls the amount of paint that is mixed with the air. 

NOTE: If  

    the fluid control knob is turned in all the way, the gun will emit only  

  air.

  c.  Spray pattern shape (see Figure 5) - loosen the air cap nut and turn the  

    air cap for the desired spray pattern. Hand tighten the air cap nut after  

  adjustment.


Round pattern

   used to draw fine lines with the gun close to the work  

    surface, for touch up work and for painting surfaces in difficult to reach  

    areas. To achieve this pattern, turn the air cap at a 45 degree angle.


Full fan pattern

  used with the spray gun 6-9” from the work surface.  

    To achieve this pattern, turn the air cap  either horizontally or vertically.


Do not turn the air adjustment knob or the fluid control 

knob out past the first visible thread while the paint gun is under pressure 

or they could fly out and cause serious injury.

OPERATING INSTRUCTIONS (continued)

USER MAINTENANCE INSTRUCTIONS

  IMPORTANT: Keep the spray gun clean. To avoid clogging the air and paint passages and possibly ruining the spray 

gun, clean the spray gun immediately after each use. 

NOTE: Paint and other material dry quickly in the small passages 

rendering the gun useless due to the difficulty of removing hardened paint from the passages inside the gun.

 If the pas-

sages become clogged and the spray gun stops working, follow the instructions in “TO CLEAN PASSAGES” below.

After Each Use

Shut off the air supply to the tank and release the pressure in the tank by pulling the trigger 

before cleaning to avoid injury.

1.  Drain and clean the cup. To clean the gun passages, put a small amount of thinner or approved solvent in the cup.  

  Attach the cup to the gun and spray the liquid through the gun while shaking the gun vigorously. Periodically pull and  

  release the trigger to help break loose dried-on material. 
2.  Wipe the gun and cup exterior with a solvent soaked rag.

To avoid of the risk of fire and/or explosion, place cleaning rags and other flammable waste  

materials in a secured metal container. The container should be disposed of properly in accordance with local, 

state and federal regulations.

3.  When cleaning out water based paints or materials with water, spray mineral spirits through the gun afterwards to  

  prevent corrosion.


When blowing out the hose, the open end should be aimed away from any person to avoid blow-

ing solvent into the eyes or skin causing possible injury.

To Clean Clogged Passages

1.  Disassemble the spray gun and soak all metal parts in thinner or appropriate solvent for 15-30 minutes. A longer  

  soaking time may be required for severely clogged passages. Clean the parts with a soft wire brush.  


NOTICE: Do not use lye or other alkalis solutions to clean the spray gun. These solutions attack aluminum  

  alloys and will ruin the spray gun over time. 

  NOTICE: Never use metal objects to clean precisely drilled passages. Damaged passages will cause 

  improper spraying.

2.  Apply light machine oil to the leather packing. This will help prevent air leakage. If air leakage continues after  

  application of oil, the packing is probably worn out and should be replaced. The gun’s packing and o-rings will be  

  damaged by leaving the spray gun assembly immersed in solvent over extended periods. 

Summary of Contents for PX 010-0014SP

Page 1: ...observation de ces instructions Lea y comprenda todas las precauciones de seguridad contenidas en este manual antes de utilizar esta unidad Si no cumple con las instrucciones de este manual podr a oca...

Page 2: ...e room Never spray into the compressor compressor controls or the motor RISK OF FIRE AND OR EXPLOSION Do not spray flammable materials in the vicinity of an open flame or near ignition sources Motors...

Page 3: ...ace the tool or have it repaired by an authorized service center Many accidents are caused by poorly maintained tools or air hose There is a risk of bursting if the tool is damaged RISK OF BURSTING AN...

Page 4: ...surface of the cup and the gasket damage to these parts will cause air leaks and prevent the gun from spraying properly If paint leaks around the needle pin packing gland tighten the packing gland nut...

Page 5: ...ssages and possibly ruining the spray gun clean the spray gun immediately after each use NOTE Paint and other material dry quickly in the small passages rendering the gun useless due to the difficulty...

Page 6: ...e gun 6 to 9 inches from the work surface Spray pattern is dis torted Fluid tip partly blocked Clean fluid tip and air cap Clogged air cap Clean air cap Material is too thick or needs straining Thin m...

Page 7: ...liable for any repairs replacements or adjustments to the equipment or any costs for labor performed by the purchaser without the Company s prior written approval The effects of corrosion erosion and...

Page 8: ...pas l outil en le tenant par le tuyau flexible et ne tirez pas d un coup sec sur le tuyau flexible pour le d connecter de la source d alimentation en air RISQUE RESPIRATOIRE Portez toujours des v tem...

Page 9: ...er un centre de r paration autoris Plusieurs accidents sont dus une n gligence dans l entretien des outils ou des tuyaux flexibles d air Il existe un risque d clatement si l outil est endommag RISQUE...

Page 10: ...es peut provoquer des fuites d air et emp cher le pistolet de pulv riser correctement Si de la peinture fuit autour de l aiguille du fouloir serrez l crou du fouloir suffisamment pour couper la fuite...

Page 11: ...stez pas le bouton du contr le de fluide ou le bouton d ajustement du motif de pulv risation plus loin que le premier filet visible tandis que le pistolet de pulv risation est sous pression sinon il p...

Page 12: ...est partiellement ferm Tournez le bouton d ajustement du motif de pulv risation dans le sens contraire des aiguilles d une montre Le bouton de r glage du motif de pulv risation est partiellement ferm...

Page 13: ...des r parations remplacements ou r glages du mat riel ou des co ts de main d oeuvre de l acheteur sans le consentement pr alable par crit de la Soci t Les effets de la corrosion de l rosion et de l us...

Page 14: ...parador activado No transporte la herramienta por la manguera ni tire de la manguera para desconectarla del suministro de aire RIESGO Y PELIGRO DE INHALACI N Si existe la posibilidad de inhalar parte...

Page 15: ...enda la herramienta sin la protecci n ni con la protecci n da ada Cambie la herramienta o haga que la reparen en un centro de servicio autorizado Muchos accidentes ocurren a causa de herramientas o ma...

Page 16: ...persora no funcionar correctamente Si hay derrames de pintura alrededor del prensaestopas del perno de aguja ajuste la tuerca prensaestopas lo suficiente como para detener el derrame pero no demasiado...

Page 17: ...ya que stas podr an salir volando y provocar una lesi n grave INSTRUCCIONES DE OPERACI N continuaci n INSTRUCCIONES DE MANTENIMIENTO DEL USUARIO IMPORTANTE Conserve limpia la pistola aspersora Para ev...

Page 18: ...istorsionado La abertura de l quido est blo queada parcialmente Limpie la punta de fluido y el casquillo de aire Casquillo de aire obstruido Limpie el casquillo de aire El material es demasiado espeso...

Page 19: ...ponsable de cualquier reparaci n reemplazo o ajuste al equipo o cualquier costo de mano de obra realizados por el comprador sin la aprobaci n previa por escrito de la Empresa Los efectos de la corrosi...

Page 20: ...reet Springfield MN 56087 Fax 1 507 723 5013 Manufactured in China for Fabriqu China pour Fabricado en China para MAT Industries LLC Long Grove IL 60047 2015 2016 2017 2018 2019 Sanborn Mfg All Rights...

Reviews: