background image

  13

PARTING OFF: 

1. 

Use parting tool. 

2.  Adjust lathe speed to lower RPM for 
parting through a workpiece. 
3.  Place tool on tool support and raise the 
handle until it starts to cut and continue to 
cut towards the center of the workpiece. 
4.  Loosely hold on to the piece in one 
hand as it separates from the waste wood. 
 

SANDING and FINISHING: 

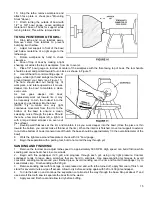
Leaving clean cuts will reduce the amount of 
sanding required. Adjust the lathe to a 

low 

speed

, and begin with fine sandpaper (120 

grit or finer). Coarser sandpaper will leave 
deep scratches that are difficult to remove, 
and dull crisp details on the spindle. 
Progress through each grit without skipping grits (e.g., do not jump from 120 grit to 220 grit). Fold the sandpaper into 
a pad; do not wrap sandpaper around your fingers or the workpiece. 
 
To apply a finish, the workpiece can be left on the lathe. Turn off the lathe and use a brush or paper towel to apply 
the finish. Remove excess finish before restarting lathe. Allow to dry and sand again with 320 or 400 grit sandpaper. 
Apply second coat of finish and buff. 


FACE PLATE and BOWL TURNING 
 

Face plate turning is normally done on the inboard side of the headstock over the bed. Larger workpieces must be 
turned on the outboard side (remove tailstock and tool support, and move headstock to opposite end of bed). 
 

MOUNTING STOCK 

 
Use of a face plate is the most common method for holding a block of wood for turning bowls and plates: 
 
1. 

Select stock at least 1/8" to 1/4" larger than each dimension on the finished workpiece. 

2. 

Always select the largest diameter face plate that can be used for the workpiece to be turned. 

3. 

True one surface of the workpiece for mounting against the face plate. 

4.  Using the face plate as a template, mark the location of the mounting holes, and drill pilot holes of the 
appropriate size. Face plates are drilled for No. 12 screws. (Phillips and square drive screws will hold up better than 
slotted screws. Sheel metal screws are case hardened with deeper and sharper threads than wood screws.) 
 
If the mounting screws on the face plate interfere with the 
workpiece, a glue or waste block can be used. 
5.  Make a block the same diameter as the face plate, Figure 9. 
Both glue block and workpiece should have good flat surfaces for 
gluing.  
6. 

Glue the block to the workpiece. Avoid using brown paper or 

newspaper between the block and workpiece. It may work fine if 
you are using scrapers, but a slight catch with a bowl gouge can 
separate the two. 
 

NOTE: When using a glue block, be careful with the 

adhesive you select. Dry workpieces can be bonded with ordinary 
white or yellow glue but must be clamped to ensure a good bond. 
Green workpieces require cyanoacrylate (super glue) or a 
urethane adhesive. Urethanes will require clamping. 

FACEPLATE OR CHUCK? 

While faceplates are the simplest, most reliable method of 
holding a block of wood for turning, chucks can also be used. As 

Summary of Contents for 4224

Page 1: ...nstructions and Parts Manual 24 Wood Lathe Model 4224 WMH Tool Group 2420 Vantage Drive Elgin Illinois 60123 Part Number M 0460228 Phone 800 274 6848 Revision B 11 03 www wmhtoolgroup com Copyright WMH Tool Group ...

Page 2: ...tions outside our facilities or to a lack of maintenance WMH TOOL GROUP LIMITS ALL IMPLIED WARRANTIES TO THE PERIOD SPECIFIED ABOVE BEGINNING FROM THE DATE THE PRODUCT WAS PURCHASED AT RETAIL EXCEPT AS STATED HEREIN ANY IMPLIED WARRANTIES OR MERCHANTABILITY AND FITNESS ARE EXCLUDED SOME STATES DO NOT ALLOW LIMITATIONS ON HOW LONG THE IMPLIED WARRANTY LASTS SO THE ABOVE LIMITATION MAY NOT APPLY TO ...

Page 3: ...niques 12 Roughing Out 12 Beads 12 Coves 12 V Cuts 12 Parting Off 13 Sanding Finishing 13 Face Plate Bowl Turning 13 Mounting Stock 13 Faceplate or Chuck 14 Wood Selection 14 Checks Cracks 14 Distortion 14 Tools for Bowl Turning 14 Bowl Turning Techniques 14 To Shape Outside of Bowl 15 To Shape Interior of Bowl 15 Sanding Finishing 15 Trouble Shooting 16 Electrical Schematic 17 Parts Lists Explode...

Page 4: ...posted on the machine and in this manual Failure to comply with all of these warnings may cause serious injury 17 Some dust created by power sanding sawing grinding drilling and other construction activities contain chemicals known to cause cancer birth defects or other reproductive harm Some examples of these chemicals are Lead from lead based paint Crystalline silica from bricks cement and other...

Page 5: ...he power source when performing maintenance to avoid accidental starting or electrical shock 30 Provide for adequate space surrounding work area and non glare overhead lighting 31 When stopping the lathe never grab the part or faceplate to slow it down Let the work coast to a stop 32 Use only Powermatic factory authorized replacement parts and accessories otherwise the warranty and guarantee are n...

Page 6: ...6 SAFETY DECALS Familiarize yourself with the location and content of this decal on your machine 6294773 ...

Page 7: ...ll Travel 4 1 2 3 Faceplate standard 14 Toolrest standard Drive System Poly V Belt Inverter Drive Spindle Lock standard Indexer 24 position Knock Out Rod standard Drive Center standard Ball Bearing live Center standard Hole through tail stock spindle 3 8 Hole through head stock spindle 5 8 Footprint of stand 65 L x 24 W NOTE The above specifications were current at the time this manual was publish...

Page 8: ...L OPERATION Inverter Drive System The model 4224 lathe utilizes the latest technology in A C inverter drives to provide infinitely variable spindle speeds The inverter controls the speed of the motor by varing the frequency of the voltage supplied to the motor The inverter provides an acceleration ramp that eliminates the shock of normal across the line starting Also a braking feature eliminates l...

Page 9: ...gh to remove the end play and the spindle should rotate very freely Speed Range Adjustment To provide the maximum horsepower to the spindle at the very slow speeds set the drive belt in the low range To change speed ranges open the access door in front of the headstock loosen the pivot lock handle located in the motor tension slot raise the motor up by lifting up on the motor plate handle and relo...

Page 10: ... place on the wheel keep it moving and use a light touch Carbon steel tools can overheat easily and should be cooled frequently If the edge turns blue it has lost its temper and should be ground past the blue area High speed steel tools are not as likely to overheat but can be damaged if allowed to get red hot High speed steel tools should not be quenched for cooling Honing with a diamond lap or s...

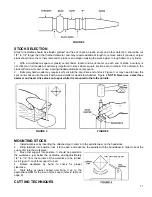
Page 11: ...ive end of stock Figure 3 or may need to have the spur center driven into the stock with a wood mallet or dead blow hammer Figure 4 NOTE Never use a steel face hammer and never drive stock onto spur while it is mounted in the lathe spindle FIGURE 3 FIGURE 4 MOUNTING STOCK 1 Install workpiece by inserting the attached spur center into the spindle taper on the headstock 2 Bring tailstock into positi...

Page 12: ... move tool forward to make the full bevel of the tool come in contact with the workpiece Gently raise handle to make cut to the appropriate depth 2 Repeat for other side of the bead 3 Using a small skew or spindle gouge start in the center between the two cuts and cut down each side to form the bead Roll the tool in direction of cut COVES 1 Use a spindle gouge With the flute of the tool at 90 degr...

Page 13: ...he most common method for holding a block of wood for turning bowls and plates 1 Select stock at least 1 8 to 1 4 larger than each dimension on the finished workpiece 2 Always select the largest diameter face plate that can be used for the workpiece to be turned 3 True one surface of the workpiece for mounting against the face plate 4 Using the face plate as a template mark the location of the mou...

Page 14: ...tyle turning The bowl gouge is heavier and easier to control than other types of gouges It also allows removal of wood much faster and with less vibration than other gouges Most average sized bowl work can be accomplished with a 3 8 or 1 2 bowl gouge A 1 4 bowl gouge is best suited for smaller bowls and light finishing cuts Larger 3 4 and 1 bowl gouges are only used for extremely large pieces Larg...

Page 15: ...here be a few small ridges left a light cut with a large domed scraper can even out the surface 7 Develop wall thickness at the rim and maintain it as you work deeper into the bowl Once the piece is thin toward the bottom you cannot make it thinner at the rim When the interior is finished move tool support to exterior to re define bottom of bowl General rule of thumb the base should be approximate...

Page 16: ... of motor Motor starts slowly or 1 Low voltage 1 Request voltage check from fails to come up to speed power company and correct low voltage condition 2 Defective motor 2 Replace motor Motor fails to develop full 1 Power line overloaded 1 Correct overload condition power 2 Undersize wires in supply system 2 Increase supply wire size 3 Low voltage 3 Request voltage check from power company and corre...

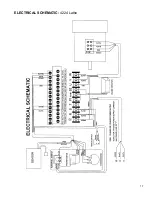
Page 17: ...17 ELECTRICAL SCHEMATIC 4224 Lathe ...

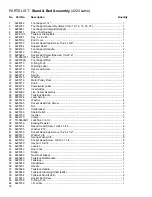
Page 18: ...el 1 24 6295719 Inverter Box 1 25 6295902 Live Center Assembly 1 28 6295723 Tailstock Spindle 1 29 6295724 Lead Screw 1 30 6295725 Washer 4 31 6295726 Socket Head Cap Screw 2 32 6295727 Nut 2 33 6295728 Chipbreaker 1 34 6295729 Strain Relief 3 35 6295730 Inverter 1 36 6294770 Clamp 2 37 TS 0650081 Lock Nut 3 4 10 2 38 6295733 Braking Resistor 1 39 6295734 Round Head Screw 10 24 x 5 16 6 40 6295735...

Page 19: ...Hex Socket Screw 5 16 18 x 1 4 74 6295769 Lock Washer 5 16 4 76 6295771 Motor Pulley 1 77 6295772 Motor Assembly Plate 1 78 6295773 Washer 7 16 1 79 6295774 Set Screw 1 4 20 x 3 8 2 80 6295775 Lock Washer 7 16 1 81 6295776 Hex Socket Screw 7 16 14 x 1 1 4 1 82 6295777 Large Washer 1 83 6295778 Stud 1 84 6295779 Handle 1 85 6295780 Spring 1 86 6295781 Stud 1 87 6295782 Motor Label 1 88 6295783 3 HP...

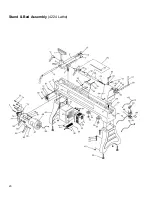
Page 20: ...20 Stand Bed Assembly 4224 Lathe ...

Page 21: ...7 Bracket 1 24 3064711 Lathe Guard Bracket 1 25 6143004 Retaining Collar 2 26 6644005 Plunger 1 27 6295850 Socket Cap Screw 3 8 16 x 3 2 28 6861300 Spring Washer 3 8 2 29 6295915 Control Pot Assembly 1 30 6294743 Knockout Rod 1 31 6295815 Tap Screw M3 x 10 4 32 6295816 E Ring E 7 1 33 6295817 Index Bushing 1 34 6295818 Index Shaft 1 35 6295819 Index Knob 1 36 6295820 Spring 1 37 6295821 Bolt 1 38 ...

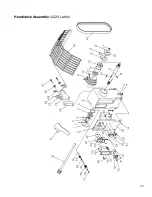
Page 22: ...eadstock Assembly 4224 Lathe Continued No Part No Description Quantity 59 6295843 Clamp 1 60 6295844 Nut 10 24 1 61 6294744 Faceplate Spanner 1 62 TS 0270011 Socket Set Screw 5 16 18 x 1 4 2 63 6295923 Clamp Washer 1 ...

Page 23: ...23 Headstock Assembly 4224 Lathe ...

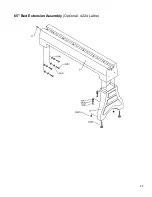
Page 24: ...e 7 6294751 Bowl Turning Tool Support LH 6295845 Short Outfeed Bed Extension 20 6295846 Tool Rest Base Assembly 24 65 Bed Extension Assembly Optional 4224 Lathe No Part No Description Quantity 6295847 65 Bed Extension Assembly Items 1 11 1 1 6295901 65 Bed Extension 1 2 6295861 Pin 1 3 6295743 Stand 1 4 6295862 Hex Socket Cap Screw 5 8 11 x 2 4 5 6295859 Lock Washer 5 8 4 6 6295860 Washer 5 8 4 7 ...

Page 25: ...25 65 Bed Extension Assembly Optional 4224 Lathe ...

Page 26: ... Bed Extension 1 2 6295853 Extension Rod 1 3 6294770 Clamp 1 4 TS 0650081 Lock Nut 3 4 10 1 5 6295860 Washer 5 8 4 6 6295854 Lock Washer 5 8 4 7 6295855 Hex Socket Cap Screw 5 8 11 x 1 1 2 4 8 6295856A Rod 1 9 6295710 C Ring 1 10 6295857 Tool Support Base 1 11 6295702 End Cover 1 12 6294761 Key 6 x 6 x 45 1 13 6294762 Bushing 1 14 6295851A Tool Support Clamp Bolt 1 15 6294764 Support Bracket 1 16 ...

Page 27: ...en 7 00 a m and 6 00 p m CST Monday through Friday Having the Model Number and Serial Number of your machine available when you call will allow us to serve you quickly and accurately Locating the stock number of the part s required from your parts manual will also expedite your order Phone No 800 274 6848 Website www wmhtoolgroup com ...

Page 28: ...28 WMH Tool Group 2420 Vantage Drive Elgin Illinois 60123 Phone 800 274 6848 www wmhtoolgroup com ...

Reviews: