11
Converting from 230 Volt to 460 Volt
Consult the diagrams on pages 54 and 55 for
specific information on the following changes.
1. Disconnect machine from power source.
2. Change the lead connections to the main
motor and to the table hoist motor.
3. Replace the RA-30 (230V) overload relay
with the provided RA-30E (460V) overload
relay.
4. Switch the “R” wire on the transformer from
the 230V to the 460V terminal.
5. If using a plug, install a proper UL/CSA
listed plug suitable for 460V operation.
Test Run
After wiring has been completed, confirm that
the wires have been connected properly:
1. Connect machine to power source and
press the “Main Motor” button for just an
instant, then press the Stop button.
2. The cutterhead should rotate clockwise as
viewed from the handwheel side of the
machine. If cutterhead rotation is incorrect,
disconnect machine from power source
and switch any two of the three wires at
"R,S,T" (see “Electrical Connections”, pages
54 and 55).
3. Re-connect machine to power source.
Controller Set-Up
To program settings in the Controller for table
movement, refer to the section beginnning on
page 20.
Adjustments
Depth of Cut
Depth of cut is adjusted by raising or lowering
the table using the elevating handwheel or the
push buttons for rough positioning; or the
keypad on the Controller. The Controller is used
for very precise positioning and for remembering
your settings (for more information on the
Controller see the section beginning on page
20).
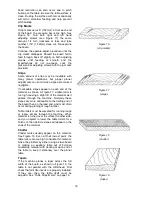
To move the table with the elevating handwheel
(Figure 3), push the handwheel
in
to engage the
sprocket on the table elevating mechanism. One
revolution of the handwheel equals 1/32”
change in table height. Use the scale or digital
readout to determine distance from the
cutterhead.
Figure 3
Summary of Contents for WP2510
Page 35: ...35 17 M15S Specifications ...
Page 39: ...39 Column Assembly ...
Page 42: ...42 Gearbox Assembly ...
Page 46: ...46 Table Assembly ...
Page 48: ...48 Base Assembly ...
Page 54: ...54 Electrical Connections 230Volt ...


