background image


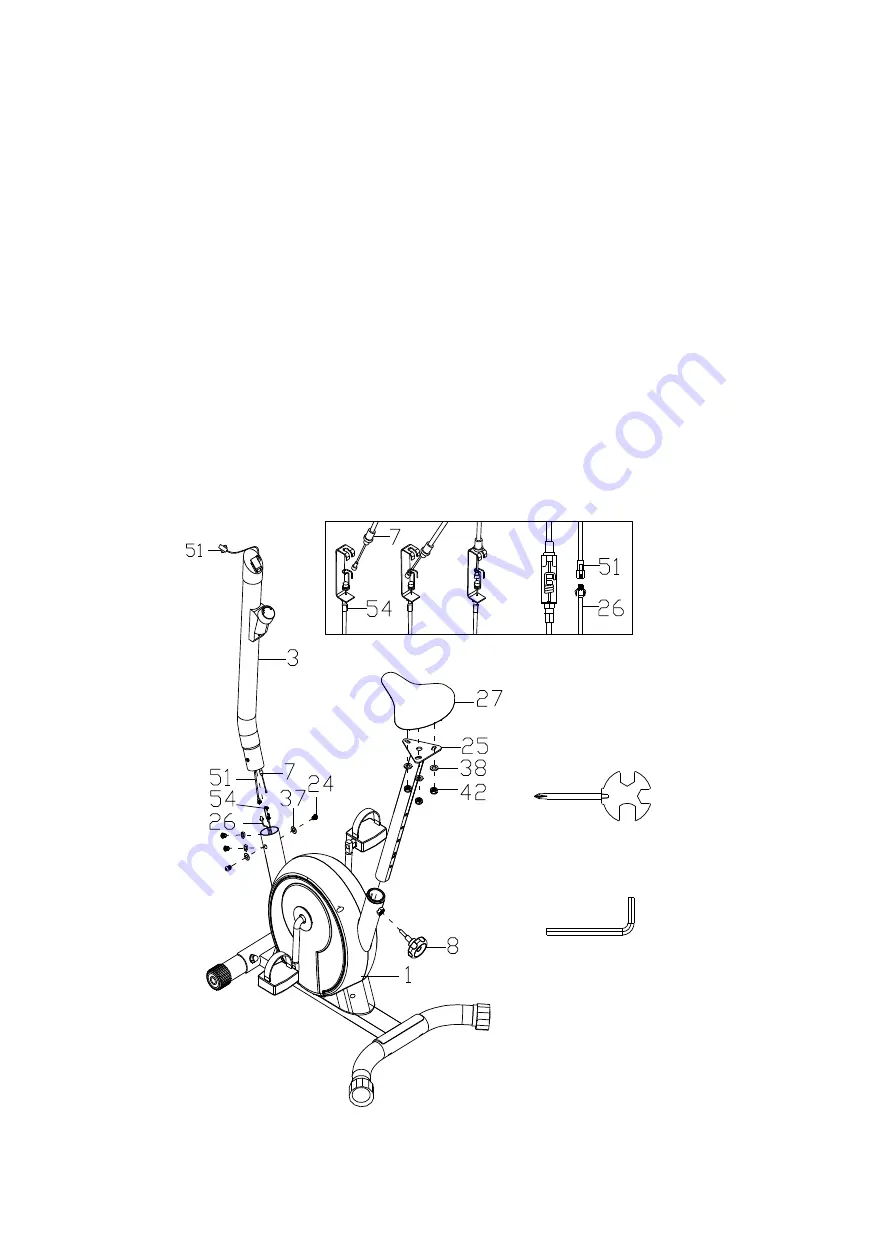
Step 3: Connect the tension control (7) with lower tension wire (54) as the photo. 

Step 4: Connect the


middle wire (51) with sensor (26). Then fix the meter tube (3) to 

the main frame (1) by 4 sets bolt M8*15 (24) and arc washer Φ8 (37) 

Step 5

Fix the saddle (27) to the seat tube (25) by 3 sets flat washer Φ8 (38) and 

locking nut M8 (42) which are attached on the saddle. 

Step 6

Insert the seat post (25) to the seat post bellow and then fix to the main frame by 

knob (8). 


Multi Hex Tool with Phillips
Screwdriver S13-S14-S15 1PC

Allen Wrench 

 S6 1PC

Summary of Contents for BU-300

Page 1: ...BU 300 Upright Bike Owner s Manual ...

Page 2: ... Your doctor s advice is essential if you are taking medication that affects your heart rate blood pressure or cholesterol level 3 Be aware of your body s signals Incorrect or excessive exercise can damage your health Stop exercising if you experience any of the following symptoms pain tightness in your chest irregular heartbeat extreme shortness of breath lightheadedness dizziness or feelings of ...

Page 3: ... rectified 9 Wear suitable clothing while using the equipment Avoid wearing loose clothing that may get caught in the equipment or that may restrict or prevent movement 10 The equipment has been tested under class H C Maximum weight of user 100kg Braking ability is independent of speed 11 The equipment is not suitable for therapeutic use 12 Care must be taken when lifting or moving the equipment s...

Page 4: ...0 1 13 Chaincover 2 44 Pressure plate 1 14 SpringⅠΦ10 50 δ1 0 1 45 Bearing 6000Z 2 15 Cross pan head self tapping screw ST4 2 16 1 46 Bushing Ф20 Ф17 3 3 1 16 Flat washerⅠΦ23 Φ35 2 0 1 47 Cover for crank 2 17 Puller sleeve I 1 48 Flat washer ⅡΦ40 2 8 1 18 Nut 1 49 Handle bar end cap Φ22 1 5 2 19 Belt plate assy Φ200 1 50 Form grip Φ21 Φ27 500 2 20 Left pedal 1 2 1 51 Middle sensor wire 750mm 1 21 ...

Page 5: ...4 30 Central spindle Φ17 90 1 31 Bearing 6203Z 2 EXPLODE VIEW I ...

Page 6: ...5 Hardware List 34 BOLT M10 56 4PCS 35 ARC WASHER Φ10 Φ20 1 5 4PCS 36 DOMED NUT M10 4PCS Multi Hex Tool S13 S17 S19 1PC Multi Hex Tool with Phillips Screwdriver S13 S14 S15 1PC Allen Wrench S6 1PC ...

Page 7: ...for assembling the item B Before assembling please check whether all needed parts are available at the above of this instruction on sheet you will find an explosion drawing with all single parts marked with numbers which this item consists of C Use the present tooling for assembling ...

Page 8: ...t M10 36 Step 2 Attach the left pedal 20 and right pedal 21 to the main frame 1 NOTE The right pedal 21 should be threaded on clockwise direction The left pedal 20 should be threaded on anti clockwise direction The right and left Pedals are marked with R L Multi Hex Tool S13 S17 S19 1PC Multi Hex Tool with Phillips Screwdriver S13 S14 S15 1PC ...

Page 9: ...e main frame 1 by 4 sets bolt M8 15 24 and arc washer Φ8 37 Step 5 Fix the saddle 27 to the seat tube 25 by 3 sets flat washer Φ8 38 and locking nut M8 42 which are attached on the saddle Step 6 Insert the seat post 25 to the seat post bellow and then fix to the main frame by knob 8 Multi Hex Tool with Phillips Screwdriver S13 S14 S15 1PC Allen Wrench S6 1PC ...

Page 10: ...hexagon bolt M8 15 24 and arc washer Φ8 37 Put Meter plate 57 into Meter Post 3 Step 8 Connect the wire of meter 10 with middle wire for sensor 51 Step 9 Attach the computer 10 to Meter Post 57 Multi Hex Tool with Phillips Screwdriver S13 S14 S15 1PC Allen Wrench S6 1PC ...

Reviews: