background image


www.powermaxfitness.net 

13 

5. PRODUCT INSTRUCTION 


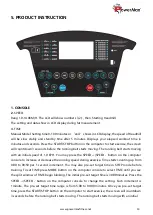
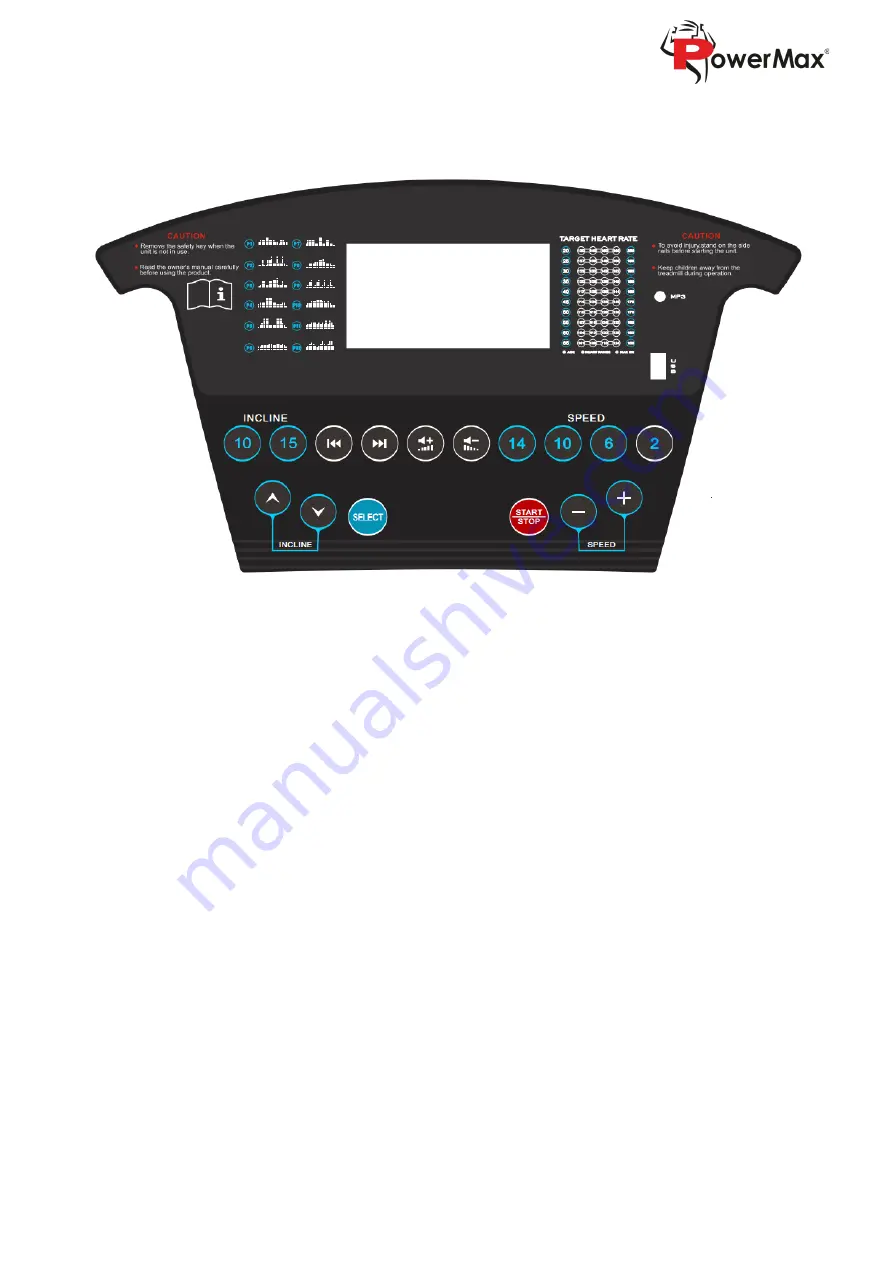
1. CONSOLE 


2.

 SPEED 

Rang 1.0-14.0KM/H. The LCD will show numbers 3,2,1, then, Starting treadmill.  
The setting and data show in LCD display during fat measurement. 

3.

 TIME 

Manual Model: Setting time 0-

100 minutes or ‘end’ shows in LCD display,

 the speed of treadmill 

will  be  slow  stably  and  standby  time  after  5  minutes.  Displays  your  elapsed  workout  time  in 
minutes and seconds. Press the START/STOP button on the computer to start exercise, the screen 
will countdown 3 seconds before the running belt starts moving. The running belt starts moving 
with an initial speed of 1.0 KPH. You may press the SPEED +/SPEED - button on the computer 
console to increase or decrease the running speed during exercise. Time starts counting up from 
0:00 to 99:59 per 1 second increment. You may also pre-set target time in STOP mode before 
training. To set TIME press MODE button on the computer console to select TIME until you see 
the split window of TIME begin blinking. The initial pre-set target time is 30:00minutes. Press the 
SPEED  +/SPEED  -  button  on  the  computer  console  to  change  the  setting.  Each  increment  is 
1minute. The pre-set target time range is from 5:00 to 99:00 minutes. Once you pre-set target 
time, press the START/STOP button on the computer to start exercise, the screen will countdown 
3 seconds before the running belt starts moving. The running belt starts moving with an initial  

Summary of Contents for TDA-230

Page 1: ...S MANUAL Read all instructions carefully before using this product Retain this owner s manual for the future s reference Product may be slightly different with photos it is subject to actual product T...

Page 2: ...is warranty is limited to replacing or repairing free of charge any parts which may prove to be defective under normal home use This warranty does not include any damage caused by improper operation m...

Page 3: ...approved qualified two consecutive years for the sampling inspection performed by National Athletic Sports Goods Inspection Centre Our products fully obtain recognition from domestic and foreign cust...

Page 4: ...Nut M8 50 2 Up Horizontal Pipe 2 6 mm Internal Hexagonal Nut M8 35 4 U Pipe Fix 3 6 mm Internal Hexagonal Nut sM8 55 2 Upright fixed 4 U shaped Pipe Cap 4 5 Handrail Cap 2 6 5 mm 6mm Internal Hexagona...

Page 5: ...er After using please switch off the machine power When exercising please clip the security lock cable to the clothes so the machine will safely shut down when emergency occurs If you feel uncomfortab...

Page 6: ...ds of skin infections 9 People who have perceived barriers caused by highly peripheral circulation obstacles that are caused by diabetes etc 10 People who have skin injuries 11 People who have a high...

Page 7: ...et close to it Otherwise accidents or injuries may be caused by falling down People who can t express their consciousness or can t operate it are not allowed to use Otherwise it may cause accidents or...

Page 8: ...quipment grounding conductor and power of ground plug The plug must be inserted into the proper plug base that have been right installed and grounded according to the local laws or regulations Danger...

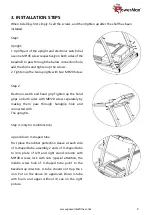
Page 9: ...eve at each side of U shaped tube assembly 2 ends of U shaped tube to iron plate of left and right stand column with M8 40 screws lock with nuts special attention the middle screw hole of U shaped tub...

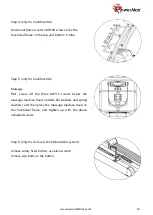
Page 10: ...screws to fix the functional frame on the top and bottom U tube Massage First screw off the three M8 16 screws below the massage machine head include flat washers and spring washers and then place th...

Page 11: ...s physical fitness and then exercise according to the progressive overload principle At the first exercising stage muscles soreness is normal and can be eliminated by keep exercising Diet To protect d...

Page 12: ...seconds and then relax Repeat for three times for each leg see picture 2 Stand with two hands on the wall or desk and one foot backward Keep back leg upright and its heel touching the ground lean towa...

Page 13: ...of 1 0 KPH You may press the SPEED SPEED button on the computer console to increase or decrease the running speed during exercise Time starts counting up from 0 00 to 99 59 per 1 second increment You...

Page 14: ...the computer console to select DISTANCE until you see the split window of DIS begin blinking The initial pre set target distance is 1 0 km Press the SPEED SPEED button on the computer console to chang...

Page 15: ...u running and catch the handrail the system will be auto checking your pulse value The reference pulse value 50 200 time min Displays your current heart rate in beats per minute BPM To activate grip t...

Page 16: ...place the abnormal situations during the motion you may pull off the safety lock and then the treadmill will quickly decrease the speed until the stop while the safety lock is put into again this devi...

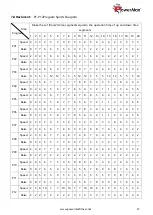
Page 17: ...5 4 3 2 1 1 2 3 4 5 6 P05 Speed 2 4 4 5 6 7 7 5 6 7 8 8 5 4 3 3 6 5 4 2 Raise 0 2 3 4 5 6 7 7 6 5 4 3 2 1 1 2 3 4 5 6 P06 Speed 2 4 3 4 5 4 8 7 5 7 8 3 6 4 4 2 5 4 3 2 Raise 0 2 3 4 5 6 7 7 6 5 4 3 2...

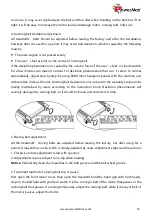
Page 18: ...eded if the running board is dry and you feel no silicon resin inside this means lubricant is needed A Steps for coating the running board with lubricant see the picture B Stop the rotation of the run...

Page 19: ...circle as the unit Running belt deviation is not covered in the warranty scope and is mainly maintained by users according to the instruction book Deviation phenomenon will severely damage the running...

Reviews: