background image

2

Always wear approved front and side 

EYE PROTECTION


when operating this Nailer. Others in the work area 

should also wear front and side 

EYE PROTECTION

. Eye 

protection will help guard against flying nails and debris, 

which could cause severe eye injury.

EAR PROTECTION

 may be required to prevent hearing 

damage when there are high noise levels in the work 

area.
Always 

DISCONNECT THE AIR SUPPLY

 before making 

any adjustments, repairing, clearing jams or when the 

Nailer is not in use.
Never attach the female end of a quick disconnect to the 

Nailer. This will trap air inside the Nailer and permit it to 

be discharged. Only the unrestricted male connection 

should be attached to the Nailer
Use only regulated compressed air, do not use bottled 

gases of any kind to power this Nailer. Normal air 

pressure should not exceed 110 psi or damage to the 

Nailer and seals may occur. Excess air pressure can 

cause the Nailer to explode.

THE TRIGGER IS A SAFETY DEVICE

 and should only 

be pulled when the Nailer is in proper position on the 

work surface and before the plunger is struck with the 

mallet. Do not tie or tape down the safety trigger as the 

Nailer could discharge if dropped on the plunger. The 

Nailer will not fire unless the trigger is pulled before the 

mallet blow.
Do not use the trigger safety as a lock up for the 

plunger then rack the wood using the locked up Nailer 

body. It will severely damage the mechanism and the 

Nailer.

DO NOT USE THE METAL END OF THE MALLET TO 

STRIKE THE PLUNGER,

 use the rubber capped end 

only.
Never place any part of the body in the discharge path 

of the Nailer when air is connected to the Nailer. Always 

connect air hose to unloaded Nailer to prevent any 

accidental discharge from occurring.
Never leave the Nailer unattended while it is connected 

to an air supply.

DESCRIPTION

OPERATION

TO PREVENT ACCIDENTAL INJURIES:

The Powernailer® Model 50P Pneumatic Nailer is the 

latest model designed to bring Powernail quality to a 

pneumatic nailer. For those looking for the ease of use of 

a pneumatic tool, the Powernailer® Model 50P designed 

for use with only 1" , 1-1/4", 1-1/2" and 1-3/4" (18 gage) 

Powercleats® nails provides several distinct advantages. 

The Model 50P can nail down 3/8", 1/2", 5/8" and 

some exotic 3/4" tongue and groove hardwood flooring 

through the use of easy to change, no mar pad and 

shims. For a superior pneumatic Nailer, look to the 

company that has been the industry’s quality leader for 

over 50 years, POWERNAIL® COMPANY, INC.

To use the Model 50P, simply place the nailer on the 

floor, pull nailer back so locating ears catch the edge of 

the floor above the tongue, pull the safety trigger and 

tap the plunger with the rubber capped mallet end and 

let the Nailer drive and set the nail at the correct 45 

degree angle. Adjust nailer by adding shims between 

the adapter foot and pad until there is a slight gap 

between the tongue of the wood and the locating ears of 

the adapter foot. See example 1B and 2A.

To Load Model 50P LS or SS 

Place up to one stick (100) of Powercleats® (18 gage) 

nails, 1" , 1-1/4" , 1-1/2" or 1-3/4" long into the nail 

channel feed slot. Pull back the spring loaded nail 

pusher over the nails until it contacts the last nail and 

slowly release the nail pusher.

To Unload 

To remove nails from the nail channel, pull the two 

round knobs on the nail pusher together. This will clear 

it from the nail path. Then turn the nailer over so the 

nails slide out of the channel.

Read these instructions carefully before you use the Nailer.

Summary of Contents for 50P FLEX

Page 1: ...8 POWERNAIL CO 1300 Rose Road Lake Zurich IL 60047 Phone 1 800 323 1653 Website www powernail com ead this manual before you use this Nailer Follow safety warnings and instructions If you are ncertain about the operation of the Nailer call us directly at 1 800 323 1653 for assistance or contact the closest Powernail Dealer for help Please retain this information for future reference W A R N I N G ...

Page 2: ...s connect air hose to unloaded Nailer to prevent any accidental discharge from occurring Never leave the Nailer unattended while it is connected to an air supply DESCRIPTION OPERATION TO PREVENT ACCIDENTAL INJURIES The Powernailer Model 50P Pneumatic Nailer is the latest model designed to bring Powernail quality to a pneumatic nailer For those looking for the ease of use of a pneumatic tool the Po...

Page 3: ...e and groove hardwood flooring Contact your Powernailer dealer for Powercleats nails WARNING WARNING Do not use any nails other than Powernail Powercleats 18 gage nails which are specifically designed for use in the Model 50P Powernailer Powercleats 18 gage nails are available in 1 1 1 4 1 1 2 or 1 3 4 lengths to accommodate 3 8 1 2 5 8 and some exotic 3 4 tongue and groove hardwood flooring Conta...

Page 4: ...ooring walls or furnishings Dry fire the Nailer without nails to purge excess oil before you begin to nail down flooring We will not be responsible for oil stains Before storing the Nailer lubricate and cycle the Nailer in insure internal parts are oil protected from corrosion PARTS SERVICE When ordering parts include the part number part description Powernailer model and serial number Be sure to ...

Page 5: ... Return Cylinder TO REPLACE THE SEALS Plunger Seal Set 32 1 Remove the Teflon Seal and its O ring expander from the Plunger groove using a bent paper clip or pick Be sure not to scratch the inside walls of the seal groove with the wire hook 2 Clean out the seal groove Place a new O ring into the seal groove by stretching it over the Plunger body Make sure the O ring is not twisted in the groove Pl...

Page 6: ...ust be clean and lubricated generously with the supplied lubricant O Ring grease or petroleum jelly Replace any part that shows signs of wear 3 Use care when installing the seals into their respective cavities Be sure the Seals are contained in their groove and do not come out as the parts slide together Generous cavity lead in chamfers have been provided to help Seal installation 4 Carefully inse...

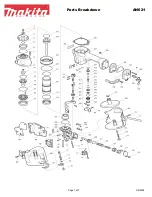
Page 7: ...7 33 21 20 19 30 32 34 ...

Page 8: ...1 K S A A 1 A 6 20 09 200 3027 Return Cylinder U cup Lip Seal 1 K S A A 1 A 6 21 09 200 3028 Piston Rod U cup Lip Seal 1 K S A A 1 A 6 22 09 200 3034 Nail Pusher Spring 1 S A A 4 A 9 23 09 200 3035 Spool 2 S A A 4 A 9 24 09 445 29832 10 32 X 3 4 SHCS Plunger 3 S A A 6 25 09 200 3057 10 32 X 1 2 FHCS Slotted Pad 4 S 26 09 445 29707 Safety Yoke 1 S 27 09 2003019 Body Plate 035 Thick 1 S 28 09 445 29...

Page 9: ...0 8 32 X 1 4 BHCS Cable 1 S 57 09 445 29822 10 32 X 3 4 SHCS w patch Gate 3 S A A 4 58 09 50P 3037 200 Thick UHMW Plastic Pad 1 S 59 09 50P 3038 Shim 4 S 60 09 50P 3040 Channel Plate 1 S A A 4 61 09 50P 3041 6 32 X 3 8 BHCS Channel Plate 2 S A A 4 62 09 50P 3036 150 Thick Plastic Pad 1 S Model 50P Parts List continued 9 ITEM PART NO DESCRIPTION QTY KEY A 1 09 200 3058A Seal Kit 1 Each Of All Seals...

Page 10: ...11 POWERNAILER MODEL 50P 10 62 ...

Page 11: ...ch application This is only a guide Results should be tested in the field before proceeding POWERCLEATS LENGTH DETERMINATION CHART 1 3 4 18 GA POWERCLEATS 1 1 2 18 GA POWERCLEATS 1 1 4 18 GA POWERCLEATS 1 18 GA POWERCLEATS 7 8 31 32 Exotic 3 4 Hardwoods Underlayment Underlayment Underlayment Underlayment Underlayment Underlayment Underlayment Underlayment Underlayment Underlayment Underlayment Und...

Page 12: ...r replace jam nut 6 Worn out gate Replace gate 4 Nailer leaks air 1 Air supply fittings loose Tighten all air line fitting connections 2 Excess air pressure blew out seals Check air supply for 110 psi maximum replace all seals 3 Plunger screws loose Tighten 3 plunger screws 4 Cracked or damaged body Replace body 5 Seals worn out Replace all seals 6 Seals need to be seated Dry fire Nailer 5 Bottom ...

Reviews: