background image


POWX07582 

EN


Copyright © 2017 VARO 

P a g e

 | 

12


www.varo.com 


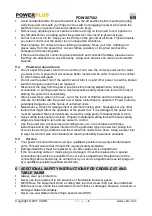
Lower the saw head carefully and completely downwards while holding firmly onto the 
handgrip. You should only apply medium pressure while sawing, so as to prevent that the 
speed of the motor slows down.  


Saw the workpiece in one single movement. 


Carefully let the saw head return to its topmost starting position.  


The saw should be switched off by releasing the switch (20), if no further sawing has to be 
done.  

Note:  The mitre saw is activated at certain angles, such as at 0°, 15°, 22.5°, 
30°, 45° and 60°. 

10.1.6 

Bevelling 


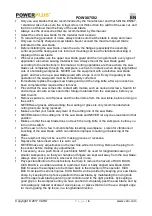
During bevelling, the workpiece is sawn at an angle of less than 90°. 


Starting position: 

 Saw head completely raised.  

 Motor head in the 0° position; the locking screw of the turntable is tightened. 

10.1.7 

Sawing the workpiece: 


Release the bevelling locking knob (16) for tilting the saw head close to the saw. 


Tilt the motor head carefully to the desired position. 


Tighten up the bevelling lock knob (16). 


Hold the workpiece against the mitre and width guide. If necessary, use a work clamp for 
fastening the workpiece. 


Activate the switch (20) and activate/push on the safety lock (6). 


Lower the saw head carefully and completely downwards, while firmly holding onto the 
handgrip. You should only apply medium pressure while sawing, so as to prevent that the 
speed of the motor slows down. 


Saw the workpiece in one single movement. 


Carefully let the saw head return to its topmost starting position. 


The saw should be switched off by releasing the switch (20), if no further sawing has to be 
done. 

10.1.8 

Double mitre cut 


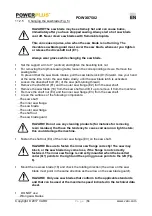
A double mitre cut is a combination of a mitre cut and a bevelling cut; this means that the 
workpiece is cut at an angle in the one single movement, which is not equal to 90° in 
relation to the mitre and width guide and the material surface. 

HAZARD!  The saw blade is exposed much more than normally when 
making a double mitre cut, which leads to an increased risk of injuries. 


Always keep sufficient distance from the saw blade. 


Starting position: 

 Saw head completely raised. 

 Mitre saw locked in the desired position. 

 Saw head tilted at the desired angle, in relation to the surface of the workpiece, and locked 

in position. 

10.1.9 

Sawing the workpiece: 


Hold the workpiece against the mitre and width guide. If possible, use a work clamp for 
fastening the workpiece. 

Summary of Contents for POWX07582

Page 1: ...RODUCT CHARACTERISTICS 7 9 INSTALLATION AND TRANSPORT 7 9 1 Installation 8 9 2 Transport 8 9 2 1 Table saw operating mode 8 9 2 2 Cross cut and mitre saw operating mode 8 9 2 3 Turntable 9 9 2 4 Adjus...

Page 2: ...ntenance 15 11 2 1 For all maintenance works 15 11 2 2 Before every use 15 11 2 3 Monthly if the saw is used every day 15 11 2 4 Every 300 operating hours Fig 3 15 11 2 5 Changing the saw blade Fig 5...

Page 3: ...g lock 17 Table scale 18 Saw blade 19 Sawing head 20 Switch 21 Saw guide 22 Locking knob 23 Mitre index 24 Push block 25 Workpiece clamp 26 Hexagonal spanner 27 Exhaust pipe 28 Dustbag 29 Switch B 3 P...

Page 4: ...ety Power tool plugs must match the outlet Never modify the plug in any way Do not use adapter plugs with earthed power tools Unmodified plugs and matching outlets will reduce the risk of a lethal ele...

Page 5: ...t allow people who are not familiar with the power tool or these instructions to operate it Power tools are potentially dangerous in the hands of untrained users Maintenance Check for misalignment or...

Page 6: ...work Remove spanners cut off pieces and the other items from the saw table before turning on the switch NEVER wear gloves while working the wearing of gloves is only recommended while cutting tools a...

Page 7: ...posures is dependent on how frequently you do this kind of work Measures for reducing your exposure to such chemicals Always work in well ventilated surroundings and with certified safety equipment su...

Page 8: ...the lower saw blade guard and fasten it Lift the machine up by grasping both sides of the base 12 Note The essential operating components of the machine are presented in this section Make sure to rea...

Page 9: ...tioned over the upper saw blade guard 3 When the mitre and width guide is installed you must always make sure that the guide is fastened with the locking knob Once the locking knob is released the mit...

Page 10: ...blade guard must always return automatically to the start position whenever the saw head is lifted The saw blade must be covered at all sides when the saw head is located in the start position 10 1 2...

Page 11: ...mpletely raised Turntable in the 0 position the locking screw of the turntable is tightened The motor head stands in a vertical position 90 and the bevelling lock knob is tightened Sawing the workpiec...

Page 12: ...e workpiece Activate the switch 20 and activate push on the safety lock 6 Lower the saw head carefully and completely downwards while firmly holding onto the handgrip You should only apply medium pres...

Page 13: ...t the riving knife is installed while working with the saw 10 2 3 Lower saw blade guard The lower saw blade guard 14 is designed to provide protection against accidental contact with the saw blade The...

Page 14: ...ce D of the workpiece is less than 120 mm Fig 4 The front edge of the saw blade guard must rest on the workpiece If necessary install the mitre and width guide and make sure that the locking screw poi...

Page 15: ...ly and smoothly over their entire operational range Check the riving knife and make sure that the distance between the riving knife and saw blade is between 3 mm and 8 mm 11 2 3 Monthly if the saw is...

Page 16: ...ft Remove the saw blade 18 from the saw shaft and lift it up to remove it from the machine Remove the shaft nut E4 and the inner saw flange E3 from the saw shaft Clean the surfaces of the following co...

Page 17: ...aw guide 21 HAZARD If the saw guide has been damaged then small pieces can become jammed between the guide and the saw which can block the saw blade Immediately replace a defective saw guide Remove th...

Page 18: ...ment screws of the saw depth stop Lower the saw head until it is stopped by the saw depth stop and check whether the saw blade can freely rotate in this position 11 4 Cleaning Use a brush a dust cloth...

Page 19: ...at the number 00 32 3 292 92 90 Any transportation costs shall always be borne by the customer unless agreed otherwise in writing At the same time no claim can be made on the warranty if the damage of...

Page 20: ...7582 is in conformity with the essential requirements and other relevant provisions of the applicable European Directives based on the application of European harmonized standards Any unauthorized mod...

Reviews: