POWX0761
EN
Copyright © 2008 VARO
P a g e
|
15
www.varo.com
9.6
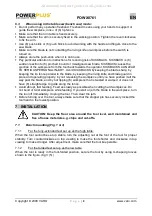
Installing and adjusting Mitre gauge (Fig. 35)
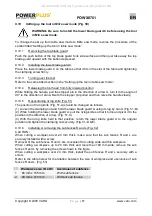
Install the Mitre gauge by inserting its shaft into one of two grooves in the table from the front.
Mitre gauge fence that is also used as rip fence can be installed on the Mitre gauge according
to your work.
9.7
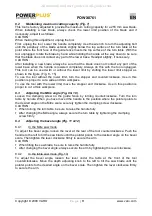
Dust bag (Fig 36, 37 & 38)
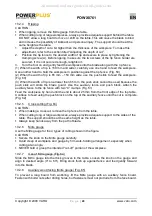
The use of the dust bag makes cutting operations clean and dust collection easy. To attach
the dust bag, fit it onto the dust nozzle.
When the dust bag is about half full, remove the dust bag from the tool and pull the fastener
out. Empty the dust bag of its contents, tapping it lightly so as to remove particles adhering to
the insides which might hamper further collection.
If you connect a vacuum cleaner to your saw, more efficient and cleaner operations can be
performed.
9.8
Securing workpiece
WARNING It is extremely important to always secure the workpiece
properly and tightly with the vise. Failure to do so can cause the tool to be
damaged and/or the workpiece to be destroyed. PERSONAL INJURY MAY
ALSO RESULT. Also, after a cutting operation, DO NOT raise the blade until
the blade has come to a complete stop.
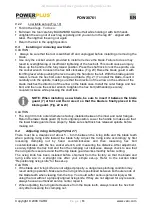
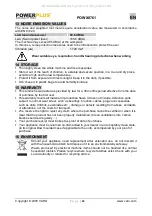
Vertical vise (Fig. 40)
The vertical vise can be installed in two positions on either the left or right side of the guide
fence. Insert the vise rod into the hole in the guide fence and tighten the clamping screw to
secure the vise rod. Position the vise arm according to the thickness and shape of the
workpiece and secure the vise arm by tightening the clamping screw. If the screw to secure
the vise arm contacts the guide fence, install the clamping screw on the opposite side of vise
arm. Make sure that no part of the tool contacts the vise when lowering the handle all the way.
If some part contacts the vise, re-position the vise. Press the workpiece flat against the guide
fence and the turn table. Position the workpiece at the desired cutting position and secure it
firmly by tightening the vise knob.
CAUTION:
The workpiece must be secured firmly against the turn table and guide fence.
9.9
Setting up the tool in table saw mode
CAUTION:
Before use in the table saw mode, make sure that the turn table has been secured at 0°
Mitre angle with the clamping screw on the guide fence.
Before use in the table saw mode, make sure that the tool head has been secured with the
lever.
Before use in the table saw mode, make sure that the riving knife has been secured in
place properly.
Before use in the table saw mode, remove the lower blade guard (8)
In table saw mode, release the lower limit stopper.
The tool is shipped from the factory with the set-up in Mitre saw mode.
Before use in table saw mode, change the set up and follow the procedure
below.
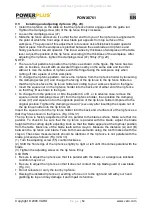
9.9.1
Securing the turn table (Fig. 41)
To secure the turn table, tighten the screw firmly on the guide fence at 0° Mitre angle.
All manuals and user guides at all-guides.com

