background image

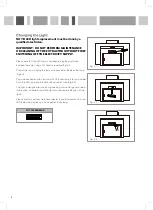
Care and Maintenance

IMPORTANT : DO NOT PERFORM MAINTENANCE OR CLEANING 
OF THE EXTRACTOR WITHOUT FIRST SWITCHING OFF THE 
ELECTRICITY SUPPLY.

Cleaning

You should use a nonabrasive cleaner.  Any abrasive cleaner (including 
Cif) will scratch the surface and could erase the control panel markings.

solution of water and mild detergent and drying to a shine with a clean 
cloth.

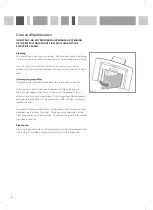
The grease filter should be kept clean to minimise the risk of fire.

At least once a month you should remove and clean the grease 
filter with hot soapy water. You can also wash the grease filter in a 
dishwasher, ensuring that you place it in an upright position to prevent 
damage from other items in the dishwasher. After rinsing and drying, 
replace the filter.

To remove the grease filter, push in the button on the handle and then 
pull down on the filter at the front.  When you have released it at the 
front, then you can pull out the filter. To replace the grease filter, repeat 
the steps in reverse.

Please note: 

Cleaning the grease filter in the dishwasher may lead to discolouration. 
This is normal and does not constitute a fault with the appliance.

Fig. 2

4

Summary of Contents for P21390XBSS

Page 1: ...Cod 0103089649 00 01 P21390XBSS Extractors Installation use and maintenance...

Page 2: ......

Page 3: ...run for approximately 15 minutes after the end of cooking Control Panel B Speed level buttons C Light button Press button C To switch on the extractor or change the motor speed at any time when the e...

Page 4: ...u should remove and clean the grease filter with hot soapy water You can also wash the grease filter in a dishwasher ensuring that you place it in an upright position to prevent damage from other item...

Page 5: ...MPT TO MAINTAIN OR CLEAN THE EXTRACTOR WITHOUT FIRST SWITCHING OFF THE ELECTRICITY SUPPLY Fig 3 I Fig 3 II Fig 3 III To ensure the best performance from your cooker hood the charcoal filter should be...

Page 6: ...ler in order to purchase a new LED lamp when replacing a damaged or faulty lamp Please note that the LED lamp is not covered by the guarantee Remove the lamp using a flat head screwdriver Fig 4 I NOTE...

Page 7: ...7 FUSE 3A PROTECTION LINE 3A Fuse is installed inside the plug to protection line 26 5W 230 240V ac 50Hz...

Page 8: ...and Distributor Shomar Ltd Unit 9 Western Industrial Estate Dublin 12 Republic Of Ireland Helplines office hours Spare Parts contact number is 01 450 5327 or email service shomar ie Shomar Ltd shall...

Page 9: ...P21390XBSS 15 5 94 79 86 5 75 Height dependent For best performance and lowest noise output we recommend use of 150mm ducting for P21390XBSS models 9 5 C E F D Centre B A Gas 750mm recommend Electric...

Page 10: ...r c s p o t d n a s g n i x fi l l a w t i F s e l o h l l i r D you use are appropriate for the wall type s w e r c s l l a n e t h g i t d o o h e r u c e S IMPORTANT SAFETY WARNING ONLY USE THE SC...

Page 11: ...e s d n a t s u j d A y e n m i h c e h t t n u o M Fig 12 The metal casing of this appliance has been coated with a preservative to protect it during transport and storage This should be removed dur...

Page 12: ...ssure at Best PBEP Pa Maximum airflow QMAX m3 h Measured electric power at Best WBEP W Nominal lighting power WL W Average illumination of the lighting system on the cooking surface EMiddle Lux Measur...

Page 13: ...12...

Reviews: