background image


Page 59 

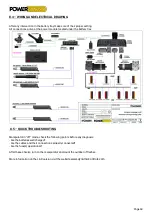
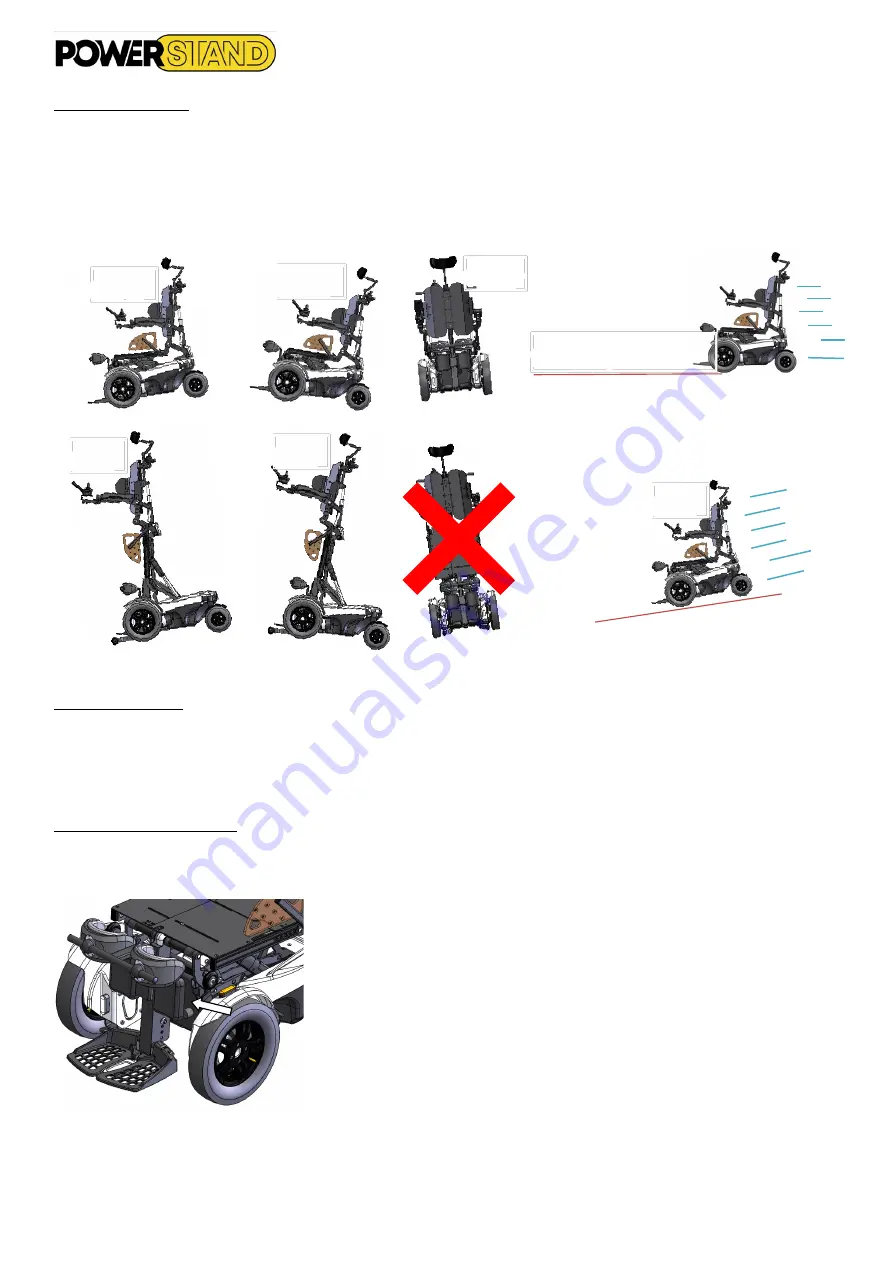
8.1 – STABILITY 

The P-Compact is a Class B electric wheelchair 

meeting the following stability criteria: 


Static


Dynamic


8.2 – LIFESPAN 

The P-Compect  is an electric wheelchair    designed  to operate for 6 years, with normal use and respecting the 

instructions for maintenance and cleaning. The life of the batteries depends on the number of charges made see section 

7.1 

8.3 – IDENTIFICATION 

You will find the trade description as well as the serial number of your chair on the front of the chassis behind the rudder  


Figure 112 :  identification label 

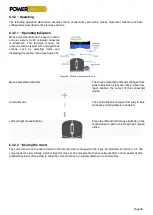
Max 6° 

Max 20° 

Max 15° 

10 km/h : 1,90 m minimum 

Max 6° 

Max 20° 

Max 6° 

Summary of Contents for P-Compact

Page 1: ...User manual Powered Wheel Chair P Compact...

Page 2: ...tal position 17 3 2 3 Setting up the bust strap 18 Chapter IV GETTING STARTED 19 4 1 Manipulator 19 4 2 Powering up down 20 4 3 Understanding the touch screen 21 4 3 1 Interacting with the touc screen...

Page 3: ...hapter VII MAINTENANCE 53 7 1 Batteries charge 53 7 1 1 Characteristic of Lithium batteries 53 7 1 2 Caract ristique des batteries AGM gel 53 7 1 3 Battery charging 54 7 1 4 Recommendations for use ba...

Page 4: ...or slope 2 Settings This wheelchair must NECESSARILY be adjusted by the dealer who will be able to make the adjustments adapted to your morphology Under no circumstances should you attempt to settle i...

Page 5: ...of alcohol narcotics and or medicaments The cushions meet the requirements of the standard NF EN 1021 nothing less it is recommended to avoid putting any part of the chair in contact with a heat sour...

Page 6: ...all be securely secured to the vehicle by means of the 4 anchorage points on the chassis and rudder see figue 2 3 Figure 2 rocking lever anchor ring Figure 3 front motorization ring To transport the c...

Page 7: ...r comes with its folded backrest pallet rest raised anti rockers holding balls and detached clothing protectors Figure 5 fixing the backrest Straightening the backrest Insert the quick attachment of t...

Page 8: ...gement levers are located on the top of the engines on either side of the chair 2 3 1 Engage electric propulsion mode Figure 7 brake locking Turn the two levers counterclockwise The wheels are connect...

Page 9: ...user s thigh length The right seating depth is achieved when the patient has his back in contact with the backrest and there is a set of 4 to 5 cm between the front edge of the seat cushion and the po...

Page 10: ...Position the seat pivots on the number 50 to 40 indicating the desired seat depth Replace the three screws on both sides of the chair Figure 10 seat septh adjustment sup Remove the two screws from th...

Page 11: ...re 13 Seat width adjustment Using a 5 mm hexagonal 6 sided wrench loosen the four armrest width adjustment screws on the same side as before See figure 14 Figure 14 adjustment width backrest armrests...

Page 12: ...armrest fixing washer Remove the adjustment screw from the armrest connecting rod Adjust the armrest connecting rod so that the armrest is horizontal again there must be the same number of free slots...

Page 13: ...the desired length Put the bolt back in place Be sure to put the bolt through the cylinder stem in the hamstring See figure 18 Note A good adjustment allows an optimal distribution of the pressure und...

Page 14: ...e support Adjust to desired depth Put the 2 screws back under the knee pad support Keep a set of 3 to 4 cm between the user s knee and the knee pad See figure 21 Figure 22 knee height adjustment The i...

Page 15: ...the absence of too much pressure on the knee and a good alignment of the user s joints 3 1 6 Side clothing protectors Amovibles pour les transferts les prot ges v tement vitent les salissures et ou d...

Page 16: ...o the fasteners of the front wheels To adjust the anti faintly it is necessary to remove the cap on the rudder and tighten the nut with a 16mm socket so that the fork can not turn unique when pushing...

Page 17: ...ion debout dans une pente de plus de 6 le fauteuil reviendra automatiquement en position assise N anmoins le risque de chute existe car le retour la position assise est progressif When the stability o...

Page 18: ...the back tube CAUTION Under no circumstances should these belts be used as a seat belt in a vehicle See figure 31 32 Safety the buckle made by the strap must always be attached to the back tube above...

Page 19: ...e swipe or tap actions to navigate through drive seating utility and connectivity cards Stereo jack sockets 2 x stereo jack sockets that can connect to an external power switch J1 tip only and other m...

Page 20: ...f the system press the power button the touchscreen displays the power off screen see Figure 34 the system turns off and the status indicator turns off The power button is also used to perform an EMER...

Page 21: ...eract with the wheelchair such as controlling the speed of the wheelchair or turning on the indicator lights Overlays which are often placed on a function map provide information or instructions that...

Page 22: ...indicating driving and seat status information See 4 3 4 Status bar Bouton de navigation Affiche le mode d interaction actuel Ouvre l aper u de la carte de fonction appui court Ouvre le menu d tat et...

Page 23: ...ion about the battery charge status is displayed in the status bar See 4 3 4 Status bar for more information 4 3 4 Status bar The status bar can be divided into three sections Profile name Hour Status...

Page 24: ...int Low voltage this is displayed when the battery voltage falls below the Batt Gauge Low Voltage Warning set point Cut off voltage this is displayed when the battery voltage falls below the voltage s...

Page 25: ...connectivity See Figure 49 and purple for the utility card See figure 51 Figure 48 Exemple ent te conduite Figure 49 Exemple ent te connectivit Figure 50 Exemple ent te si ge Figure 51 exemple Ent te...

Page 26: ...y card example A driving card is selected when the user wants to drive the wheelchair control the speed of the wheelchair operate the lights and sound the horn A seat card is selected when the user wa...

Page 27: ...proportional to the deviation of the joystick so the farther the joystick is from the neutral position the faster the training or sitting function moves Speed Control discrete mode In discrete mode t...

Page 28: ...system installation manual for more information on speedometer odometer calibration 4 6 CONTROLLING AND VIWE SPEED The speed Dial The speed dial displays the speed parameters of the user and the whee...

Page 29: ...de press and hold the speed slider and drag it up or down Release the cursor to the desired set point see Figure 60 To set the speed slider to simple keystroke mode press at the top of the speed slide...

Page 30: ...t image and a system with lighting right image Figure 63 Driving card with and without lighting To control the wheelchair lighting press the lighting control button to display the lighting control pan...

Page 31: ...The horn sounds for as long as the horn button is activated See figure 65 4 9 EMERGENCY SHUTDOWN If the user needs to quickly stop the wheelchair or quickly stop a seating movement the power button ca...

Page 32: ...he board and is defined using the programming and diagnostic tools A seat card can be dedicated to a single seat function Figure 67 or can offer several seating functions Figure69 Seat images identify...

Page 33: ...he four dials front back left and right of the circular dial Un utilisateur actionne un mouvement en activant l entr e configur e joystick ou bouton de commande dans le sens indiqu par la position du...

Page 34: ...the elevation and lock motion the user must enable user input configured for a correct operation such as deflecting the joystick to the right Figure 71 Seat card 2 quadrants Figure 72 Seat card 4 qua...

Page 35: ...rning light will be displayed on the touch screen and the chair will only be able to move at 10 of its maximum speed Once back in a sitting position the indicator will automatically turn off and the c...

Page 36: ...arrow to tilt the backrest back Note If the joystick is not held in the position of the arrow the movement stops 5 5 TILT LEGREST To Adjust tilt legrest Select legrest card Legrest icon Push the joyst...

Page 37: ...ia the control inputs Bouton control is an accessibility feature that allows the user to navigate and select items on their iOS or Android device using any main input control inputs or the TOUCH SCREE...

Page 38: ...connectivity card with the user s device These actions are described in more detail below Note Typically you only need to pair a device once unless you voluntarily forget it see Forget devices on page...

Page 39: ...de le faire Start Devices Printers or Start Control Panel Devices Printers or Icon tray click on the bluetooth device icons Figure 80 Add a device Figure 78 Connectivity menu The connectivity settings...

Page 40: ...the LiNX device that appears on the touchscreen e g REM J16130951 Click Next Figure 81 Pair a new device Figure 82 Selecting a device to add Wait for the device to connect Click Next Figure 83 Device...

Page 41: ...ooth devices displayed on your Android device locate and tap the name of the LiNX device you want to pair with e g REM G16138663 the Bluetooth status of the selected LiNX device changes to Connection...

Page 42: ...nu Figure 88 Linked Functions Devices The names of the connectivity cards are displayed in the Functions section top section of the menu For each menu item the name of the connectivity card is display...

Page 43: ...again reselect the connectivity function from the profile that is deselect it and then reselect it Figure 90 Select a mouse mover connectivity card from a profile If a connectivity card in the profil...

Page 44: ...ured according to individual needs See figure 93 These settings can be found in the connection function menu To view these settings tap and hold Navigation button Et puis appuyez sur Settings Connecti...

Page 45: ...ed It remains at this speed for the duration set by the slow movement time see Figure 94 The speed of the slow cursor is set so that the user can move the cursor slowly over small distances which is u...

Page 46: ...to move to a greater distance in a shorter time Mouse movement allows the user to control a mouse cursor on a PC or laptop connected to Bluetooth This includes moving the cursor as well as typical lef...

Page 47: ...its home screen when you press the REM400 s touch screen you ll need to identify the REM400 touch screen as the button input and then assign the action of that button to the Home menu 6 4 1 1 Assign a...

Page 48: ...Item If required repeat the instructions above to add more switches Figure 100 Assigning actions to switches 6 4 1 2 Turn on swotch control Figure 101 Turn on switch control After you assigning switc...

Page 49: ...ion to add or remove it from the list At this point activate the external switch this could be a tap on the remote module s touch screen or a joystick movement in one of the four quadrant directions f...

Page 50: ...ct items on their iOS or Android device The switch control indication varies depending on if a user s device is connected via Bluetooth and whether or not a switch control input is active see below Fi...

Page 51: ...6 5 DISCONNECTING DEVICES To stop using a connectivity card select a different function card from a profile When the connectivity card is deselected the Bluetooth connection disconnects 6 6 FORGETTING...

Page 52: ...CES Check the details on the next screen and then tap Forget this device Press the Forget This Device button again or the Cancel button to cancel this operation Figure 107 Forgetting a device Figure 1...

Page 53: ...teuil quand la jauge de charge de la batterie sur le manipulateur est en rouge Vous devez imp rativement recharger la batterie avant toute nouvelle utilisation Warning The use of a discharged Lithium...

Page 54: ...the battery The only precaution to take is to ensure proper unloading and loading To recharge your wheelchair s battery plug the appropriate battery charger Lithium or AGM equipped with a 5 pin XLR pl...

Page 55: ...atteries have a lifespan limited to their number of charging cycles Every time you bank the charger of your chair you use a charging cycle even if you do not fully charge the batterie ne charge only w...

Page 56: ...t Finally check the wear of your tires and make sure to replace it to avoid punctures In case of punctures you can have your tire repaired by your PowerStand dealer or a bike shop You can also remove...

Page 57: ...the joystick bellows Replace in case of cracks and or cracks Check the status of the manipulator screen and connection Check the proper functioning of the brakes Once the manipulator is in operation m...

Page 58: ...epoxy paint Seat width Lga adjustable from 40 to 50 cm modulo 2 cm Seat depth Pa adjustable from 40 to 50 cm modulo 2 cm Reclining backrest in relation to the seat de 5 45 Front wheels 360 x 80 mm inf...

Page 59: ...6 years with normal use and respecting the instructions for maintenance and cleaning The life of the batteries depends on the number of charges made see section 7 1 8 3 IDENTIFICATION You will find th...

Page 60: ...battery tray 8 5 QUICK TROUBLESHOOTING Manipulator in off mode check the following points before any diagnosis Are the batteries well charged Are the cables and their connections properly connected A...

Page 61: ...RESNA WC vol 2 However in some cases there may be a risk of malfunction of the wheelchair subjected to electromagnetic fields 9 3 RECYCLING Respect the environment and deposit your used batteries in...

Page 62: ...or cutting the remote control cord falling charger etc in neglect of maintenance in a modification beyond the control of the manufacturer Similarly it does not apply to metal elements that have been...

Page 63: ...Page 63 Rue CARAUTE 106 BE 1410 WATTERLOO Belgique Tel 0811 700 440 ou 32 0 2735 1101 www 4power4 powerstand com info powerstand eu Version 12 2021 Imprim le 27 01 2022...

Reviews: