background image

5

ASSEMBLY

•  Replace the upper and side belt guards and secure in 

place with the belt guard locking knob.

•  Plug the power cord into the correct receptacle. 

(Refer to 

Power Source

 paragraph in this section of 

the manual.)

•  Turn the switch ON and OFF to make sure the belt 

is tracking at high speed; readjust with tracking knob 
if needed.

BACKSTOP

Refer to Figure 12
The backstop is a surface to sand against. 

To Adjust

•  Remove the sanding belt table. See

 Mount the 

Sanding Belt Table 

paragraph and reverse the order 

of assembly.

•  Loosen the two screws on backstop and slide the 

backstop in or out until it just touches the back of 
the belt. Retighten the two screws and replace the 
sanding belt table. See

 Mount the Sanding Belt 

Table 

paragraph.

To Remove

The backstop can be removed for polishing and 
contour sanding.
•  Remove the sanding belt table. See

 Mount the 

Sanding Belt Table 

paragraph and reverse the order 

of assembly.

•  Remove screws and washers securing backstop. Place 

screws, washers and backstop in a safe place for future 
use.

•  Replace the sanding belt table. See

 Mount the 

Sanding Belt Table 

paragraph.

Figure 12

Screws and 
Washers

Backstop

REPLACING THE SANDING DISC

Refer to Figure 2, 3

NOTE:

 This sander disc uses 5" self adhesive 

sanding disc. 
•  Turn the machine "OFF", and disconnect the machine 

from the power source before assembling the 
sanding disc. 

•  Remove the sanding disc locking levers and slide the 

sanding disc table from the sander. See Figure 3.

•  Remove the screws and washers securing the dust 

chute and remove the dust chute from the sander. See 
Figure 2.

•  Peel the old sanding disc from the sanding wheel. Clean 

the sanding wheel with mineral spirits. Make sure the 
surface is clean and dry.

•  Position the new sanding disc onto the sanding disc and 

press into place.

•  Reassemble the sanding disc table and dust chute. 

Adjust the sanding disc table, if needed. See to

 Adjust 

Sanding Disc Table.

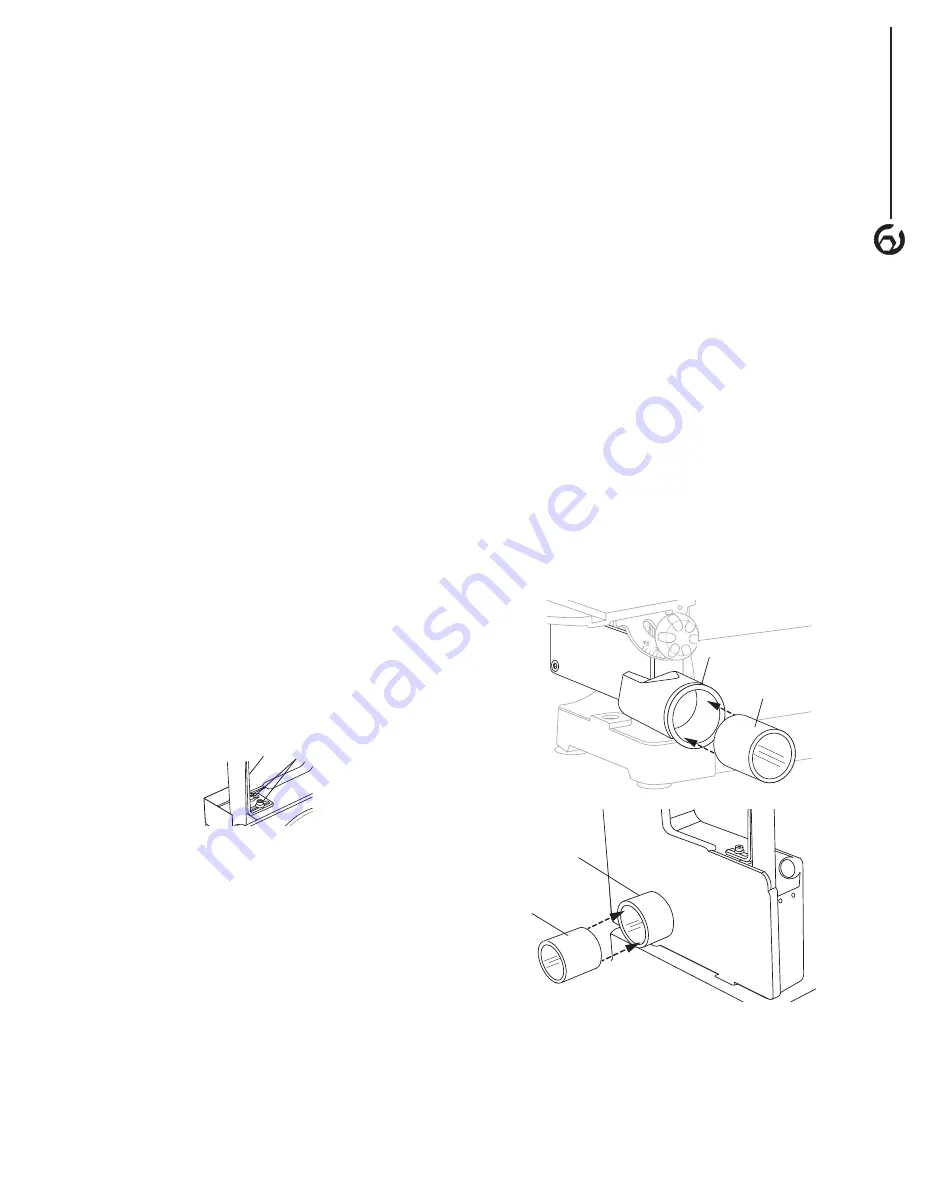
DUST PORT OPTIONS

Refer to Figure 13
The dust ports can be easily connected to a dust 
collection system with a large diameter shop 
vacuum hose.
Sanding operations are inherently dusty. This sander is 
equipped with two 1-3/4” OD x 1-1/2” ID dust ports to help 
minimize the amount of dust escaping into the surrounding 
air. Attach the dust collection system vacuum hose to the 
dust chute.

NOTE:

 The dust chute is shipped with an adapter for 

use with smaller hose dust collectors. This adapter has a 
1-1/4” ID and can be used in either dust port.

NOTE:

 The use of a dust collection system is strongly 

recommended when using the belt/disc sander. Use of a 
mask or respirator is still recommended even when using 
a dust collection system.

Figure 13

Dust Port 
Adapter

Dust Port 
Adapter

Dust Port 

Dust Port 

Summary of Contents for BD1502

Page 1: ...ed this manual for safety instructions operating procedures and warranty Put it and the original sales invoice in a safe dry place for future reference Visit us on the web at www southerntechllc com 1 X 30 BELT and 5 DISC SANDER QUESTION 1 847 780 6120 ...

Page 2: ...ation ASSEMBLY 2 Unpacking Tools Needed Assemble the Dust Chute Assemble the Sanding Disc Table Assemble the Sanding Belt Table Replacing the Sanding Belt Sanding Belt Tracking Adjustment Backstop Replacing the Sanding Disc Dust Port Options Mounting the Sander to Work Surface Power Source Grounding Instructions Motor Extension Cords Electrical Connections OPERATION 8 ON OFF Switch Surface Sanding...

Page 3: ... It should have grounding prong and should be of the correct gauge 1 SAFETY RULES Keep children and visitors away Your shop is a potentially dangerous environment Children and visitors can be injured Make your workshop childproof with padlocks master switches or remove switch keys to prevent any unintentional use of power tools It should have a grounding prong and should be of the correct gauge TO...

Page 4: ...l TOOLS NEEDED The following tools not included are needed to assemble and adjust the belt disc sander Combination square Phillips screwdriver Standard screwdriver 4 mm Hex Wrench ASSEMBLY 2 ASSEMBLE THE DUST CHUTE Refer to Figure 2 Slide the groove in the dust chute onto the sanding disc guard casting as shown Secure the dust chute to the sander with screws flat washers and spring washers supplie...

Page 5: ...he table as shown Figure 5 Sanding Belt Sanding Belt Table Slot Use the washer and shaft from the locking lever assembly to secure the sanding belt table to the frame The shaft should be placed at the rear of the adjusting slot as shown in Figure 6 Reassemble the screw spring and lever to the shaft Tighten the locking lever fully to lock the table Figure 6 Adjusting Slot Shaft Screw Spring Lever W...

Page 6: ... The belt tracking knob is spring loaded Figure 11 Sanding Belt Belt Tracking Knob Wheel Middle Wheel Wheel Position the new belt on the wheels Applying pressure to the belt tracking knob will release tension allowing the belt to be assembled over the middle wheel Make sure the directional arrows on the belt point in the same direction as the arrows on the sander If needed turn the belt tracking k...

Page 7: ... Turn the machine OFF and disconnect the machine from the power source before assembling the sanding disc Remove the sanding disc locking levers and slide the sanding disc table from the sander See Figure 3 Remove the screws and washers securing the dust chute and remove the dust chute from the sander See Figure 2 Peel the old sanding disc from the sanding wheel Clean the sanding wheel with minera...

Page 8: ...rom electrical shock In the event of an electrical short circuit grounding reduces the risk of electrical shock by providing an escape wire for the electric current This machine is equipped with an approved 3 conductor cord rated at 150V and a 3 prong grounding type plug for your protection against shock hazards Grounding plug should be plugged directly into a properly installed and grounded 3 pro...

Page 9: ...n cord Extension Cord Length Wire Size A W G Up to 25 ft 16 NOTE Using extension cords over 25 ft long is not recommended MOTOR The sander is equipped with a 2 3 Amps motor The 120 Volt motor has the following specifications Horsepower 1 3 Voltage 120 Amp 2 3 Hertz 60 Phase Single RPM 3450 ELECTRICAL CONNECTIONS Turn the switch off and disconnect the machine from power source before performing any...

Page 10: ...nward toward the work table on the left side of the sanding disc and upward from the work table on the right side of the sanding disc Always use the left side of the sanding disc using the right side of the sanding disc will cause the workpiece to fly up or kickback and could result in injury Figure 19 Slot On Work Table Lock Knob Miter Gauge MITER GAUGE DISC SANDER Refer to Figure 19 A miter gaug...

Page 11: ...other conditions that may affect the sander operation Should any of these conditions exist do not use the belt disc sander until properly repaired or parts are replaced Frequently blow or vacuum dust from all sanding parts and motor housing MAINTENANCE WARNING Any attempt to repair or replace electrical parts on this tool may be hazardous Repairs should be done by a qualified service technician LU...

Page 12: ...1 X 5 BELT DISC SANDER PARTS ILLUSTRATION 10 PARTS LIST 10 ...

Page 13: ...510035 Adaptor 1 36 BD1510036 Driving Wheel 1 37 BD1510037 Philips Screw M6x10 3 Key Part Description Specifications Qty 38 BD1510038 Hex Bolt M10x25 1 39 BD1510039 Belt Support 1 40 BD1510040 Inner Hex Set Screw M6x20 1 41 BD1510041 Belt Work Table 1 42 BD1510042 Big Flat Washer D8 1 43 BD1510043 Locking Knob Assy 1 44 BD1510044 Guard for Adjustable Shaft 1 45 BD1510045 Adjustable Spring 1 46 BD1...

Page 14: ...nals and or worn insulation 3 Install correct fuses or circuit breakers or switch tool to an appropriately size circuit Motor overheats 1 Motor overloaded 2 Extension cord too long and of insufficient gauge weight 1 Reduce load on motor pressure on object being sanded 2 Utilize an extension cord of appropriate gauge and length or plug tool directly into outlet Motor stalls resulting in blown fuses...

Page 15: ...sent proof of purchase documentation which includes a date of purchase POWERTEC will either repair or replace any defective part at our option at no charge to you The repaired or replacement unit will be covered by the same limited warranty for the remainder of the one year warranty period WHAT IS NOT COVERED This warranty applies to the original purchaser at retail and may not be transferred This...

Page 16: ...Southern Technologies LLC 3816 Hawthorn CT Waukegan IL 60087 ...

Reviews: