Solar Panels from the Regulator at night.
11.
Stay alert
. Watch what you are doing, use common sense. Do not operate any product when you are tired.
12.
Check for damaged parts
. Before using any product, any part that appears damaged should be carefully checked to
determine that it will operate properly and perform its intended function. Check for alignment and binding of parts; any
broken parts or mounting fixtures; and any other condition that may affect proper operation. Any part that is damaged should
be properly repaired or replaced by a qualified technician. Do not use the product if any switch does not turn On and Off
properly.
13.
Guard against electric shock
. Prevent body contact with grounded surfaces such as pipes, radiators, ranges, and
refrigerator enclosures.
14.
Replacement parts and accessories
. When servicing, use only identical replacement parts. Use of any other parts will
void the warranty. Only use accessories intended for use with this tool. Approved accessories are available from Harbor
Freight Tools.
15.
Do not operate product if under the influence of alcohol or drugs
. Read warning labels if taking prescription
medicine to determine if your judgment or reflexes are impaired while taking drugs. If there is any doubt, do not operate the
product.
16.
Maintenance
. For your safety, service and maintenance should be performed regularly by a qualified technician.
Warning: The warnings, cautions, and instructions discussed in this instruction manual cannot cover all
possible conditions and situations that may occur. It must be understood by the operator that common sense
and caution are factors which cannot be built into this product, but must be supplied by the operator.
Unpacking
When unpacking, check to make sure the parts listed on page 7 are included. If any parts are missing or broken, please call
Harbor Freight Tools at the number on the cover of this manual as soon as possible.
Assembly
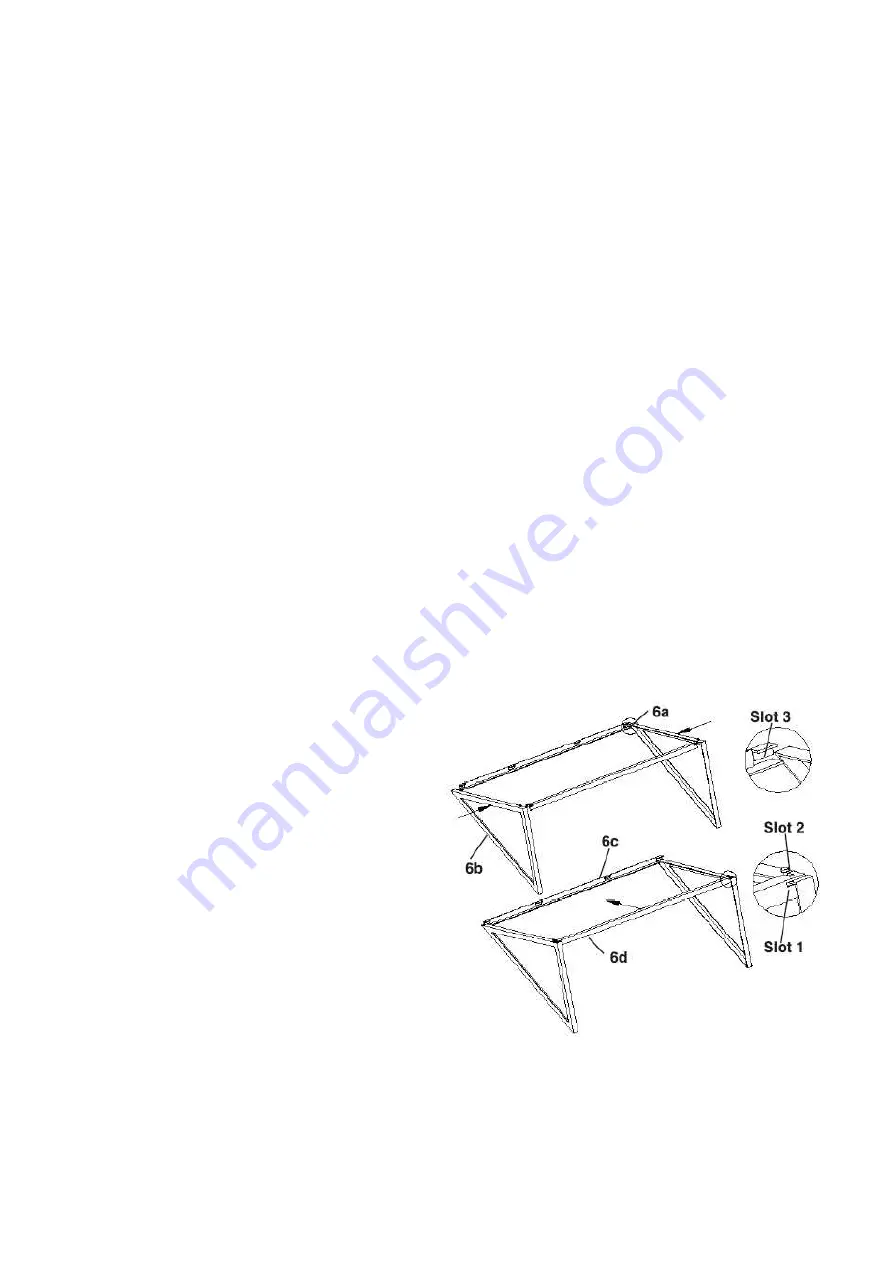
1. Slide the Left and Right Triangle Frame (6a and 6b) into
slot 1 and slot 3 on both ends of the Top Link Bar (6d) and
Bottom Link Bar (6C) (to form the frame assembly). See to
right.
2. Push the Top Link Bar (6d) down to slot 2 (to lock the
frame assembly).
See to right.
3. Determine where you want to position the
Frame
Assembly (6a-6d)
making sure it is facing south (for
maximum sun exposure) with no obstructions in front of
it. The
Regulator (2)
must be in a dry, well ventilated
location nearby. If necessary, build a small structure that
guarantees the unit will stay dry during rain or snow, and,
provide enough ventilation to allow the unit to vent and
cool properly.
4. Secure the
Frame Assembly (6a-6d)
to its mounting location using hardware (not supplied) through the four holes on
the bottom of the
Left
and
Right Triangle Frames (6a & 6b)
.


