INSTRUCTIONS PL600H/PL1000H
11
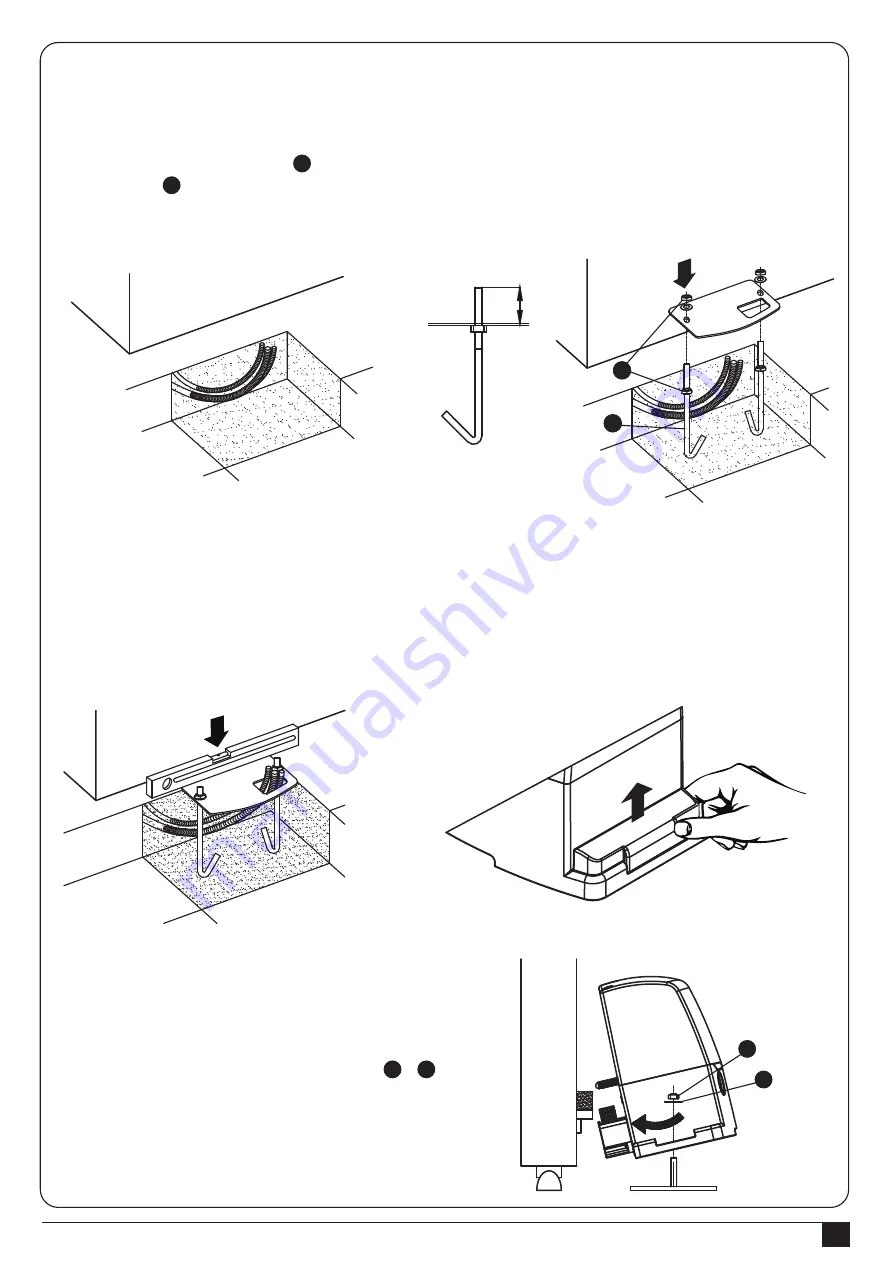
10). Put the gearmotor onto the plate and underneath
the rack. This step of installation can be operated
by tilting the gearmotor so that the pinion can be
easily under the rack. Make sure the gearmotor
lies ideally parallel with the gate. Then fix it by
fastening the two nuts and washers. (as the &
parts in
Figure 28
)
11). If necessary, adjust the height of the gearmotor
(Max. 10mm) with the 4 dowels. It is better to fix
the gearmotor without dowels as it is fastened
firmly and securely on the plate.
1). Dig the foundations based on “Preparation for Motor Installation” and please notice the distances indicated in
Figure 12
.
2). Lay the conduits for the power cables and leave 30-50 cm longer as
Figure 24
.
3). Fit the two bent bins (as below part in
Figure 25
) into the foundation and fix them above and below with two
nuts (as the part in
Figure 25
); make sure the outstanding part does not exceed the maximum height 25~35 mm
as
Figure 25
.
B
C
D
A
Figure 24
Figure 26
Figure 27
Figure 28
Figure 25
3.3.1.2 Installing on Gates with Rack
4). Put the foundation plate and make sure the gate keeping the distances shown as
Figure 12
.
5). Fit the conduits through the hole of the foundation plate.
6). Pour the concrete.
7). Sink the plate into the concrete and make sure it is parallel to the leaf as below
Figure 26
.
8). After the concrete is dry enough, remove the two upper nuts (which will no longer be used) form the plate and cut
the cable conduits above the plate if the conduits are too long.
9). Open the cap by the rear of the gearmotor as shown in
Figure 27
.
A
B
25~35mm
C
D
Summary of Contents for PL1000H
Page 1: ...FOR RESIDENTIAL USER MANUAL SLIDING GATE OPENERS PL600H PL1000H 24V DC MOTOR ...
Page 2: ......
Page 27: ......


