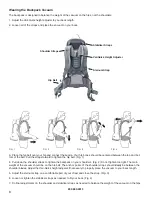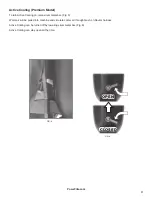
6
o
PeratIng
InStructIonS
Please read the following instructions carefully. They will help to get the best performance from this professional commer-
cial vacuum cleaner and to maintain it in optimum condition. Always make sure the main power of the vacuum is off and
the unit is not plugged in when doing any maintenance on the vacuum.
Preparing To Vacuum
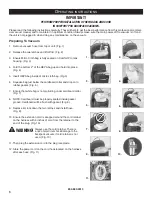
1. Remove vacuum hose from top of unit. (Fig. 1)
2. Release the two latches and lift off lid. (Fig. 2)
3. Ensure Micro Cloth bag is fully seated on Comfort Pro tank
housing. (Fig. 3)
4. Fold the bottom 2” of the HEPA bag up and hold into place.
(Fig. 4)
5. Insert HEPA bag inside of micro cloth bag. (Fig.5)
6. Squeeze bag just below the cardboard collar and drop onto
rubber gasket. (Fig. 6)
7. Ensure that white bag is not protruding under cardboard collar.
(Fig. 7)
8. NOTE: Cardboard must be properly seated inside gasket
groove. Cardboard will be fl ush with gasket. (Fig. 8)
9. Replace lid, lock down the two latches and install hose.
(Fig. 9).
10. Ensure the extension cord is wrapped around the cord retainer
on the harness with 6 inches of cord from the retainer to the
end of the plug. (Fig. 10)
Always use the cord retainer. There is
a risk of electrical shock/damage to the
backpack vacuum if cord retainer is not
used. (Fig. 10)
11. Then plug the extension cord to the plug receptacle.
12. Store the power cord on the cord hook located on the harness
after each use. (Fig. 11)
800.880.2913
WARNING!
IMPORTANT!
PERFORM PROPER INSTALLATION OF HEPA BAGS AND CORD
IN COMFORT PRO BACKPACK VACUUMS.
1.
2.
3.
5.
4.
7.
8.
9.
10.
11.
6.


