background image

8

800.880.2913

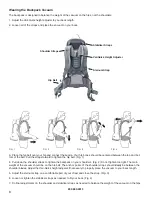
3. Place the hip belt over your hip and connect the buckle. Your hip bones should be centered between the top and bot-

tom of the belt. Pull the straps forward to tighten the hip belt. (Fig. 1)
4. Pull down the shoulder straps to tighten the backpack on your shoulders. (Fig. 2) Do not tighten too tight. The main 

weight of the vacuum should be on the hip belt. The anchor points of the shoulder straps should ideally be between the 

shoulder blades. Adjust the Vari-Quick height adjuster if necessary to properly place the vacuum to your back length.
5. Adjust the sternum strap on a comfortable part of your chest and close the strap. (Fig. 3)

6. Loosen or tighten the stabilizer straps as needed, to fit your back. (Fig. 4)
7. Do final adjustments on the shoulder and stabilizer straps as needed to balance the weight of the vacuum on the hips.

FIG. 1

FIG. 2

FIG. 3

FIG. 4

Wearing the Backpack Vacuum

The backpack is designed to balance the weight of the vacuum on the hips, not the shoulders.
1. Adjust the Vari-Quick height adjuster to your back length. 
2. Loosen all of the straps and place the vacuum on your back.

Stabilizer Straps

VariQuick Height Adjuster

Shoulder Straps

Sternum Strap

Hip Belt

Summary of Contents for BP10 Series

Page 1: ...ackpack Vacuum BP6 BP10 Series WARNING OPERATOR MUST READ AND UNDERSTAND THIS MANUAL COMPLETELY BEFORE OPERATING THIS EQUIPMENT X9712 4 2013 Tacony Inc All rights reserved Save These Instructions 10 quart model Hands free tool kit 6 quart model ...

Page 2: ...________________________________ Serial Number ____________________________________________________________________ Date of Purchase _________________________________________________________________ Retain this manual as a permanent record of your purchase ...

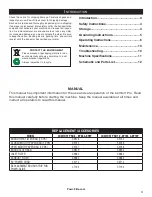
Page 3: ...nual carefully before starting the machine Keep the manual available at all times and instruct all operators to read this manual Introduction 3 Safety Instructions 4 Storage 4 Grounding Instructions 5 Operating Instructions 6 Maintenance 10 Troubleshooting 10 Machine Specifications 11 Schematic and Parts List 12 PROTECT THE ENVIRONMENT Please dispose of packaging materials in an environmentally sa...

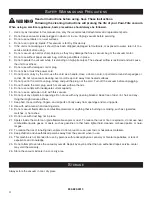
Page 4: ...plug Grasp and pull the plug not the cord Turn off the vacuum before unplugging 13 Do not handle the cord plug switch or vacuum with wet hands 14 Do not use outlets with inadequate current capacity 15 Do not use an extension cord with this vacuum 16 Do not put any objects into openings Do not use with any opening blocked Keep free of dust lint hair and any thing that might reduce airflow 17 Keep h...

Page 5: ...to connect this plug to a 2 pole receptacle as show in Figure B if a properly grounded outlet is not available The temporary adapter should be used only until a properly grounded outlet Figure A can be installed by a qualified electrician The green colored rigid ear lug or the like extending for the adapter must be connected to a permanent ground such as a prop erly grounded outlet box cover Whene...

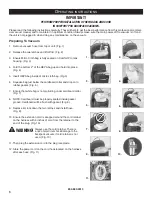
Page 6: ...elow the cardboard collar and drop onto rubber gasket Fig 6 7 Ensure that white bag is not protruding under cardboard collar Fig 7 8 NOTE Cardboard must be properly seated inside gasket groove Cardboard will be flush with gasket Fig 8 9 Replace lid lock down the two latches and install hose Fig 9 10 Ensure the extension cord is wrapped around the cord retainer on the harness with 6 inches of cord ...

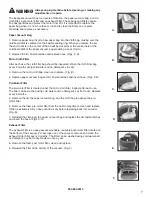
Page 7: ...tergent Line dry 3 Remove the micro cloth bag clean and replace Fig B 4 Replace paper vacuum bag and lid Fasten latches and insert hose Figs C D Pre Motor Filter The pre motor filter is located under the micro cloth filter Inspect after each use The filter can be washed using cold water and no detergent Lay flat to dry Replace every 6 months 5 Remove the lid the paper vacuum bag and the cloth bag ...

Page 8: ...f necessary to properly place the vacuum to your back length 5 Adjust the sternum strap on a comfortable part of your chest and close the strap Fig 3 6 Loosen or tighten the stabilizer straps as needed to fit your back Fig 4 7 Do final adjustments on the shoulder and stabilizer straps as needed to balance the weight of the vacuum on the hips FIG 1 FIG 2 FIG 3 FIG 4 Wearing the Backpack Vacuum The ...

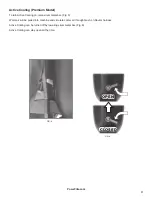
Page 9: ...oling on raise silver metal bar Fig 5 Warm air will be pulled into machine and circulate cooler air through mesh on Deuter harness Active Cooling can be turned off by lowering silver metal bar Fig 6 Active Cooling can stay open all the time FIG 5 FIG 6 OPEN CLOSED ...

Page 10: ...Maintenance 1 Inspect all electrical connections 2 Check the power cord for any breaks fraying separations or cuts 3 Make sure the ground pin or grounding prong is intact If the vacuum will not turn on 1 Make sure the power cord is firmly connected to the unit and is in good condition 2 Check sure the power cord is firmly seated in the wall outlet 3 Check to see if the building circuit breaker is ...

Page 11: ... 4 4225 kg HARNESS WEIGHT LBS KG 3 2 lbs 1 45 kg 3 2 lbs 1 45 kg 3 2 lbs 1 45 kg 3 2 lbs 1 45 kg CORD LENGTH TYPE 50 ft 15 m direct plug 50 ft 15 m direct plug 50 ft 15 m direct plug 50 ft 15 m direct plug CAPACITY QUARTS LITERS 6 qt 5 69 l 10 qt 9 46 l 6 qt 5 69 l 10 qt 9 46 l FILTRATION 4 stage HEPA 4 stage HEPA 4 stage HEPA 4 stage HEPA WATERLIFT 110 in 279 cm 110 in 279 cm 110 in 279 cm 110 in...

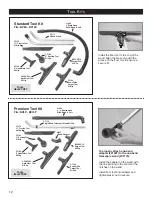
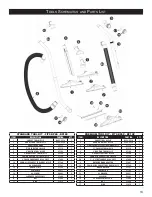
Page 12: ...loor Tool W Clip CT188 5 Upholstery Tool W Clip CT176 17 Crevice Tool W Clip CT170 Single Bend Telescopic Wand W Clip J1007 1 Bend Adapter CT194 Powr Glide Carpet Tool W Clip B352 PF10 Carpet Tool W Clip To properly attach one bend adapter J1007 to the one bend telescopic wand CT170 Install the adapter on the wand with the line pointing to the center of the notches on the wand Install floor tool o...

Page 13: ...H HOLDER CT191 1 12 BRUSH STRIP CT192 1 13 6 WASHER X8817 2 14 6 SCREW X9903 2 15 90 DEGREE SWIVEL CUFF J1004 1 16 NUT J1009 1 17 RING J1010 1 STANDARD TOOL KIT FITS BP6S BP10S ITEM DESCRIPTION PART NO OTY 1 CARPET TOOL W CLIP B352 PF10 1 2 HARD FLOOR TOOL W CLIP C352 PF20 1 3A DOUBLE BEND WAND CT171 1 4 17 CREVICE TOOL W CLIP CT176 1 5 3 DUSTING TOOL W CLIP CT184 1 6 5 UPHOLSTERY TOOL W CLIP CT18...

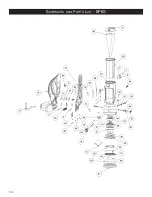
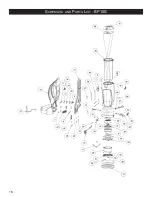
Page 14: ...14 Schematic and Parts List BP6S ...

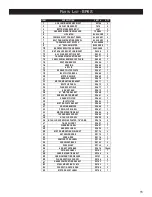
Page 15: ...ET X9671 1 23 BELT CLIP PANEL X9672 2 24 PLUG RECEPTICLE X9677 1 25 6 QUART BAG X9679 1 26 5 1 MOTOR GASKET X9680 1 27 RUBBER MOTOR MOUNT X9681 3 28 EXHAUST FILTER X9682 1 29 INLET FILTER X9683 1 30 MOTOR PLATE GASKET X9684 1 31 HOUSING BUMPER X9685 1 32 POWR FLITE LABEL X9687 1 33 MOTOR MOUNTING BOLT X9688 3 34 TOP HARNESS SCREW X9688 2 35 8 18 HI LO SCREW X9690 5 36 8 18 HI LO SCREW ZINC PLATED ...

Page 16: ...16 Schematic and Parts List BP6P ...

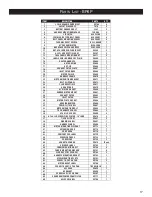
Page 17: ...26 5 1 MOTOR GASKET X9680 1 27 RUBBER MOTOR MOUNT X9681 3 28 EXHAUST FILTER X9682 1 29 INLET FILTER X9683 1 30 MOTOR PLATE GASKET X9684 1 31 HOUSING BUMPER X9685 1 32 POWR FLITE LABEL X9687 1 33 MOTOR MOUNTING BOLT X9688 3 34 TOP HARNESS SCREW X9688 2 35 8 18 HI LO SCREW X9690 5 36 8 18 HI LO SCREW ZINC PLATED 75 LONG X9676 2 37 1 4 20 CLIP NUT X9691 2 38 WARNING LABEL X9697 1 39 HARNESS LABEL X96...

Page 18: ...18 Schematic and Parts List BP10S ...

Page 19: ...ET X9671 1 23 BELT CLIP PANEL X9672 2 24 PLUG RECEPTICLE X9677 1 25 10 QUART BAG X9692 1 26 5 1 MOTOR GASKET X9680 1 27 RUBBER MOTOR MOUNT X9681 3 28 EXHAUST FILTER X9682 1 29 INLET FILTER X9683 1 30 MOTOR PLATE GASKET X9684 1 31 HOUSING BUMPER X9685 1 32 POWR FLITE LABEL X9687 1 33 MOTOR MOUNTING BOLT X9688 3 34 TOP HARNESS SCREW X9688 2 35 8 18 HI LO SCREW X9690 5 36 8 18 HI LO SCREW ZINC PLATED...

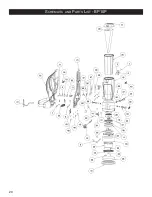
Page 20: ...20 Schematic and Parts List BP10P ...

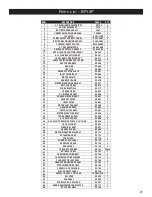
Page 21: ... 5 1 MOTOR GASKET X9680 1 27 RUBBER MOTOR MOUNT X9681 3 28 EXHAUST FILTER X9682 1 29 INLET FILTER X9683 1 30 MOTOR PLATE GASKET X9684 1 31 HOUSING BUMPER X9685 1 32 POWR FLITE LABEL X9687 1 33 MOTOR MOUNTING BOLT X9688 3 34 TOP HARNESS SCREW X9688 2 35 8 18 HI LO SCREW X9690 5 36 8 18 HI LO SCREW ZINC PLATED 75 LONG X9676 2 37 1 4 20 CLIP NUT X9691 2 38 WARNING LABEL X9697 1 39 HARNESS LABEL X9698...

Page 22: ...ther proof of date of original consumer purchase also will be required before warranty service is rendered This warranty covers normal use and does not cover damage which occurs in shipment or failure resulting from alteration accident misuse abuse neglect or improper maintenance STATEMENT This warranty is not transferable and extends only to the original purchaser when a new Powr Flite vacuum is ...

Reviews: