background image

tion without squeegee and vacuum then return to area after a min-
imum of 5 minutes and remove the suspended dirt, finish and
solution.

Squeegee:

Every week, check the blades of the squeegee and

wash them carefully.  Then replace them in the correct working
position.  If drying is not perfect even after the unit has been
cleaned, replace any blades which are excessively worn.  If the
squeegee does not pick up enough water or streaks, lift and wipe
off the blades. 

The pad driver or brush must be in good working condition
because it is the component which removes the dirt.

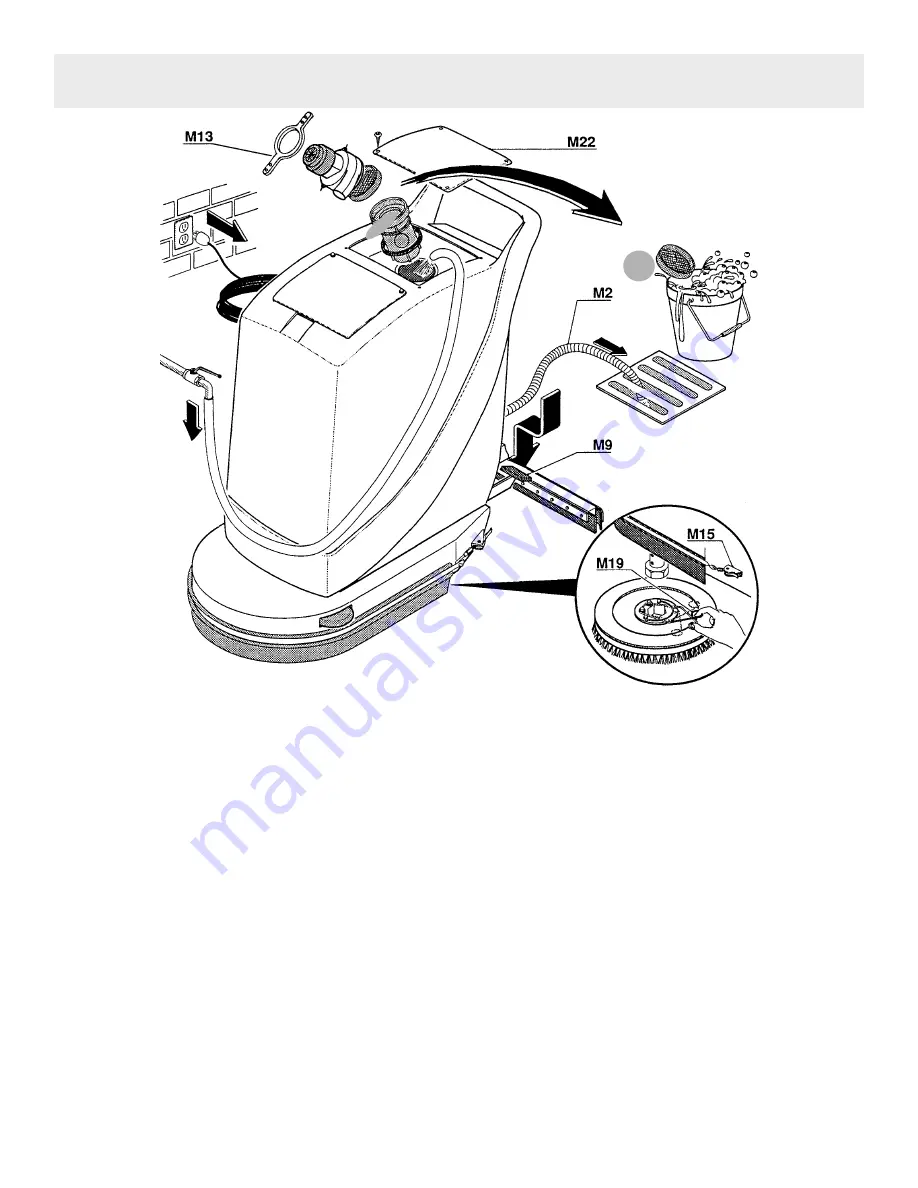
To remove the drive block, pad or brush:

• Fold the vinyl bumper over the left side of the 
brush housing.
• Depress the brush pedal (M9) with your right hand 
hold the brush position to allow free spinning by hand 
of the driver or brush until the scissors style spring 
lock can be squeezed  with your left hand.

• Depress the brush pedal (M9) completely down 

clearing the brush or drive block and slide  brush or 
driver out from under the housing.

To replace the drive block, pad or brush:

• Hold the brush pedal (M9) down while centering 
the brush or driver under coupling.  While squeezing the 
spring lock together lower the coupling into the driver or 
brush center by allowing the brush pedal to raise.
Release the scissors spring lock

The machine is supplied with a pad driver.  Brushes in tynex, 
poly and steel are available on request, together with floor pads
recommended for use with the pad driver.  

Black

for stripping,

green

for deep scrub, 

blue

for cleansing and red for light scrub.

Water collection tank:

This tank should be cleaned every week.

Lift the lid and remove the panel or funnel 

M1

of the solution

tank.  Remove the strap 

M13

and lift the vacuum motor out of its

seat.  Thoroughly clean the filter and wash out the dirt deposited
in the tank with a jet of water, allowing it to drain out through hose

M2. 

If necessary, replace filter. Replace float cage with open side

facing front of scrubber.

- 7 -

GENERAL OPERATION

Summary of Contents for PAS16

Page 1: ...WARNING OPERATOR MUST READ AND UNDERSTAND THIS MANUAL COMPLETELY BEFORE OPERATING THIS EQUIPMENT Predator Automatic Scrubber 16 OPERATORS MANUAL AND PARTS LIST Model PAS16 PAS200...

Page 2: ...ngs or damage to the machine if the machine is not operated the way described in this manual or if the maintenance and safety instructions are not fully complied with The instructions provided in this...

Page 3: ...Keep adjustments according to specifications WARNING Always use a three wire electrical system con nected to the electrical ground For maximum protection against electric shock use a circuit that is p...

Page 4: ...drive with 50 lbs of contouring pad pressure prevents streaking and produces high productivity 6 Solution control conveniently located with ease of operation and dispensing control user friendly 7 In...

Page 5: ...tion tank should be emptied preferably each time after use so that the dirt does not settle there To do this remove the plug of the drain hose M2 which is kept in position by a simple spring clip and...

Page 6: ...h by pressing pedal M9 Lower the squeegee by depressing pedal M3 Set the detergent solution supply to minimum by adjusting knob M12 Experience will help with the selection of the correct solution amou...

Page 7: ...ush pedal M9 completely down clearing the brush or drive block and slide brush or driver out from under the housing To replace the drive block pad or brush Hold the brush pedal M9 down while centering...

Page 8: ...1400 14 3 75 Cord 12 500 158 Washer 13 410 013 Screw Stainless 14 PAS197 Screw 6mm 15 PAS311 Cover Nut 6mm 16 410 016 Support 18 PAS126 Wheel 19 400 050 Screw 6mm 20 400 049 Pin 21 410 021 Panel 22 41...

Page 9: ...8mm 60 430 117 Nut 8mm 61 430 117 Nut 8mm 62 430 118 Washer 63 410 063 Washer 64 410 064 Washer 65 410 065 Support 66 PAS311 Nut 6mm 67 430 120 Screw 8mm 68 PAS97 Poly Scrub Brush 68 1 PAS99 Powr Nylo...

Page 10: ...400 130 Support 128 430 173 Washer 10mm 129 430 168 Nut 10mm 130 PAS31 Spring 131 PAS304 Nut 6mm 132 PAS197 Washer 6mm 133 430 198 Outer Bar 134 PAS 302 Black Rubber 135 430 201 Squeegee Body 136 PAS...

Page 11: ...art No Description 181 M1400 14 3 75 Cord 183 PAS125 Switch 184 1972 Suction Motor 185 430066E Brush Motor 187 PAS309 Connecting Board ELECTRICAL DIAGRAM BROWN VAC MOTOR BRUSH MOTOR LITE BROWN BROWN B...

Page 12: ...A Tacony Company 3101 Wichita Court Ft Worth TX 76140 1710...

Reviews: