- 6 -
connect to the mains supply, make sure that the supply voltage is
the same as indicated on the battery charger itself. To charge the
batteries connect the connector
M5
, which comes directly from
the battery compartment, to the battery charger connector. The
charger will automatically regulate the charging cur-rent and will
turn itself off when the batteries are recharged.
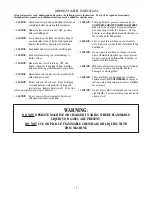
WARNING:
The battery acid may give off harmful fumes. When
working near the batteries use protective glasses and clothes.
DO NOT PLACE ANY METAL TOOLS OF ANY KIND ON THE
BATTERIES.
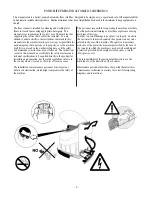
Recharging the batteries generates explosive gas. Do
not smoke, light flames or make sparks. Make sure the charger
is switched off before disconnecting. Recharge the batteries in a
well-ventilated area and keep the cover open.
WARNING:
objects lying on the floor can be thrown at high speed
by the brushes, endangering people and/or property.
The area to be cleaned: In order to increase the effectiveness of the
detergent, the area to be cleaned should first be swept (manually
or by machine) to remove loose dirt, which may quickly clog up
the suction circuit.
Powering up and operation:
• Turn off the battery charger and disconnect it from the
machine. Connect battery cable to machine.
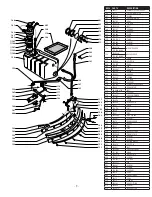
• Turn the key switch,
M6,
to position 1 and press buttons
M7
and
M8
;
• Lower the brush by pressing pedal
M9
;
• Lower the floor wiper by pressing pedal
M3
;
• Regulate the flow of detergent to a minimum using knob
M12
;
• Press lever
M10
, the machine will go forward, keep press the
button
M5
, the machine will go back-ward. Releasing
M10
to stop the machine
• Regulate the forward speed with potentiometer
M11
;
• Finally, use lever
M12
to regulate the dosage of detergent
according to the amount of dirt and the speed of the machine.
Particularly dirty floors: Certain floors or environments require
particular attention or even a second pass with the cleaner.
In this case you should make on pass with the wiper raised and the
brush in the working position; in this way the detergent remains on
the floor for longer and will dissolve the tougher dirt. The second
pass should be made with the brush and wiper lowered and at a
slower speed.
WARNING
this machine is designed to work in closed industrial environ-
ments on level floors or on inclines no steeper than 2%. Do not
use flammable chemicals and/or explosives with this machine.
Squeegee assembly:
Inspect and clean the floor squeegee
weekly and make sure to restore it to its working condition. If
the drying action is not perfect after cleaning the wiper
assembly, remove and replace any worn rubber blades.
Brush:
The brush must be kept in working order; to remove a
worn brush proceed as follows (follow the procedure in
reverse to reassemble):
• Turn off the machine (key switch in OFF position) and lift the
brush with the pedal provided (
M9
);
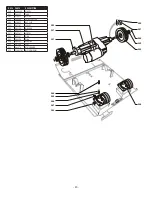
• Release the catch
M15
and remove the rubber spray guard;
• Turn the brush to be re-moved by hand until the coils of spring
M19
are accessible;
• By closing together the coils of spring
M19
with your fingers
(as if you where closing a pair of scissors) the brush will
free itself;
Recovery Tank:
clean the tank every week as follows: lift the
cover;
remove the cover of the suction motor
M1
; remove the motor
stop ring
M13
and remove the suction motor from its seat;
carefully clean the filter, net and sponge, and remove the dirt
which has accumulated in the tank.
Batteries:
Check the electrolyte level and top up with distilled
water if drops below the level of the battery elements. Keep the
batteries clean and dry with anti-static cloths. Recharging must
be carried out with the cell plugs removed and the cover of the
machine opened so as to allow the gases generated to escape.
In confined spaces these gases can be explosive, so recharging
should be done in a well ventilated area.
Summary of Contents for PAS20DX
Page 12: ......
Page 15: ......
Page 16: ...A Tacony Company 3101 Wichita Court Ft Worth TX 76140 1755...


