background image

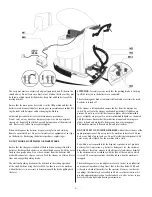
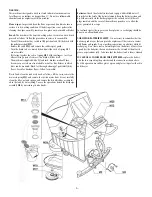
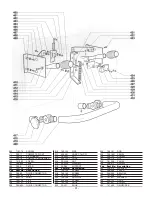
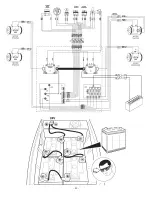
Installing and recharging the batteries: The batteries are supplied separately 
and are located in the appropriate compartment underneath the cover; 
apply a coating of grease (e.g. Vaseline) to the terminals; connect the 
batteries as shown in the attached diagram; make sure the terminals are 
securely tightened. The battery charger should be set up in the area where 
it is planned to leave the ma-chine for recharging. Use the cable supplied 
to connect to the mains supply, normally 220 V 50 Hz; make sure that the 
supply voltage is the same as indicated on the battery charger itself. To 
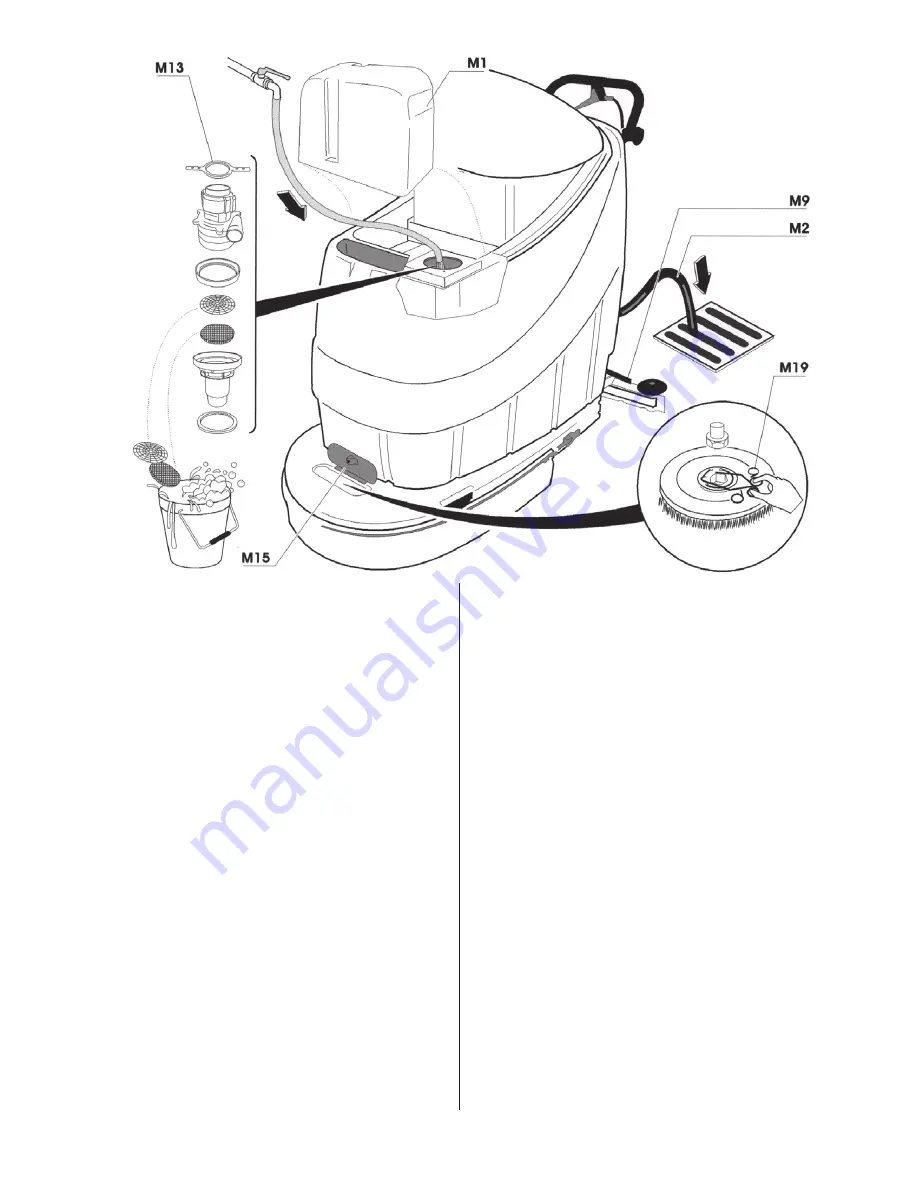
charge the batteries connect the connector 

M5

, which comes directly from 

the battery compartment, to the battery charger connector; apply voltage 
using the appropriate but-ton on the charger. The charger will automati-
cally regulate the charging cur-rent and will turn itself off when the batter-
ies are recharged.

WARNING:

 The battery acid may give off harmful fumes. When working 

near the batteries use protective glasses and clothes.

DO NOT PLACE ANY METAL TOOLS OF ANY KIND ON THE 
BATTERIES.

 Recharging the batteries generates explosive gas. Do not 

smoke, light flames or make sparks. Make sure the charger is switched off 
before disconnecting. Recharge the batteries in a well-ventilated area and 
keep the cover open.

WARNING:

 objects lying on the floor can be thrown at high speed by the 

brushes, endangering people and/or property.

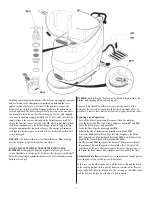
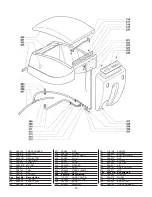
The area to be cleaned: In order to increase the effectiveness of the 
detergent, the area to be cleaned should first be swept (manually or by 
machine) to remove loose dirt that may quickly clog up the suction circuit.

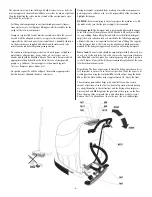
Powering up and operation:

- Turn off the battery charger and disconnect it from the machine:
- Turn the key switch, 

M6

, to position 1 and press buttons 

M7

 and 

M8

;

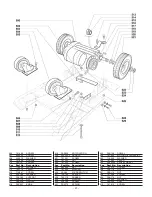
- Lower the brush by pres-sing pedal 

M9

;

- Lower the floor wiper by pressing pedal 

M3

;

- Regulate the flow of detergent to a minimum-using knob 

M12

;

- Press lever 

M10

, the machine will go forward, keep press the button  


M5

, the machine will go backward. Releasing 

M10

 to stop the machine

- Regulate the forward speed with potentiometer 

M11

;

- Finally, use lever 

M12

 to regulate the dosage of detergent according to  

  the amount of dirt and the speed of the machine, this will come with  
  experience; at this point the floor cleaner will come with experience, at  
  this point the floor cleaner will simultaneously clean and dry the floor: 

Particularly dirty floors:

 Certain floors or environments require particu-

lar attention or even a second pass with the cleaner.

In this case you should make on pass with the wiper raised and the brush 
in the working position; in this way the detergent remains on the floor for 
longer and will dissolve the tougher dirt. The second pass should be made 
with the brush and wiper lowered and at a slower speed.

- 5 -

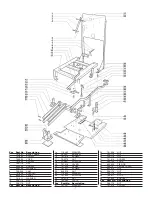
Summary of Contents for PAS28032DX

Page 1: ...WARNING OPERATOR MUST READ AND UNDERSTAND THIS MANUAL COMPLETELY BEFORE OPERATING THIS EQUIPMENT Predator Automatic Scrubber OPERATORS MANUAL AND PARTS LIST Model PAS28 32DX PAS300A 8 2013 ...

Page 2: ...this equipment in bare feet or with open toed shoes or sandals CAUTION Charging batteries generate explosive gases NO SMOKING OR OPEN FLAMES OR SPARKS Make sure the charger has turned off before disconnecting it from the batteries Charge batteries in a well ventilated area with the tanks in the raised and locked position CAUTION Store or park this machine on a level surface only Remove key from sw...

Page 3: ...fer the customer You are advised to adhere strictly to the instructions con tained in this manual since the manufacturer does not accept responsibility for any damage caused to persons or to property or to the machine itself if it is not used in the way described here or if the safety and maintenance instructions are not followed The instructions set out in this manual do not substitute the safety...

Page 4: ...ON for safety reasons verify that the parking brake is working pull the lever once the batteries are connected The electromagnetic brake is automatically activated every time the scrub ber drier is turned off If the cleaner is left unattended remove the key from the main power switch Do not leave the cleaner unattended particularly if children are present Do not use or install the cleaner in place...

Page 5: ...e or to fill the tanks make sure that the power supply is disconnected Detergent tank The detergent tank is positioned underneath the upper cover at the front of the machine with the filter hole M1 easily accessible for easy refilling Before filling the tank with correctly diluted detergent empty the waste collection tank as described in the following paragraph obviously this step is not required ...

Page 6: ...ARNING objects lying on the floor can be thrown at high speed by the brushes endangering people and or property The area to be cleaned In order to increase the effectiveness of the detergent the area to be cleaned should first be swept manually or by machine to remove loose dirt that may quickly clog up the suction circuit Powering up and operation Turn off the battery charger and disconnect it fr...

Page 7: ...the tank every week as follows lift the cover remove the motor stop ring M13 and remove the suction motor from its seat carefully clean the filter net and sponge and remove the dirt which has accumulat ed in the tank by water jetting To ease the operations detach the discharge assembly M2 by unscrewing its side knobs Batteries Check the electrolyte level and top up with distilled water if drops be...

Page 8: ...257 BRACKET 16 701 016 SCREW 17 PAS176 NUT 18 PAS227 SUPPORT 19 701 019 LEVER 20 701 020 PEDAL 21 701 021 SCREW 22 850 310 NUT 23 710 093 WASHER 24 701 024 SUPPORT 25 PAS176 NUT 26 700 084 PLATE Pos Part No Description 27 701 027 WASHER 28 701 028 NUT 29 PAS176 NUT 30 PAS176 NUT 31 701 016 SCREW 32 500 120 FORK 33 860 039 TIE ROD 34 PAS14 PEDAL COVER 35 850 310 NUT 36 PAS176 NUT 37 PAS176 NUT 38 7...

Page 9: ...LATE 106 501 024 SCREW 107 701 028 NUT 108 PAS122 HOOK 109 850 305 SPLASH GUARD 110 PAS919 SPLASH GUARD 111 801 111 PLATE 112 430 072 SCREW 113 PAS223 SCREW 114 700 085 PLATE 115 701 115 SCREW Pos Part No Description 116 PAS5 COUPLING 117 710 135 SCREW 118 701 118 SCREW 119 PAS6A SUPPORT WITH SPRING 120 500 066 NUT 121 850 306 SCREW 122 PAS188 WASHER 123 430 069 1 TANG 124 710 041 SCREW 125 PAS67 ...

Page 10: ...AS32DX 125 PAS615 15 Union mix brush fits PAS32DX 125 PAS961 drive block fits PAS32DX 125 PAS965 Powr Scuff 018 dia 500 grit gen scrub fits PAS32DX 200 410 105 1 TIE ROD 201 PAS146 WASHER 202 700 101 1 SCREEN 203 430 065 SCREW 204 701 204 REINFORCE 205 700 131 TANK 206 PAS196 NUT Pos Part No Description 207 701 016 SCREW 208 710 041 SCREW 209 PAS188 WASHER 210 701 210 CHEST 211 710 135 SCREW 212 7...

Page 11: ...AS38 PIPE STRAPP 240 PAS36 PLUG 241 PAS37 PIPE 242 PAS74 KNOB 243 PAS136 WASHER 244 PAS70 SEAL 245 PAS440 FIXED FLANGE 246 PAS441 SEAL Pos Part No Description 247 710 270 HOSE COLLOR 248 PAS393 HOSE FITTING 249 500 223 1 KNOB 250 PAS212 WASHER 251 710 168 SCREW 252 PAS936 SCREW 253 PAS1 BUFFER WHEEL 254 PAS937 NUT 255 710 165 SCREW 256 850 265 PLIT PIN 257 PAS92 PIN 258 PAS191 HOSE COLLOR 259 430 ...

Page 12: ...091 HOSE COLLOR 312 PAS262 NUT 313 400 160 1 COCK 314 PAS149 NUT 315 PAS146 WASHER 316 PAS84 SUPPORT Pos Part No Description 317 700 154 SCREW 318 700 155 SCREW 319 PAS110 HINGE 320 700 158 SUPPORT 321 430 056 SCREW 322 700 160 HOOK 323 PAS11 KNOB 324 700 161 ROD 325 700 162 1 PANEL 326 PAS153 SCREW 327 PAS176 NUT 328 701 328 PANEL 329 PAS271 SCREW Pos Part No Description 330 PAS270 WASHER 331 PAS...

Page 13: ...E 421 701 421 SCREW 422 701 422 NUT 423 701 423 SCREW Pos Part No Description 424 500 066 NUT 425 701 425 WASHER 426 PAS56 MICRO SWITCH 427 700 194 SPACER 428 700 175 RUBBER 429 701 425 WASHER 430 430 194 SCREW 431 PAS172 SPRING 432 PAS148 DOWEL 500 701 500 MOTOR DIFFERENTIAL 502 710 040 WASHER 503 701 503 LEVER 504 500 204 2 SWIVEL WHEEL Pos Part No Description 505 701 016 SCREW 506 PAS176 NUT 50...

Page 14: ...E 607 PAS141 CABLE 608 500 250 1 HOSE BATTERY 240 AH 608 500 250 2 ARMATURE BATTERY 240 AH 608 500 250 3 PLATE BATTERY 240 AH 608 700 227 HOSE BATTERY 240 AH 609 500 263 CABLE 610 500 266 CABLE 611 500 258 1 CONNECTION 612 500 258 1 CONNECTION Pos Part No Description 613 430 299 SCREW 614 430 297 WASHER 615 430 296 NUT 616 650 328 YOKE 617 430 072 SCREW 618 PAS149 NUT 619 430 310 WASHER 620 PAS57 ...

Page 15: ... 14 ...

Page 16: ...A Tacony Company 3101 Wichita Court Ft Worth TX 76140 1755 ...

Reviews: